Winter is a “magical” time, which children and adults associate with fairy tales, gifts, holidays and fun. Drawing winter is not only easy, but also fun. Each time, depicting a new one storyline(a snow-covered house in the forest, a squirrel on a Christmas tree or falling snowflakes), you are immersed in the world of your drawing and partially dissolve in it.
You can draw a winter landscape with anything: pencils, crayons, paints. The simplest tool is, of course, a pencil. Choose colored or simple pencils, as well as thick landscape or craft paper.
IMPORTANT: Drawing a winter landscape on colored craft paper is much more pleasant and interesting, since this material already has a certain color shade, to which white applies easily and contrasts.
Before drawing, plan in advance what exactly you will depict: a hut, a snow-covered city, a snow-covered forest or a playground. First, sketch out your landscape (mountains, houses, figures) and only then start detailing, depicting lumps of snow on every surface.
You can draw snow in waves (imagine that there is a small cloud on each branch or roof), or dotted. To do this, you should use a white pencil, with which you will make many dot marks in the selected place.
IMPORTANT: When working, always use a good quality eraser, which will help remove unnecessary lines and sketches and make the drawing neat and “clean”.
How to draw a winter landscape and the beauty of Russian winter with pencil, paints, and gouache?
“The beauty of the Russian winter” is snow-covered fields and forests, warm, cozy huts with “snow caps” on the roofs, children playing with snowballs in the yard, kind forest animals and only happy faces. Drawings depicting Russian winter should radiate warmth and only positive emotions.
When depicting the “Russian winter”, remember everything that you associate with the “good old winter fairy tale”: sleighs, grandmother’s rolls, a fluffy Christmas tree, Santa Claus, red-cheeked children, skates and much more. You should draw the entire sketch with a pencil and only then paint it with bright colors, not sparing the colors.
Russian winter, drawing ideas:
Russian winter: simple template  Russian winter: drawing template
  Russian winter and winter fun: template for drawing
  Russian winter, hut: template for drawing
  Russian snowy winter: drawing template
  Hut in the forest, Russian winter: template for drawing
“Russian Winter”, finished drawings:
Russian winter, children's fun: drawing Russian winter in the village: drawing
  Russian winter, Santa Claus: drawing
  Russian winter, Christmas time: drawing
  Russian winter, morning: drawing Russian winter, huts: drawing
 How to draw the beginning of winter with a pencil?
The beginning of winter means not snowdrifts and snowmen, but roofs of houses and tree branches slightly covered with a white veil. There is a special magic in the first days of the “fairy tale time” and therefore you can try to capture it in pictures and drawings.
You can choose any subject for drawing: nature, city, village. The main thing is to try to convey the coldness of the frosty air and the mood. Special attention deserves heaven. To depict it, use heavy blue paints so that the ground looks contrasting, and the first snow especially stands out.
IMPORTANT: It wouldn’t hurt to also depict the wind and the first snowflakes descending to the ground. They can be large or small, detailed or just white dots.
The beginning of winter, how to draw:
 The picture clearly shows the gold of recent autumn and the first snow that fell
  You can depict “bare” trees and yellow fields, only covered with the first snow. The first snow is often associated with the joy of children.
  You can depict the beginning of winter not necessarily through a landscape, but also as a view from a window
  The beginning of winter is often associated with bare trees, wet puddles and fallen leaves.
  Simple children's drawing the first snow is very simple, but conveys all the energy of real winter
  You can depict a winter landscape, both rural and urban.
  First snow: gouache drawing
 How to draw a winter forest with pencil and gouache?
The winter forest becomes especially charming and beautiful when the first snow comes. You can depict any trees, complement them with fir trees, bushes and clearings. The main thing is to cover all the branches and crowns in the forest with a white veil and snow “caps”.
Depending on what exactly you want to depict, you can complement the picture with snow-capped mountains, forest animals, a village with glowing windows in the distance, a bright moon, stars or a month. If you draw with a pencil, choose dark paper, on which a white pencil will look more contrasting.
IMPORTANT: Drawing a winter landscape with gouache is much easier. To do this, apply paint layer by layer: first the background, then the forest, and only when everything dries - white snow.
Drawing a winter forest with gouache:
Winter forest gouache on white paper Winter forest gouache on blue paper
  Winter forest gouache, multi-layer drawing
  Winter forest with a simple pencil, winter
  Winter forest with colored pencils: children's drawing
  Winter forest, hut: paints, pencil
 How to draw a winter village with pencil and gouache?
The images of a winter Russian village, dusted with snow, where light and comfort glow in every house, are truly captivating. It is best to draw such images on dark paper or with a dark background so that the snow looks especially contrasting.
IMPORTANT: The drawing where you depict evening or early morning will turn out bright and effective. In the evening or at night it is good to draw the stars and the moon, in the morning - a bright red sunrise and sparkling snow.
Ideas for drawings:
 Night, winter village: colors
  Winter in the village: colors Winter morning in the village: colors
  Early morning in a village in winter: colors
  Winter in the countryside: a simple pencil
  Country winter: pencil
  Winter, village: pencil
 Ideas for drawings on the theme of winter for sketching
If you do not have special drawing skills, templates for sketching will always help you. With the help of templates you can depict any landscape and picture in your head. You can sketch by observing every detail of the image, or by attaching the drawing to the glass (now everything is much simpler in the era of computers and a sheet of paper can simply be placed on the computer monitor to trace the outline with a pencil).
 Template for drawing No. 1
  Template for drawing No. 2
  Template for drawing No. 3
  Template for drawing No. 4
  Template for drawing No. 5
 How to draw a landscape, where to start drawing it for children, let's draw the landscape ourselves. Let's look at examples of how to draw landscapes with pencil and paints. Presented to you step by step drawing summer, autumn and winter landscapes.
1. The horizon line is indicated.
2. Draw the sun and clouds above it.
3. In the foreground, on one side of the sheet, we will place curved lines; these will be the trunks of future trees.
4. Now we finish drawing the branches to the trunks.
5. The trunks are ready, now we draw the crowns of the trees, they are drawn almost the same as clouds. The crowns of the trees need to be made lush, because it’s summer.
Don't forget to erase any extra lines with an eraser.
6. Now we draw a house on the other side. The house is drawn from two rectangles, and a roof is placed on top.
7. On the house you can draw a pipe on the roof, and we will also draw the roof of the corridor.
8. We continue to decorate the house by drawing: the door, windows, including attic window. At the same time, we slowly erase all the extra lines so that they do not distract from the main picture.

9. A fence is drawn from the house, and grass is made under it with strokes. You can also draw simple flowers. Finally, you can draw a path to the house and some other details that will be nice to depict.

10 So our summer landscape, drawn in pencil, is ready, now you can color it if you wish.

To create an autumn landscape we will need: gouache, watercolor paper, brushes, a simple pencil, pieces of newsprint, a plastic board or a flat palette.
1. Mark the horizon and shore line with a pencil.
2. We tint the sky from dark to light to the horizon line by adding white gouache to the blue color.

3. Using light ocher and dark yellow, paint the far shore.
4. Cover the near shore with light ocher, with the addition of dark brown.

5. Cover the water with white, with the addition of blue, green and brown. Closer to the shores we make it darker.
6. Using a piece of crumpled newspaper, print clouds.

7. It should look like in the picture.
8. In the background, draw a Christmas tree with a semi-dry brush using strokes in different shades of green.

9. Using a piece of newspaper, we print the bushes in the background in dark yellow with ocher and the crown of the tree on the right (a large bush) in ocher, with the addition of red and yellow. Here colors can be used as desired. To match the fall foliage colors.
10. Using a thin brush, draw the branches of a tree (large bush) and a bush on the left in the foreground. On the bush we outline the foliage with small strokes.

11. Use light gray to paint the trunks of birch trees and dark gray branches with a thin brush and spots on the trunks. If desired, add small Christmas trees on one of the banks.
12. Again, using a piece of newspaper with yellow paint, with the addition of white, we carefully print the crown of the birches and in yellow, with the addition of ocher, the grass in the foreground and background.

13. Add a darker color (dark brown) and print grass under the trees and bushes
14. Using a thin brush, paint branches of bushes and blades of grass in the foreground

1. First, with a pencil in the middle of the sheet, draw the outlines of one Christmas tree and one house. The Christmas tree will be wide and spreading.
2. Now let’s add two more houses and another Christmas tree on the sides. The houses will have triangular roofs, characteristic of many villages.

3. Let's add more Christmas trees and a little fence.
4. Now, based on the sketch, we will draw with paints. The Christmas trees will be a lush green hue, the houses will give warm shade unpainted wood, and the snow will have a slightly blue tint. To make the picture look alive, we will place three birds on the fence.

Read 18007 once
Snow outside the window is a great reason to pick up a brush and depict all the beauty of winter. Show your kids several ways to draw snowdrifts, “crystal” trees, “horned” snowflakes, fluffy animals, and let winter “drawing games” bring the joy of creativity and decorate your home.
Music to which masterpieces are created
So, let's turn on some pleasant background music and... draw winter with the children!
Drawing with “snow”

mtdata.ru
You can imitate snow in a drawing in different ways.
Option No. 1. Draw with PVA glue and semolina. Squeeze out the required amount of glue directly from the tube; if necessary, you can spread it with a brush (if you plan to cover large surfaces). Sprinkle the image with semolina. After drying, shake off excess cereal.

www.babyblog.ru
Option number 2. Paint with salt and flour. Mix 1/2 cup of water with 1/2 cup of salt and the same amount of flour. Mix the “snow” well and draw winter!

www.bebinka.ru
Option number 3. Draw with toothpaste. Toothpaste perfectly serves as “snow” in the drawings. It can be tinted with watercolor or gouache if you need to get a color image.

Drawings with white paste on dark paper look beautiful. And they SMELL delicious!

The greatest popularity toothpaste It probably won because it washes off easily, so you can paint with the paste on glass. Feel free to pick up the tubes and go decorate mirrors, windows and other glass surfaces in your home!
 polonsil.ru
Option No. 4. Draw with shaving foam. If you mix PVA glue with shaving foam (in equal proportions), you will get an excellent “snowy” paint.

www.kokokokids.ru
Option #5. Painting with salt. If you pour salt onto a pattern outlined with PVA glue, you will get a sparkling snowball.
Drawing on crumpled paper
An unusual effect can be achieved if you draw on previously crumpled paper. The paint will remain in the creases and form something like crackle.
Drawing with stencils

img4.searchmasterclass.net
Stencils make the drawing process easier for those who “don’t know how” (as they think). If you use several stencils at the same time, you can get an unexpected effect.

mtdata.ru
By leaving the part of the image covered with the stencil unpainted, you can pay more attention to the background: sprinkle salt on the still wet surface, apply strokes with a hard brush different sides etc. Experiment!
 www.pics.ru
Several sequentially applied stencils and sprays. It is convenient to use an old one for these purposes. toothbrush or a stiff bristle brush.

www.liveinternet.ru
A knitted snowflake will help you create real lace on paper. Any thick paint will do: gouache, acrylic. You can use a spray can (spray from a short distance strictly vertically).
Drawing with wax

Drawings drawn with wax look unusual. Using a regular (not colored) candle, we draw a winter landscape, and then cover the sheet with dark paint. The image “appears” right before your eyes!
Who are you? Seal?

masterpodelok.com
The effect of fluffy wool can be created by a simple technique: dip a flat brush in thick paint (gouache) and apply strokes with a “poke”. Drawings with white paint always look better against a dark, contrasting background. All shades of blue are great for winter motifs.
How to draw winter trees

www.o-detstve.ru
The crowns of these trees are made using a plastic bag. Dip in paint and blot in in the right places- that’s the whole secret of “snow caps” for trees.

cs311120.vk.me
Finger painting is suitable for kids. Dip your index finger into thick gouache and generously sprinkle snow onto the branches!
 masterpodelok.com
Unusually beautiful snow-covered trees are obtained using cabbage leaves. Cover a leaf of Chinese cabbage with white gouache - and voila! This painting looks especially impressive against a colored background.
 www.mtdesign.ru
No cabbage - no problem. Any leaves with clearly pronounced veins. You can even sacrifice your favorite ficus. The only BUT, remember that the juice of many plants is poisonous! Make sure your child doesn’t taste his new “brush.”

ua.teddyclub.org
The trunk is a handprint. And everything else is a matter of minutes.

www.maam.ru

orangefrog.ru
A favorite technique for many is blowing paint through a tube. We create “snowiness” using the little artist’s fingerprints.
 www.blogimam.com
Not everyone will guess how this charming birch grove is drawn. The resourceful artist used masking tape! Cut strips of the required width and glue them onto a white sheet. Paint over the background and remove the paint. Draw the characteristic “dashes” so that the birch trees become recognizable. The moon is made in the same way. Thick paper is suitable for these purposes; the tape should not be too sticky so as not to damage top layer drawing.
Drawing with bubble wrap
 mtdata.ru
Apply white paint to the bubble wrap and apply it to the finished drawing. It's snowing!
 mtdata.ru
The same technique can be used in applications.
The snowman has melted. It's a pity…

mtdata.ru
This idea is suitable for both the youngest artists and those who want to give a gift “with humor.” Cut out “spare parts” for the snowman from colored paper in advance: nose, eyes, hat, twig arms, etc. Draw a melted puddle, wait for the paint to dry and glue what’s left of the poor fellow snowman. Such a drawing can be an excellent gift to loved ones on behalf of the baby. Even more ideas in our article.
Drawing with palms

www.kokokokids.ru
An easy way to create a surprisingly touching New Year's card is to tell a story about funny snowmen. You can create a whole family if, based on a palm print, you add carrot noses, ember eyes, bright scarves, buttons, twig hands, and hats to your fingers.
What's there outside the window?

ic.pics.livejournal.com
What does a window look like from the street side? Unusual! Invite your child to look at the window through the eyes of Santa Claus or another character who may find himself outside in the most severe cold.
Dear readers! Surely you have your own “winter” drawing techniques. Tell us about them in the comments.
Summary: Children's drawings on the theme of winter. How to paint winter with paints. How to draw winter with a pencil. How to draw winter step by step. Drawing of a winter landscape. Drawing winter's tale. Picture of a winter forest.
In winter, adults and children spend a lot of time at home, so there are more opportunities to get creative. Winter is very beautiful time year. Try to convey the beauty of this time of year in winter drawings. We will share with you simple techniques drawings, with which you can teach your child to draw on your own beautiful drawings on the theme of winter. From this article you will learn how to make voluminous snow paint and learn how to draw winter pictures using the spray technique. When drawing pictures on a winter theme, we will use all kinds of additional materials, and not just a brush and paints. You don’t even suspect that you can draw winter using plastic film or salt, bubble wrap, or shaving foam.
1. Winter drawings. "Volume snow paint"
If you mix equal amounts of PVA glue and shaving foam, you will get wonderful airy snow paint. She can draw snowflakes, snowmen, polar bears or winter landscapes. For beauty, you can add glitter to the paint. When drawing with such paint, it is better to first outline the contours of the drawing with a simple pencil, and then paint it with paint. After some time, the paint will harden, and you will get a voluminous winter picture.

2. Winter drawings of children. Using electrical tape in children's creativity
3. Winter drawings. Drawings on the theme of winter

If there is snow outside the window, you can depict it using a cotton swab.


Or use a brush to put snow on each branch.

11. Winter drawings. Drawings on the theme of winter
An interesting idea on the topic of children's winter drawings was proposed by the author of the Homeschool Creations blog. She used putty to paint snow on the transparent film. Now it can be applied to any winter pattern or appliqué, simulating falling snow. They put the film on the picture - it started snowing, they removed the film - the snow stopped.

12. Winter drawings. "New Year's lights"
We would like to tell you about one interesting unconventional technology drawing. To draw New Year's garland as in the photo, you will need a sheet of thick paper of a dark color (blue, purple or black). You will also need regular chalk (the kind you use to draw on asphalt or a blackboard) and a light bulb stencil cut out of cardboard.
On a piece of paper, use a thin felt-tip pen to draw wires and light bulb sockets. Now apply the light bulb stencil to each socket in turn and outline it boldly with chalk. Then, without removing the stencil, smear the chalk on the paper using a piece of cotton wool or directly with your finger to create rays of light. You can replace chalk with colored pencil graphite chips.
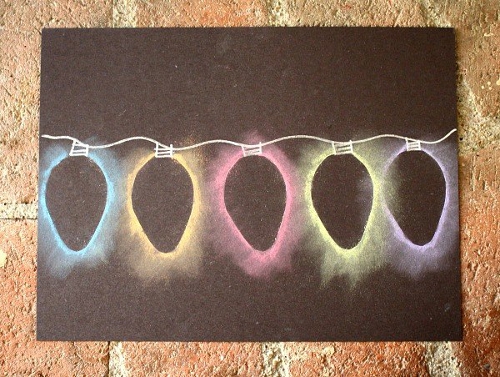

It is not necessary to use a stencil. You can simply paint over the light bulbs with chalk, and then gently rub the chalk in different directions to make rays.
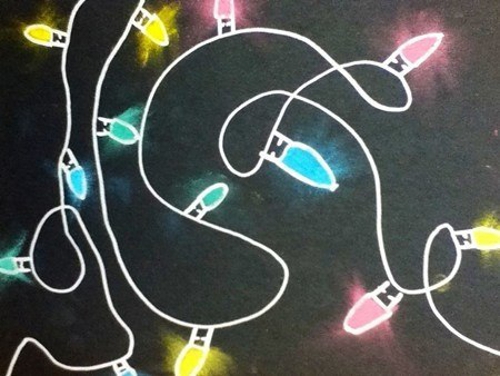
Using this technique, you can also draw a winter city, for example, or the northern lights.

13. Drawings of a winter fairy tale. Winter forest drawings
On the Maam.ru website already mentioned above, you will find an interesting master class on drawing winter landscapes using templates. You will only need one base color - blue, a coarse bristle brush and a white drawing sheet. When cutting out templates, use the cutting method from paper folded in half. Look at what a magnificent drawing of a winter forest the author of the painting created. A real winter fairy tale!


14. Winter drawings. Drawings on the theme of winter
You are probably very eager to find out how the wonderful “marble” Christmas tree in the photo below was painted? We'll tell you everything in order...To draw such an original drawing on the theme of winter you will need:
Shaving cream (foam)
- watercolor paints or food coloring green shades
- flat plate for mixing shaving foam and paints
- paper
- scraper

1. Apply shaving foam to a plate in an even, thick layer.
2. Mix different shades of green paint or food coloring with a little water to make a rich solution.
3. Using a brush or pipette, drip paint onto the surface of the foam in a random order.
4. Now, using the same brush or stick, beautifully smear the paint over the surface so that it forms fancy zigzags, wavy lines, etc. This is the most creative stage of the whole work, which will bring pleasure to children.
5. Now take a sheet of paper and carefully apply it to the surface of the resulting patterned foam.
6. Place the sheet on the table. All you have to do is scrape off all the foam from the sheet of paper. For these purposes, you can use a piece of cardboard.
Simply amazing! Beneath the shaving foam you'll find stunning marble patterns. The paint has time to quickly absorb into the paper; you just need to let it dry for a few hours.
15. How to draw winter. How to paint winter with paints
Concluding our review article on winter drawings for children, we want to tell you about one more in an interesting way, how you can paint winter with paints together with your child. To work you will need any balls small size and a plastic cup (or any other item cylindrical with lid).

Place a piece of colored paper inside the glass. Dip the balls in white paint. Now put them in a glass, close the lid on top and shake well. As a result, you will end up with colored paper with white streaks. Similarly, make colored paper with white streaks of other colors. From these blanks, cut out the details of the applique on a winter theme.

Material prepared by: Anna Ponomarenko
Other publications on the topic of this article:
Learning to draw a winter landscape.
Huge white snowdrifts, fluffy snowflakes, snow-covered trees - the beauty of the winter landscape inspires not only professional artists, but also amateurs to paint such a picture.
This article tells in detail how to depict a winter landscape on paper for a beginning artist.
How to draw a beautiful winter nature landscape with a pencil step by step for beginners?
First of all, we prepare:
- Pencils of different colors
- Rubber band for erasing
- Simple pencil
- White sheet of paper for drawing
Let's get creative:
- Making sketches of snowdrifts
- Adding the outline of a large oak tree with spreading branches

First step
- Near the majestic tree we draw three circles different sizes, standing on top of each other in decreasing order. In this way we form the figure of the future snowman

Second step
- We bring the snowman to life: we draw his eyes, nose, mouth, hands
- We decorate the head with a hat
- We paint buttons on clothes

Third step
- Let's draw a feeder
- Let's put the birds there
- Let's assign another bullfinch to the branch

Fourth step
- Let's draw the base for the tree behind the snowman, in the form of a triangle

Fifth step
- Let's form beautiful branches on the Christmas tree
- Add a bright bullfinch to the top of the head

Sixth step
- Fill the background with Christmas trees
- Let's put a ruffled bullfinch in the foreground

Seventh step
- We erase contour lines Christmas trees

Eighth step
- Coloring spruce branches with a green pencil
- We wrap the greens in a snow coating with blue

Ninth step
- Removing unnecessary contours
- Draw a tree trunk with a brown pencil
- We paint the snow with blue and blue flowers

Tenth step
- Fill the background with a blue-green palette
- We paint the fir tree like an already painted fir tree.

Eleventh step
- Our oak will be brown, and the veins will be highlighted in dark brown.

Twelfth step
- Paint the sky with a dark blue palette
- Add volume using blue, lilac and purple shadows on the snowdrifts and snowman

Finishing touches
How to draw a beautiful winter landscape of nature with paints, watercolors, gouache step by step for beginners?
We prepare in advance:
- Watercolor paper
- Palette
- Squirrel brushes, sizes 4 and 9
- Any colors
- Simple pencil
- Eraser
Let's start drawing:
- Using a simple pencil we outline all the details of the landscape
- We highlight spruce paws on the trees
- Lines indicate the horizon and mountain heights
- The contours should be slightly noticeable. So that they do not show through when coloring

- Now let's move on to the most important stage - coloring
- Dilute blue watercolor with water to a soft blue hue
- Painting the sky with a brush
- To the raw drawing we add pink and yellow shades in the sky
- We get a smoothly transitioning sky background from one tone to another.
- Dry the sheet a little

- Mountains and snowdrifts, on the left side, are illuminated sunlight. To do this, mix yellow paint with water and let's do it soft shade as shown in the picture

- We paint the hills and partially the foreground with blue paint
- We will tint the snow cover under the trees with blue. After all, the winter rays of the sun cannot reach there

- Shade with pale ocher and soft pink tones snowballs on Christmas trees that are illuminated by the sun from the left side
- On the right side of the branches we will make cool blue shades

- Add greenery to branches free of snow
- We make darkened places dark green, sunny ones a tone lighter
- Using a thin brush we draw the details of the Christmas trees. To do this, take a delicate green palette
- In the foreground we draw thin branches of the bush. We do this with the tip of a thin brush
- We darken the shady places under the tree with blue. In some places we add mixed green and black colors

- Draw the outlines of the branches in dark green

- Adding density to the bush

- We outline with a brush the muted, green mass of trees behind the large spruce trees
- Let's shade it
- Filling the clear sky with flying birds

Video: Drawing a winter landscape with gouache
How to draw an easy winter landscape with a pencil for beginners?
Even preschool children can handle these drawings.
- Making sketches of snowy hills. The lines can be of any shape, because snowdrifts do not have strict boundaries

First touches
- Duplicate the outlines of the snowdrifts with a second line to add volume

Adding airiness to the snow
- We draw the outlines of simple trees along the snowy hills

Outlining the main elements
- Writing furry sky clouds
- Using small strokes in the foreground, we add splendor to the snow

Complementing the landscape
- Erase extra lines
- We clearly outline the contours of the drawing
- Color the drawing at your discretion

Add brightness with colored pencils
Video: How to draw a winter landscape with a pencil and a nag?
Simple and light and beautiful winter landscapes: drawings for sketching
If available certain experience drawing, take beautiful pictures as a basis and simply draw them.
Snowfall

Light landscape with colors

Starry sky in a forest village
- Step-by-step drawing lessons make it possible to gain first skills without much difficulty.
- Using simple drawings, you can create a postcard with your own hands and give it to your mother as a gift.
- And if the drawing turns out to be very successful, then you can put it up for competition.