Almost everyone is familiar with the concept of kite. You immediately imagine a string on which is attached an object that is moving through the air. In fact, the world of kites is much more diverse. There are many various types kites. They differ in size, design, and purpose.
People have long been interested in the abilities of flying kites. They were widely used in life. And now, it’s no secret that designing and flying a kite is one of people’s favorite pastimes.
How pleasant it is to experience the ease of flight when launching a kite into the sky, to feel like you are part of this aircraft. Especially if it is made by yourself. You put part of your soul into it when creating it, and when you see it rise into the heavens, you feel joy for your justified and rewarded work.
Since 1985, International Kite Day has been celebrated around the world on the second Sunday in October. On this day, various competitions and master classes are held. Kite festivals are held all over the world where every amateur or professional can fly their own flying kite into the air.
Such an extraordinary and unique activity as creating a kite with your own hands and flying it is available to everyone. You just need a little time and desire.
The history of flying kites
A flying, or otherwise aerial, kite is one of the most ancient flying structures. Its origin is attributed to countries such as China and Malaysia. It is believed that it was in these countries around the second century BC. e. The first mention of a kite appeared. So, for example, in China a similar design resembled a snake with the head of a dragon.
This is where the name snakes come from, which continues to this day. The very idea of creating a flying kite was taken from nature. In order to say how and under what circumstances this happened, there are many stories, but none of them has exact confirmation. The significance and popularity of this invention has overshadowed the details of such things.
Application
From the very beginning of its development, the kite found application in such areas as military affairs, everyday life and ritual activities. In military affairs, kites were used to measure the distance of enemy territory and objects when planning military operations, as well as to demoralize enemy troops by intimidating them with such air structures. Since the mid-18th century, flying kites have been found practical application. So, they are starting to be used in scientific field when conducting experiments. Lomonosov, Euler, Newton are among the many who used kites in their experiments. Kites have found application in research in areas such as meteorology, terrain photography, sports and many others. For the development of the wings of the first aircraft, valuable material was the information obtained in the process of studying the aerodynamics of flying kites. Now the kite is mainly used for sports (for example, kitesurfing) and entertainment purposes.
Techniques for making different types of kites
Flat kite "Monk"
This type of flying kite is the simplest. To directly receive necessary design, you need to cut a square sheet
Required materials:
- A4 paper (a sheet of newspaper, polyethylene, nylon is also suitable),
- thread 30 cm long, ribbons, threads (both regular and wool).
- Threads or strips of some fabric will be used to make the tail of the snake.
Kite making technique:
- Prepare a sheet of A4 size, and the paper should be thick. Then position the bottom right corner of the sheet so that it touches the largest left side, which in turn aligns with the smaller left side. Thus, if we do not take into account the upper strip, we get the figure of a double expanding triangle. After the top rectangle is cut off, you will be able to achieve an even square sheet.
- Draw the axis of the square with a pencil or pen, connecting its two opposite corners with a line.
- Position the right and left sides of the square so that they are adjacent to its axis. And like an accordion, bend the corners up twice.
- Get the so-called “bridle” by gluing a 30 cm long thread into the middle of the accordion. Moreover, this is done on both sides of the accordion.
- Prepare a rope to launch and control the kite. You need to tie a rope in the center of the bridle.
To make a tail for a kite, you need to follow these steps:
- Achieve a length of threads of at least 50 cm. This is approximately what is needed for a kite average size. If the threads are ordinary, then you need to make 20 pieces; if they are wool, then 6 will be enough.
- Connect the prepared sections and tie them closer to the end so that you get a tassel, or you can also make a pigtail. To make the snake more colorful, you can add some bright objects to the tail. They can be cut out of paper.
- Attach the tail directly to the kite. You need to insert the tail prepared according to the previous point through the hole made in the lower part of the kite. Then glue it with glue or tie it in a knot.
“Russian” kite made of paper, fabric and wood
The design of this kite has some complications and also requires larger view materials.

Required materials:
- Two notebook sheets
- thin wooden slats 3 pieces, two of them are 60 cm long, and one is 40 cm,
- fabric of any color,
- strong nylon thread,
- scissors,
- glue,
- file small size,
- ruler for ruling,
- pencil.
Kite making technique:
First you need to assemble the frame. In order to do this, you need to follow these steps:
- We take two slats, each of which is 60 cm long, find the middle in them and put one on top of the other in the middle area. The middle can be marked with a pencil. We secure this position with a rope in the middle.
- We place a 40 cm long slats so that its ends touch the two ends of the other slats, that is, at the very edge, so that a triangle is formed. We secure them with rope at the points of contact.
- We take the thread and tie it around the remaining perimeter, slightly pulling it, so that a closed square is formed, and inside it there are intersecting diagonals in the form of slats of 60 cm each.
Afterwards the fitting is done using the steps below:
- We take two notebook sheets and glue them along the edge of the larger length (the unfolded side).
- We place the previously prepared frame on top of the glued paper and cut the paper to the size of the frame, leaving 2 cm from the edge of the frame for folding.
- We fold the paper along the edge of the frame and glue it with glue.
To make the paper cover taut better, you can spray it with water and leave it to dry.
- We take a pin and stick it where the slats intersect. We tie one of the ends of the thread to one of the upper ends of the frame. We wrap a thread around the pin and then tie it to the other upper end. We mark the place where the thread touched the pin and remove the pin.
- Now we use the second thread of the bridle. We turn the kite over, placing it on the tight cover. We tie a thread to the intersection of the slats in the center.
- In the center where a pin or nail was stuck, depending on what you used, we do small hole. You can use scissors for this. Through this hole we pass the thread obtained in the previous step.
- We draw this thread to top edge This is the snake and at the very end, where the thread reaches the rail, we make a mark on it with a pencil.
- We place the thread under the first part of the bridle, which interacted with the upper ends, wrap it around and make a knot, tightening it so that it is tied at the place of the pencil mark from the previous step.
- We find another mark on the first thread and move the knot to this mark, tying another knot for strength. The knot should be exactly in the middle of the structure.
To make a tail, you need to perform the following sequence of actions:
- We take a thread 60 cm long, tie it to the bottom edge of the frame, then to the second bottom end to make a semi-arc.
- Set the frame aside. We make strips of any fabric 7-8 cm wide.
- We tie the strips together with ordinary knots until we get a tail length of 4 - 4.5 m. A loop is made at one end of the tail, but it is not tightened to the very end. Next, take a thread 15 cm long and pass it through a loose knot, tie the thread well and make a strong knot.
- We take the kite and create a loop right along the central part of the tail frenulum, make a knot and connect it to the thread at the tail. The snake is ready!
Polyethylene triangle kite
This is also a flat kite design, but requires a lot of effort to make. The kite will be obtained in the shape of a clear triangle and will look very beautiful when using bright materials. It turns out to be more durable than a paper kite, and, therefore, will last longer. Such snakes are unpretentious to the weather and are easy to disassemble.

Required materials:
- A polyethylene bag of any color and dense in structure,
- 4 slats,
- fishing rope or reel.
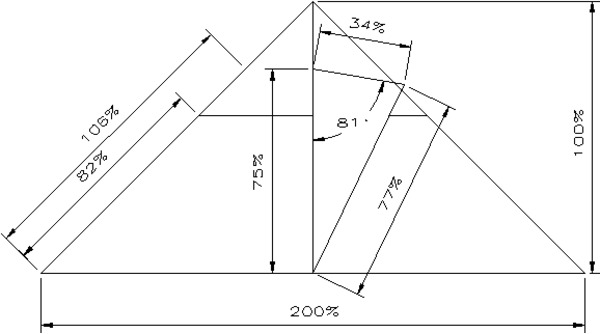
A triangular, or in other words, delta-shaped kite consists of four elements: two side slats, a central rail, and a transverse one. It is better to make such a snake according to the drawing. The dimensions are also calculated from the drawing; first you need to take some part, for example, the length of the central rail, as the base one and start calculating all other dimensions from it.
Kite making technique:
- Take the prepared package and, looking at the drawing, cut out the snake.
- Prepare 4 slats, the size of which is calculated in accordance with the drawing: a long longitudinal one, a short transverse one, two side ones, the size of which is the same.
- First, glue the side slats on the sides. Then glue the longitudinal part along the central part. At the very end, use glue to secure the central cross section. Attach the keel along the middle part of the kite with tape.
- Insert the tail into the hole made in the central part of the bottom of the canvas. The tail is constructed from pieces of bags obtained by trimming.
- Tie along the fishing line to the corners. Then tie them together with a knot.
- In order to launch and control the kite, it is necessary to connect a fishing line with a reel to the “bridle” made.
This type of flying kite is similar in design to a triangular kite.

Required materials:
- A rail with a length of 60 cm
- rail with a length of 30 cm,
- scotch,
- polyethylene bag,
- fishing line
Kite making technique:
- First, you need to arrange the slats in a cross in such a way that a 30 cm long slats can intersect a 60 cm long slats at a height equal to one-fourth of the total length.
- Afterwards you need to bandage the slats in this position using tape. Place the resulting cross on the prepared plastic bag.
- Then cut out the canvas, shaped like a diamond, leaving some margin.
- Stretch the resulting fabric onto a cross of slats. As for the stock, it must be tucked and hemmed or glued with glue.
- Tie one fishing line both to the corner at the bottom of the diamond and to where the sticks intersect. It’s good to secure all this with a few turns.
- Get a bridle. To do this, you need to connect the fishing line with a knot. Don’t forget to attach the fishing line and reel to the knot.
- The last thing to do is attach the tail with tape to the end of the axle stick. The tail can also be cut out of cellophane.
You can achieve better kite flight if you maintain the following proportions: the size of the kite's tail is 10 times larger than the size of the base.
Kite in the form of a bird
This type of kite actually resembles a bird due to the resulting design effect. The result is a kind of wave, similar to the flapping of a bird's wings. Special cuts in the form of feathers on the wings also help to see the bird.

Required materials:
- 8 sticks, the diameter of which is less than 1 cm and the length is 30.5 cm,
- 3 sticks with lengths equal to 91.5 cm,
- 3 sticks with lengths of 150 cm (sticks can be made, for example, from pine).
- You will also need fishing line
- polyethylene film,
- coil.
Kite making technique:
- First you need to arrange the 150 cm rods in parallel.
- At a distance of 59.75 cm (counting from the edge) place a stick with a length of 91.5 cm. This must be done across.
- Tie the stick with threads. Moreover, between the first two slats the distance should be equal to 30.5 cm, between the second two it should be 61 cm.
- Then make an indent of 30.5 cm in the larger direction. Attach another stick, the length of which is 91.5 cm.
- Place 4 short slats at a distance of 30.5 cm from each other. They need to be placed at an angle, which would allow them to converge into a triangle at the bottom.
- Get a “manger” attached to the central part of the kite structure. Place the last strip on the meeting ends of the short planks. The length of the slats is 91.5 cm. And then tie everything together with threads soaked in glue.
- Moisten the ends of long sticks in water and connect them. The wetting procedure is carried out so that they do not break when they begin to bend.
- Pull the fishing line between the tips of the resulting “wings” of the kite.
- To construct the body of the kite, you need to cut a piece of fabric shaped like a pentagon. Moreover, the top side should be 30.5 cm, as well as the bottom, height equal to 91.5 cm + 2 cm for tucking. You also need to make a square in the middle with a side of 30.5 cm.
- Measure 59.75 cm to the left and right sides from the bottom corners of the square. And stretch the sections from the end of both the upper and lower sides of the pentagon-shaped piece of fabric to the points marked after this, which will result in a fabric with a cutout in the center.
- Sheath the wooden rod of the kite. Also use glue to glue the rod.
- You will need to cut out 4 more inserts. Their size should be 30.5 x 30.5 cm for the “nursery”. Place them in the cutouts and glue them.
- Then you can make a tail out of rope. Also, some leftover fabric can be used to create the tail. And finally, attach it to one of the sides of the “manger”.
- You also need to make a bridle from connected fishing lines and tie a thread tightly to them. (Thread with a rope).
A box kite is no longer a flat kite, but a three-dimensional one. Unlike flat kites, it has more lifting force. The design of such a kite has a body, a harness and a cord. This snake has no tail.
Required materials:
- Reiki 4 pcs. 100 cm each,
- slats 6 pcs. 60 cm each,
- garbage bags (preferably large ones for 60 liters or more) or cotton or silk fabric,
- nylon harness on a reel,
- scotch,
- ruler straight and with an angle,
- scissors,
- glue.

Kite making technique:
- The frame of the kite should be made in the shape of a parallelogram, the term box shape is often used. The sides of each rectangular face are proportional in size as one part to three parts, or one part to four parts. The shape of the box is created using slats.
- It is also necessary to install diagonal slats in the body of the lower and upper edges. The dimensions of the slats must match. Slats with both round and square cross-sections are suitable; there is no fundamental preference.
But it would be better if all the slats were of the same section and not bent.
- The slats are connected to each other in such a way that the ends of the slats protrude 5 cm from the place of its attachment with another slat. To make this possible, each slat is made 10 cm longer than the intended size. The slats must be tightly connected to each other, usually the place where one slat is placed on top of the other is tied with a rope or strong thread, and can also be additionally secured with glue.
- After the body of the kite is ready, it needs to be covered with fabric or film, depending on what materials were prepared, but not completely, but only the lower and upper parts, leaving the middle uncovered. For strength, secure the trim with glue or sew. It is not necessary to make the kite frame in the shape of a parallelogram; it can also be made in the shape of a rhombus, that is, the body must be made in the shape of a parallelepiped.
- To improve flight performance, you can also add wings to the side surfaces of the body. The wings are cut from the same material from which the body was covered, in the shape right triangle. The dimensions of the wing are determined according to the fact that it must cover the entire side to which it is attached, and in span extend to a length equal to the length of the kite frame. They are also attached to the side with glue and threads.
- Attaching the kite to the cord is made of two lines, which are connected together with a knot or ring. If you use a ring, then it is easier to attach a cord to it for starting. The dimensions of the attachment to the cord do not depend on the chosen frame shape.
- Since this type of snake does not have a tail, for convenience, the lower skin is taken for the tail. When flying a kite, they try to regulate its position in the air masses, creating a balance between the upper part of the skin and the lower part - the tail. But balance is not so easy to achieve! It is necessary that the kite is positioned at the desired angle in the air masses. The desired angle will not be obtained immediately; it must be adjusted when launching the kite, changing the position of the kite fastenings, that is, the lines, and their length.
- There are several nuances that can tell you what to do with the kite mounts. For example, if a kite does not take off at all or flies at a low altitude and does not rise higher in any way, then this means that the constructed kite has too massive a lower skin, that is, a tail. In order to correct this situation, it is necessary to either replace the lower fastening strap with a longer one and adjust the new junction of the slats, or replace the upper fastening strap with a shorter one. You may have to do this several times until the kite starts to fly normally. Another example. If the kite twists too much in the air, this indicates that the lower skin is underweight, too light. In this case, the opposite is done: the upper line is taken longer or the lower one is replaced with a shorter one.
- The larger the box kite, the more lifting force it has. But to launch a larger kite, it is better to use a light cord or fishing line.
The concept of "Kite Train" was introduced by Sergei Alekseevich Ulyanin, creating a design of 7-10 kites connected into one flexible system, capable of lifting four observers. Such designs began to be actively used in military operations in order to land one’s own man or conduct a reconnaissance operation on enemy territory without incident, since when one of the components failed, there was only a decrease in lift and a decrease in altitude, and not a collapse of the entire system.
To make a “Snake Train”, you need to make several flying kites, not necessarily of the same shape or size, there is room for your imagination to run wild, and connect them into a single system. Then you will get a composite structure, consisting of flying kites in a row, connected as one whole.

Successful launch of a flying kite
To fly a kite into the air, much preparation and special skills are not required. The main thing is to find the right place and the right wind.
As for the place, it should be open space without any objects that could prevent a successful launch. Obstacles can include trees in which the kite can get stuck, buildings, hills, etc. The most suitable places to fly a kite are fields and coastlines. Also, as a rule, cities have specially designated places intended for launches. They bring together all amateurs and professionals who want to fly their kite into the air. Typically, an area of 1600 square meters is sufficient for kite flying. m.
As for the wind, it should be from 3 to 4 m/s. If there is too much wind, there is a risk of putting yourself and others in danger, as well as damaging the kite itself. It is important to take into account such a wind parameter as its direction. It is recommended to place the kite in front of you, and keep your back to the wind.
There are several types of successful kite flying:
- So, the first includes a regular launch, which involves two people and a flying kite of any type. In this case, one launch participant will hold the kite, and the second will unwind approximately 20 meters of the line, maybe less, but not more. The latter should position himself with his back to the wind, and facing the kite, carefully pulling the line. Next, the person holding the kite runs up and launches it into the air. If the wind strength is not enough or the kite begins to sink to the ground, losing height, then the participant with the lifeline will need to run back until the kite flies higher, catching the wind.
- The second method of launching a kite is called “Hand Launching”. For this type of launch, one participant is enough to launch the kite without a bridle or with a short bridle. The launcher holds the line next to the kite and pulls towards himself, slowly lifting it off the ground. As soon as the kite rises into the air, it is enough to unwind the line. With a properly constructed kite there should be no difficulties.
- The last type of launch, “Pull-up and release,” involves a small space for flying a kite and either one or two participants. This method is especially convenient when it is not possible to fly the kite over a large space, since it does not require running up to increase the kite's position in the air. The launch begins similar to a Hand Launch or with a line that is unwound as much as possible and a kite held by a second participant. The first participant goes back, the rope does not unwind. The kite is raised to the maximum height, taking into account the length of the line, and then, lowering the line, he ensures that the kite completely lowers the height, thereby unwinding the line. By repeating this sequence of actions, it is necessary to raise the flying kite to a height with an acceptable wind for the kite to be lifted into the air on its own.
Safety precautions
In order to fly the kite and protect yourself from injury and deaths, and also not to cause inconvenience to anyone, the following safety rules must be observed:
- Do not fly a kite near power lines, railway, airport, next to motorway
- Make sure the kite design is correct and durable
- Avoid launches during storms and thunderstorms
- Observe airport flight rules
- Do not fly the kite near, behind or over people
- Do not fly a kite near large animals, such as horses.
- When operating a kite, use a reel or gloves to avoid injuring your hands.
Creating a kite and flying it is an amazing activity that will bring only the warmest and most joyful emotions to you and your loved ones.
Good day everyone!
Just recently I read a review from the author irecommend about a kite from Aliexpress and I really wanted to fly one with my child, since I didn’t have this fun in my childhood. And just a couple of days later we saw retail sales We bought a kite at the Fix Price store in St. Petersburg without hesitation.
I’ll say right away that to fly a kite need wind outside. There’s no point in going out for a walk with him when it’s calm.
In strong, gusty winds, flying kites is not recommended.
Product name:
Sport&Fun kite from the store Fix Price
size 135 * 65 cm; rope length 30 meters
Price - 99 rubles
Country of origin: China
Design options: I saw it in the Fix Price store in St. Petersburg lion, bird, plane And dolphin My daughter liked the lion better.

Compound: Dacron (190T), fiberglass, polypropylene.
In the characteristics of the snake there is no detailed description, how to launch it and assemble it, but it is written that expiration date is unlimited. I laughed at this moment, because even after one launch a hole appeared on the snake (the quality is Chinese and that says it all).

In a rustling transparent bag, the snake is very reminiscent of an umbrella.

And inside is directly canvas kite with tail and frame;

Thread winding spool And the thread itself (rail), in this case fishing line.

The reel is made of cheap plastic, but special cuts are made on it so that the fishing line can be fixed and it will not unwind. It's convenient!
The fishing line is tied to a special hole on the kite canvas.

And on the other side of the canvas there are special plastic grooves...

Inserted flexible plastic black stick, it also comes included.

The snake is collected. You can run it. This does not require special skills, everything is quite simple.

We go out into the open (into some field).
Convenient when flying a kite 2 people, one initially holds it above his head, and then releases it at a signal, the second person unwinds the fishing line and holds the kite in the sky, catches it and feels the direction of the wind.
There is no need to run with the kite, but my daughter really liked this activity, so she flew it for a short time.

Since the line in the set is 30 meters, the kite can rise quite high in a good wind.

Lion superman in yellow tights caused a storm of positive emotions in the child, adults passing by, and my husband and I were also very interested in watching him fly over our heads.

The Chinese believe that floating in the sky the kite carries away all illnesses and misfortunes.
Have you wanted to build your own kite? Here's an easy way to make your own snakes! The kite consists of the following main parts:
The Spine. This is the vertical or horizontal base of the kite.
Spar(spars). Guides that are placed either across or, as well as obliquely relative to the “spine”. Sometimes they are curved.
The Frame. Collectively glued or otherwise assembled, the base and guides form a frame on which the fastenings for the slings and, of course, the main covering are located.
The Cover. Paper, plastic, or fabric (nowadays nylon is often used) that is attached to the frame to capture airflow.
The Bridle. One or more spine restraints or spars that help control the kite in the air.
The Flying line. The ropes, now often made of nylon, act as a line for the kite to keep it in the air.
The Tail. A long strip of paper or nylon tape that helps balance the kite's flight. Not all kites require a tail.
The Reel (reel). A reel on which nylon ropes (slings) are wound. Used to control and control the kite during flight.
Diamondback kite
You will need the following materials:
Rope, preferably nylon nylon
tape or glue
1 sheet of thick paper (102 cm x 102 cm) or nylon fabric
Two straight wooden or bamboo sticks, 90 cm and 102 cm
markers, paints or pencils to decorate your kite.
1.
Make a cross from two sticks. The small stick should be positioned horizontally, and the larger one vertically. Make sure both sides of the cross are equal in width.
2.
The sticks must be perfectly perpendicular. The ideal way to make sure of this is to apply a small amount of glue and hold them together for a while.
3.
Then cut a groove in the middle of each stick, as well as along their edges. The groove should be deep enough so that the sticks fit together more securely. Cut a piece of rope, it should be long enough to cover the entire frame and hold the sticks together. Place the sticks together and wrap the rope tightly around them. Then coat this fastening with glue for greater reliability. Stretch the rope around the perimeter so that the frame of the kite becomes more durable. Make a strong loop and secure it to the top of the kite. Make the same loop at the bottom of the kite. Done, the sling should tension the frame. Make sure that the sling does not deform the perpendicularity of the sticks and does not change the overall design.
4.
Place the sail (paper or nylon fabric) on the table. Place the finished kite frame on the material. Trim the material around the kite, leaving 2 - 3 centimeters from the edges of the kite. Fold the edges of our material over the frame of the kite and glue these edges so that the material holds tightly.
5.
Cut the rope approximately 122cm long. tie it to the top loop of the kite and, stepping back a little from the top, make a loop and pull it to the bottom of it. Secure it there.
6.
Make a tail by tying small ribbons, about 10cm each. along the entire length of the tail. Attach the tail to the loop at the bottom of the kite.
7.
Decorate the snakes as you wish and to your taste.
Well, that’s probably all, it’s time to start flying a kite.
Some tips:
It is better to place the support (attachment) point of a long sling slightly in front of the center of gravity.
Installing a tail will give additional stability and efficiency to the kite's flight.
Check if the kite is balanced by holding it by the line. If the balance is out of balance, you can correct this defect by attaching paper.
Each kite is different in its own way, so you may have to make some adjustments to the design yourself.
Hello again everyone! Warmth has finally come to us, and at the same time our most favorite pastimes - picnics in nature, family active recreation and conscientious feeding of mosquitoes. But we somehow learned to cope with the latter using all sorts of means. We'll get serious about picnics and campfire menus someday. But today on our agenda: active games with kids. One of them is launching a kite into space. Therefore, I declare the creative workshop open. And very soon there will be a do-it-yourself kite with drawings and dimensions. Forward?
Materials and tools that can be used for design
The beauty of this craft is that no matter what material you have at home, you can choose the right model for yourself. And I will convince you of this now!
First, I will give a small visual example. Windy weather occurs periodically in cities. This is when the wind blows and blows for days, blowing away everything that doesn’t lie right. Various light objects fly up, just as all sorts of things are torn down from the balconies. But one day the wind subsides. And the period comes. Which I call " chinese lanterns" And indeed, the trees are neatly “decorated” with plastic bags. Why? Yes, because all these windy days the bags were carried on their own, no worse than gliders. Got the idea? Then I will develop it.
What can you build an aircraft from:
- made of paper;
- plastic bag;
- thin tracing paper;
- old umbrella;
- made of fabric;
- and even newspapers and magazines will be used.
So, look around and you will realize that you have the most basic material. But what else is needed in order to make the design:
- Main material;
- Thin strips. These can be hollow metal rods, bamboo sticks, or grape sprigs (they are lighter than usual);
- Scotch tape or glue;
- Rope, fishing line or strong thread;
- Spool to adjust the length of the thread;
- Scissors.
- Pattern.
I want to say right away that the model, as well as the complexity of the craft, will depend on how old our little one is, for whom we are making. And the conditions under which we do this. For example, if the baby is very, very small and will not be able to run around the field flying a kite, but we want to give him new emotions, or if we are already in open field, and before that we didn’t plan to create anything, so we don’t even have half the list of materials, we can still come up with something.
Ideas and DIY
Craft for kids
For example, here is the most basic, but no less cool craft:
- take a simple one plastic bag T-shirt;
- tie her arms in the middle with a thread.
All that's left is to catch the wind! It's that simple! But believe me, the little one will be delighted. Moreover, you won’t have to run much, the kite will “inflate” itself and take off, as soon as a breath of wind touches it. True, it won’t fly high, but children under 5 years old will still find it interesting.
But let's talk about something more complex that you can do at home with our helpers.
A paper kite that flies high in 5 minutes
This option seemed to us the simplest and fastest, so we immediately made it at the first wind. I, my son, and even my husband really liked it, although he was very skeptical.
Details in our video:
The simplest kite design
It’s the same package, or rather, I’ll describe it with a package, but you can use any of the above materials instead.
We will need:
- Package – 1-3 pcs. (depending on their size);
- Wooden sticks (choose light ones) – 2 pcs.;
- Scotch;
- Knife and scissors;
- Fishing line;
- Glue;
- Marker;
- Coil;
- Strong rope.
Manufacturing: 
- We cut the sticks so that one is 60 cm, and the second is 35. We fold them crosswise. We place the shorter one on top of the longer one, retreating 15 cm from above. We fix them by tying them with tape.
- We cut each edge of the stick in the middle to a depth of 1 cm. wrap it with tape under the cut. This will make the structure more durable.
- We pull the fishing line into the cuts and pull it tight.
- We wrap it with tape several times to secure the fishing line.
- We fold the bags, perhaps if they are too small, they will have to be firmly glued to each other to get right size. We place the “skeleton” on top of the cellophane “canvas” and outline it. After adding 1.5 cm of cellophane on each side for tucking, we cut out the base.
- We attach the frame to the base and tuck the edges. We secure them with tape.
- We tie a 50 cm fishing line to one and the second edge of a short stick.
- We also tie a 25-40cm rope to the top of the model. Its length will depend on the kite angle you choose. If you want the structure to fly almost horizontally, then its length should be minimal; vertically – maximum.
- We tie the middle of the fifty-centimeter fishing line to the fishing line that is attached to the top.
- We tie a rope to the junction of the lines. Secure it firmly with tape.
- Decorating our balloonist. We tie another rope, small, about half a meter, with cute bows attached to it to the lower end of the frame.
We draw a picture on the “front” side of the base.
According to the same scheme, but with different materials of construction. Cocktail straws, paper and rope are used here.

Based on materials
Parchment paper snake
To work you will need:
- parchment paper 36*51 cm;
- wooden sticks or light slats: 2 x 60 cm, 48 cm and 36 cm;
- colored crepe paper;
- strong thread;
- reel with fishing line;
- glue stick and PVA;
- small metal ring;
- scissors.
Fold the parchment sheet in half to mark the middle line. Place the smallest stick along the top edge of the narrow side of the rectangle, stepping back a centimeter from the edge. Lubricate the free edge of the sheet with glue and wrap it so that the stick is inside, it should be tightly fixed.
Grease a 48 cm long stick with PVA and glue it to the center line of the workpiece. 
Place the remaining sticks along the diagonals of the rectangle. 
Glue them with pieces of paper as shown in the photo. 
Cut out squares or random shapes from colored paper and paste them onto the front side of the rectangle.

Make a hole on both sides of the intersection point of the diagonals.
Using pieces of thread, tie the ends of the sticks along the upper corners of the rectangle, pulling them together a little.

Tie a long piece of thread to the upper right corner of the kite. Thread a ring onto a thread, it will help control the flying machine. Then thread the thread through the holes previously made in the center of the rectangle and pass it through the ring again. Tie the end of the thread to the upper left corner of the product.

Tie the end of the line tightly to the control ring. 
Glue long strips of corrugated paper to the bottom of the kite. These “tails” will help him balance in air currents. Their optimal size 5 cm*2.5 m. 
The Air Wanderer is ready to surprise you with its flight characteristics. Have a good flight!

Simple DIY box kite
Snake Rokkaku
More serious design.
Convenient kite reel
Draw a circle with a diameter of 20 cm. Cut out two such blanks from cardboard. Cut convenient slots for your fingers on them; they should completely match on both circles.

Cut several strips 2.5 cm wide.

Mark the inner circle, use a compass or a suitable template.

Roll the cut strips along the contour of the cutouts and glue them with hot glue.

Glue the inner ring in the same way.

Glue the second circle on top of it.

Glue the end of a long thread to the inner surface of the spool and wind the thread.

To prevent it from getting tangled, tie a match to its end and secure it with glue. Thread the thread into the slot on the outer ring.

With such a convenient device, your flying kite will conquer not only the sky, but also the hearts of your children.
* based on materials
Mechanical bird
Not quite a kite, but it also flies. And even without a motor and wind. Make one like this homemade toy Anyone can do it, no special skills or tools are needed. All you need are skewers, paper clips, super glue and plastic. This mechanical bird is very light and strong, and it is very interesting to play with it.
As you can see, everything is very simple and doable! I wish you fruitful collaboration with your little one in creating a kite! Also, have a great launch! I hope you’ll tell us how your weekend spent outdoors and whether you managed to amuse your baby (and yourself too; I’m still in awe of the flights of this wingless “beast”). I say goodbye until we meet again and remind you to subscribe for yourself and your friends!
Hello everyone and as they said “Peace, labor, May!”)))
A fascinating story about a kite awaits you.
In short, it's worth taking!
After reading the review of the flying kite, it was immediately decided to order the same one.
Delivery took almost two weeks, the track was tracked.
When I came to the post office and submitted the notice, the employee could not find my parcel for a long time!.. And I said that we need to look for an oblong-shaped parcel.
Imagine my surprise when it turned out to be triangular, 70 centimeters long!
I forgot to take pictures of the parcel and packaging...
And this is what the kite itself and its spare parts look like! 


I immediately compare it with the kite from the review, and I understand that it is going completely differently!..
Considering that I had never flown anything like this as a child and had only heard about kites by hearsay, I was overcome with some stupor.
Figured it out approximate location details 
With the tail part, in principle, everything is clear - a flexible white knitting needle needs to be inserted along the edges into the spacer, while it bends in an arc - this is how it should be.
Half the job was done, all that remained was to understand how to properly install the black spokes and why stoppers with a slot were installed on them. If you install them as in the previous review, but with thin edges into the corner stops, and in the center - into each other - the assembled spoke strongly protrudes in an arc, and what to do with it next is not very clear.
By brainstorming and dancing with a tambourine, a solution was found. 
This is what the kite looks like when assembled - it has a clear tension on all the wings!
All that remained was the small matter - field tests - in the literal sense)))
Who is interested in a brief description of the process of launching and controlling the kite:
1) stand facing the wind and take the kite by the place where the thread is tied (I’ll call it “keel”).
2) wait for good wind (this is a prerequisite for a successful launch and flight)
3) we start running and release the kite.
After that, it begins to gain height - don’t forget to let go of the rope - you can simply throw the reel on the floor, it was even more convenient for me at first.
The main condition for a successful flight is to constantly monitor the tension of the thread:
-if it weakens, you need to reel it in or run into the wind
- when the tension is strong, you can let go of the thread, at least until the spool runs out. 


(not me in the photo - my friend).
I think controlling and launching the kite is very simple, at least for me.
A friend even decided that this was not my first time flying a kite, but when he picked it up himself, everything worked out great for him too.
As a result, when I launched it - I unwound almost the entire coil - the wind contributed to the successful launch and flight! I didn’t check the length of the thread, but it is sooooo long (100 m stated).
Conclusion: great thing for your money!
The only downside can be an unsuccessful landing, as a result of which something can break...(((
There was a lot of emotions - everyone liked it, but especially the children - they came up with their mouths open...
But even the grandmothers turned around and pointed their fingers at the sky)))
Initially, buying a kite was intended as entertainment for kids, but in the end, adults get just as much fun!
Below is a video of the launch and flight
I'm planning to buy +50 Add to favorites I liked the review +42 +78