Increasingly grown on personal plots Although quails are the smallest variety of poultry, the poultry farmer will have to create comfortable conditions accommodation. You can build cages for quails from different materials, and the task can be done not only by professionals, but also by home craftsmen armed with a minimal set of tools.
Types and requirements for quail cages
Before you start work, it is important to know that separate housing is required for different age categories, and in separate cells they contain:
- chicks aged from 1 to 10 days;
- young animals up to one and a half months of age;
- adult livestock;
- laying hens that produce table eggs;
- quail for meat purposes;
- parent groups.
A do-it-yourself brooder for quails differs from other cages by serious protection from cold and drafts, and necessarily by a lighting and heating system for small chicks that do not tolerate cooling and overheating well. Home craftsmen prefer to make all walls, except the front, from plywood, fiberboard or chipboard. The floor and ceiling of this design are made of fine mesh, through which debris and bird droppings easily penetrate, and the quails themselves move confidently and do not risk injuring their legs.
For this age, a self-built brooder for quails is equipped with a feeder and drinking bowl. This equipment, as well as the heater and lamps, are mounted inside the cage.
The video, which talks about making your own drawings of a brooder for quails, will not allow you to make mistakes even for those who for the first time in their lives decided to start breeding such an interesting bird as quails.
 How older bird, the larger the metal mesh cell can be. Grown-up young animals are better adapted to environmental conditions. It does not need a closed space, and open mesh quail cages are much easier to clean.
For adult birds, cages are built at home from a variety of available materials. Not only plywood or chipboard is used, but also metallized mesh, metal and even plastic. Laying hens are housed in specially designed houses with a bottom sloping towards the outside. A chute is attached to the outside where the laid eggs fall.
In order for meat-producing animals to gain weight better, quail cages are made mesh and rather low to artificially limit the movement of the bird. This technique allows you not only to quickly achieve the desired weight, but also to delay the onset of puberty. Therefore, the meat of such quails is more tender and juicier than that of those raised in ordinary cages.
Before making a quail cage with your own hands, carefully consider the safety of the future structure, the possibility of its sanitization and cleaning, as well as the suitability of the size of the house for the number of birds housed in it.
Calculations of the size of future cages for planting quails can be made based on the given standards for a population of 10, 30 and 50 birds. 
DIY quail cage drawings
The most popular and convenient design of a quail cage is a wooden or metal frame, lined with mesh on the outside and on the floor, and on the rest, at the owner’s request, with materials available to him.
 The drawing of a homemade quail cage, in the photo, includes:
- 1 - frame;
- 2 - drinking bowl;
- 3 - door;
- 4 - feeder;
- 5 — chute for rolling eggs;
- 6 — cage floor;
- 7 - tray for collecting litter and droppings.
A reliable functional design will take more than one generation of laying hens; it can be installed on the floor, while it is important to provide legs 15–30 cm high, or used as a tier of a “multi-story” structure. This method of placing cages is very helpful for poultry farmers who do not have enough space to install separate houses for their feathered pets.
Quail cages assembled in a multi-tiered structure must be securely attached to each other and to the vertical surface of the wall next to which they are located.
 If you want to save money and simplify the manufacturing process, the master can abandon the frame. In this case, the drawing of a quail cage shown in the photo will help you cope with the task; even a novice poultry farmer can make such a design with his own hands. The material for the side walls and pallet can be thin metal, strong plywood or fiberboard sheets.
To prevent an egg from falling from an inclined floor, a gutter up to 10 cm wide with a limiter is provided on the outside. The bottom is made of fine metal mesh, suitable for quick and effective cleaning of cells.
DIY quail cage: step-by-step instructions
 Homemade designs are simple, affordable and do not require special knowledge to manufacture. It is only important to consider:
- number of quails raised;
- the need to install heating and lighting systems for chicks;
- trays for laid eggs;
- Possibility of cleaning quail cages.
 If as starting materials the master chose wood, plywood and metal mesh, he will need it in his work:
- hacksaw;
- metal scissors;
- stapler with staples for attaching the mesh;
- self-tapping screws for assembling the frame.
If you assemble a quail cage with your own hands, according to the step-by-step instructions, at the first stage, cut out blanks for the back wall, two parts for the sides and the top of the box. The dimensions of the future structure are calculated according to the table above.
The frame, sawn from wooden blocks, is fastened with self-tapping screws. To make the use of a quail cage safe and long, it is better to clean the wood with sandpaper and impregnate it with an antiseptic that is safe for poultry.
Further work begins when the impregnation is completely dry. A blank for the front wall is made from a material with a large cell that allows the quail to freely use the fixed feeder and drinker.
 The future floor of the bird house is cut out of a fine-mesh mesh. The tray for collecting eggs is a continuation of the sloping floor with an upward curved edge that prevents eggs from rolling off. This must be taken into account when preparing drawings of a quail cage.
Grid to wooden parts The structures are conveniently fastened using large furniture brackets. Below, under the sloping floor, a removable tray is made for collecting litter and litter.
Quail cage made from plastic boxes
An economical and very simple version of a quail cage is based on the use of vegetable packaging boxes made of lattice plastic.
This material is not only easy to process and durable, it is easy to clean and wash, which is extremely important when keeping poultry.
 Before moving on to the step-by-step instructions for building a quail cage with your own hands, you need to prepare everything you need for work. The master will need:
- three boxes of equal dimensions;
- flexible strong wire;
- file for working on plastic and metal;
- sharp knife.
The box, which will be in the center of the structure and is intended for, should have a height of about 30 cm, the rest of the boxes may be lower. One of them will serve as a tray, the second - as a ceiling and lid:
- At the first stage, all protruding parts along the upper edge of the main box are cut off.
- Then it is connected to the bottom drawer using the existing grooves and legs.
- The structure is crowned by a second low box.
- The resulting structure is fastened with wire, and if it is not there, other available materials are used: strong twine, double-sided or strong mounting tape.
- On the lid of the resulting quail cage, a future door is marked, convenient for cleaning and removing or adding birds.
- The hatch is cut on three sides, and the fourth is folded outward. For ease of use, a wire loop-lock is attached to the improvised door.
- Several slits are made on the outer wall for feeding the quails in the cage.
- A grooved feeder is attached a little lower, and a drinking bowl is mounted next to it.
How to build a quail cage with your own hands in the video reveals in all details all the tricks of the process and will help you acquire the housing necessary for birds in a matter of hours.
Making a cage for quails - video
Today, more and more people began to grow in their backyard various types birds, one of which is quail. But to obtain a guaranteed profit, you must adhere to some maintenance rules. Firstly, you should take care of the birds’ comfortable living, and this is impossible without a cage.
In addition, it is worth taking care of the required temperature regime. In the room where the quails will be kept, the temperature should be above 20-24 degrees. Also, the intensive growth of quails is influenced by such factors as lighting. The duration of daylight hours will be 17-18 hours.
Necessary parameters for making a cage
You will find the instructions “Rabbit Breeding for Beginners”.
In this case, you must adhere to the following dimensions:
- the height of the back will be 18 cm;
- the height of the front part is 20 cm;
- to arrange the lower part, you should use a mesh cell of 12x12 mm, and a wire diameter of 0.9-2 mm;
- The angle of inclination of the egg collector should be 10 degrees;
- The egg collection must be equipped with side sides that protrude by 10 cm.
How to make a quail cage is described.
Assembling a quail cage with your own hands - drawing
If you have already decided to purchase ready-made option, then you need to spend 2 hours on this. The main blank has the following dimensions: 105x70 cm. From its waste you will get side walls whose dimensions are 30x30 cm.
The sizes of cages for broilers are indicated.
After this, the main workpiece is bent in compliance with the following dimensions:
- front height 16 cm;
- rear height 14 cm;
- the width of the wall located on the side reaches 30 cm;
- the remaining material from the workpiece can be used to designate a collection for eggs.
To secure the side walls, you must use plastic clamps. After this, you need to bend the ends of the egg collector, taking into account the fact that its height should be at least 3 cm.
For the floor of the cage, a mesh will be used. Its dimensions should be greater than those of the main workpiece. In order for the floor to achieve maximum stability, the base of the cage must be reinforced with metal blanks. The most excellent option considered galvanized iron. The door is cut out from the top. For greater comfort, it can be wide across the entire top surface.
In order to get right angles on the folds of the mesh and not rounded ones, it is necessary to use two edged boards during bending, the thickness of which is 5 cm. To connect them, use two loops. The bird cage mesh is inserted into the cracks that have formed between the boards. In this case, you need to measure the required size of the bend and the board, and then add the two obtained values.
To support the cage, not only the bottom, but also the end walls of the structure are used. Here it is worth considering the space that will be required to insert a litter tray. For its manufacture, fiberboard, plywood or wooden slats are used.
How broiler chickens are raised for meat is described.
After the cage has been assembled, it is necessary to carry out a number of activities before the quails settle down there. To do this, it is necessary to treat with disinfectants. They allow you to eliminate bad smell saltpeter arising from quail droppings.
Dimensions and area for a do-it-yourself wooden structure
This design option is used extremely rarely. Most farmers still prefer homemade wire cages. The main material is plywood. The process of making the bottom is similar to the previous version.
The plywood cage for quails has the following dimensions:
- the height of the back is 18 cm;
- the height of the front part is 20 cm;
- floor inclination angle – 10°.

For the normal living of one adult bird, you will need 1.5 dm3 of the area of the entire structure.
Breeds of laying hens are listed.
Dimensions depending on the number of quails
In addition, the size of quail cages varies depending on how many heads will live there:
- 10 heads – floor dimensions 350 x 275 mm;
- 20 - floor dimensions 500 x 350 mm;
- 30 – floor dimensions 650 x 475 cm;
- 40 – the design consists of two compartments, each of which is suitable for breeding 20 birds;
- 50 – floor dimensions 1050x825 mm;
- 1000 – the cage consists of 4 compartments, each of which contains 20 heads.
The meat and eggs of domestic quails not only have excellent taste, but are also considered dietary and healthy. However, in order for the bird to regularly produce eggs and its meat to be tasty, it is necessary to provide the quail with optimal living conditions. Spacious warm cages for comfortable stay birds are simply necessary.
In this article we will learn how to make a quail cage with your own hands at home using drawings, and we will talk about the sizes of quail cages for 10, 20 and 50 heads.
How to build a quail cage with your own hands for 10 heads? During manufacturing, it is necessary to calculate the dimensions that will be optimal for such a number of birds. As a rule, the dimensions of the cage for quails for 10 heads are 30×75 cm and 25×60 cm for birds raised for eggs and meat.
Quail cages must meet the following criteria:
- the size of the cells depends on the size of the birds so that they do not fall out on the floor;
- the structure should be free of dampness and mold because otherwise the birds may get sick;
- the number of quails should correspond to the size.
The material for making a quail cage can be completely different: mesh, plywood, plastic, wood.
Below is a diagram of a quail cage that you can make yourself with your own hands.
1 – frame; 2 – drinking bowl; 3 – door; 4 – feeder; 5 – tray for collecting eggs; 6 – floor; 7 – reservoir for litter.
You can save space by stacking cells on top of each other. The result will be a kind of cell battery for quails. To do this, they must match each other in size and shape. Bird houses can be secured with regular wire. Two or three tiers are enough. The first structure is installed at a height of at least 10-30 cm above the floor.
For frame you can use wood or reinforcement, and make the walls from mesh. It is important to choose a net of such a diameter that the birds cannot escape. Quail is a fairly small bird, so you can use a small-diameter chain-link mesh.
Cages for laying hens should be equipped with a bottom at an angle of 7-8 degrees to the drinking bowl. This is necessary so that the eggs fall into the egg collector.
How to build cages for 20 heads at home
The cages should not restrict the movement of the bird, so you can make the size of the quail cage 20 heads larger than the standard ones. For an adult male, the most comfortable area will be about 100 square centimeters. Respectively, a cage of 1 m² can easily accommodate a herd of 75 individuals. The following must be provided everywhere:
- drinking bowl;
- feeder;
- egg collector;
- litter tray.
The ideal material for the egg collector, feeder and drinker is durable plastic. Any plastic container can be easily adapted into bird tanks. A tray for collecting litter can be made from sheet iron. The service life of these materials is longer.
The cage can be made from any material that is at hand: for example, wood. The cell is similar to wooden box with dimensions of 30x30x25 cm. However, despite the apparent simplicity of manufacture, such a cage needs additional lighting, ventilation and maintaining optimal temperature.
Ventilation can be ensured by recesses through which air will flow inside. Temperature and lighting can be controlled by lamps adjusted to the birds' needs. Light and heat can also enter through recesses in the cell walls.
Step-by-step instructions for making a cage battery for 50 quails with your own hands
The minimum area for a DIY quail cage is 50 pcs. should be 75x150 cm for parent flock birds and 60x120 cm for breeding meat and egg breeds.
For manufacturing it is best to use mixed materials, which are always at hand. To keep a large number of birds, you can make cages in several tiers. This approach is justified by the small size of quails, which can be kept in large numbers in a small area.
It is cheapest to use mixed materials. You can fit a piece of wood under the frame appropriate size. For the sides, ceiling and floor, a regular mesh is perfect, which is easy to find in the arsenal of any summer resident.
We will take the minimum size (30x30 cm), which can be increased depending on the number of bird heads. To keep 50 birds, you can always install a multi-tiered cage that can easily accommodate all the quails.
Now let's look at step by step instructions for a do-it-yourself quail cage.
For this you will need:
- 8 wooden beams 30 cm long and 2.5 cm thick;
- mesh with small cells (2x2 meters);
- nails and screws;
- awnings and metal corners.
First we make a frame from wooden beams, onto which we then attach the mesh sidewalls. We make the ceiling and floor and attach it to the frame. For ease of assembly we use metal corners.
Cages for meat quail breeds are made lower than for egg-laying breeds. Such quails move more slowly and quickly gain weight.

How to make quail cages from mesh?
Quail cage mesh is one of the most affordable materials that can be used to create cages.
First, the frame is prepared, corresponding to the number of bird heads. Cell sizes can be completely different. The bottom, sides and ceiling are attached to the frame. The frame must be strong, so we take a base made of metal or wood. If you have chosen wooden frame, then it is recommended to take wooden blocks 25x50 mm.
For a metal frame, corners of 25x25 mm are well suited. The mesh slots on the sides must be selected in such a way that the birds' heads fit into them when feeding. Birds should not fall out through holes in the floor and sides, so for the floor we select a mesh of smaller diameter than for the sides.
What are we doing?
- Let's prepare the corners for the frame. We will need 4 corners of the following sizes: 300 mm and 500 mm, as well as 3 corners of 700 mm. We connect the corners, then fasten the beams with self-tapping screws. We fix the metal corners with bolts or weld them to the frame.
- The dimensions of the sidewalls are calculated based on the size of the walls. We fasten the mesh walls with a furniture stapler, taking into account that the staples sit evenly and cannot harm the birds during the operation of the cage. The mesh can be secured to a metal frame using wire.
- We make the floor at an angle of about 7-9 degrees. When assembling the floor, take into account the length of the egg collector (about 10 cm), the end of which is bent a few centimeters. The eggs will be fixed in one position. We leave a gap of 3 centimeters between the egg collector and the wall, where the eggs will roll.
- We fasten the door in such a way that you could stick your hand through it. The door is also made of mesh and secured with canopies.
- We make a pallet for collecting litter. It's better to get a piece of sheet metal that is easy to care for and will last a long time.
The litter tray will be much easier to clean if you put newspaper in it. We change the newspaper from time to time.
From plastic boxes
Making cages for quails from plastic boxes is as easy as shelling pears: we don’t need to calculate the dimensions, we don’t need to look for a frame. It is enough just to carry out some modifications and we will have a ready-made cell. The diameters of plastic boxes are well suited for keeping quails.
We will need:
- two small drawers;
- one box about 17 cm high.
What to do?
- Cut off the corners on the tops of the drawers.
- We place a tall box on a small one, which will become a tray for collecting litter. We install a second low drawer on top. Make sure that the diameters of the boxes match. We fix the structure with wire.
- We cut the lid in the top drawer.
- If necessary, expand the cells of the drawers. The bird's head should fit through the openings when feeding.
From plywood: drawings and dimensions
Plywood cages can be made either on the basis of a frame, or the ceiling and walls can be installed between each other using bars. The size directly depends on how many birds you plan to keep. Before manufacturing, be sure to make a drawing of a cage for quails or quails and only then begin manufacturing.
What are we doing?
- We cut out the side walls 350x200 mm, the end and the ceiling(dimensions of the ceiling and end wall - 700x350 mm). We cut small holes in the sides for ventilation and lighting.
- We treat all workpieces with an antiseptic or varnish.
- We fasten the parts to each other with corners and self-tapping screws.
- Cutting out the floor(the dimensions correspond to the dimensions of the ceiling) and attach it to the base of the cage with a stapler or nails. We take into account the tilt angle of 7-10 degrees.
- Install the door on the front of the box.
It is very important to use an antiseptic, otherwise the birds may get sick.
As you can see, making homemade cages for keeping quails according to the drawings is not so difficult. The main thing is patience and you will succeed.

Due to the ease of keeping, the domestic quail enjoys the status of being the favorite of its owners, providing them with healthy products. Proper arrangement of housing for these birds is a guarantee good growth and reproduction, allowing to obtain sufficient quantity meat and eggs. You can make cages for quails with your own hands using simple circuits and drawings.
Basic requirements for quail cages
When deciding to have quails, it is advisable to worry in advance about the availability of durable and comfortable cages that will allow necessary conditions for bird life. The designs can be purchased in specialized stores, but for those who like reasonable savings the best option will be creating them with your own hands. This will not only save money, but also optimize the space as much as possible.
There are certain requirements for the living conditions and cages for quails.
- Lack of dampness in the room, compliance with a certain temperature regime within 18–20 degrees. This significantly reduces the number of bird diseases that lead to death.
- When placing quails in cages, it is important to maintain their number. So, a dozen birds selected for breeding will need a cage of 15–17 dm². And to receive food eggs and meat, the planting density should not exceed 10–12 dm².
- The size of the grid cells must be selected depending on age group birds. Too large is not suitable for young animals; chicks will easily get through it.
When creating a cage, remember that quails are very shy and do not tolerate large number external stimuli. Protect them from exposure to drafts, loud noise and excess light. Regardless of the type of construction chosen, the cage should be as closed as possible and made of durable material.
Materials from which you can make your own cells
The most acceptable options for creating back and side walls are boards, galvanized, plastic and plywood. And the front part of the cage is traditionally made of medium-sized mesh or rods located at a short distance from each other. There is a hanging feeder at the front.
The front of the cage is made of lattice, leaving a hole for birds to feed.
To maintain cleanliness in the quail cage, its bottom is made of fine mesh, under which a tray should be installed to allow the removal of accumulated droppings. Such homemade cages can be installed on top of each other, which saves space in the room.
As the experience of most bird owners shows, cages made entirely of mesh material are completely unsuitable for keeping them. In such structures, quail behave restlessly, due to constant stress they practically do not lay eggs, gain weight poorly, and crush each other.
Cell parts are made from different materials:
 Cage from combined materials you can make it yourself
  Frame cages are made from metal profiles
  The mesh cage must be reinforced with dense materials: wood, plywood or fabric
  Quail battery helps save space
When making cages for quails, it is very important to take into account the age of the birds and the ultimate purpose of keeping them. There are several main types of structures:
- brooders: for small chicks from birth to 10 days;
- cages for young animals up to 45 days old;
- structures in which adult birds are kept;
- cells for producing food eggs;
- separate quarters for the parent flock;
- special cages for fattening meat.
Professional breeders immediately place newly hatched chicks in specially equipped brooders. They allow you to maintain the required temperature for harmonious and proper development young animals In addition, such structures must be additionally equipped with a round-the-clock lighting system, without which the full growth of the chicks is impossible. These cells must be closed type with a mesh cell size of 10x10 mm. The feeder and drinker are placed inside the box. It is advisable that quails remain in such conditions for 2–3 weeks from the moment of birth.
Quail brooders - gallery
 It is necessary to maintain a comfortable temperature and lighting inside the brooder.
  A brooder helps raise up to 90% of young quails
  Brooder provides good conditions for the growth and development of quails
Grown-up quails should be transferred to a new cage equipped with a larger floor mesh, which allows for thorough cleaning. The recommended cell size is 16x24 mm. The structure itself can also be made of mesh with a cell size of 24x24 mm.
The best option for adult quails is combined cages made of plywood and mesh. To ensure the comfort of the hens, the bottom of the structure should be located at a slope of 7 to 8 degrees to the drinking bowl. The cage requires an egg collector, which can be organized by extending the length of the bottom, equipped with a limiter. The cell size of the bottom mesh should be 16x24 mm, and to create the side walls, a mesh with a cell size of 32x48 mm is suitable.
Sizes and layouts of cages depending on the number of birds
The main task of a poultry farmer who breeds quails for the purpose of obtaining meat is to create conditions under which the birds will be inactive. To do this, during the manufacture of the cage, the parameters of its height are reduced. Such structures are traditionally made of mesh with a mesh size of 32x48 mm, which provides a sufficient level of illumination that affects the growth of the bird.
Cage size depending on the number of birds bred for meat - table
The optimal height of the structure is usually 240–250 mm. For one quail to live, according to rough calculations, 1.5 dm 3 of the area of the entire structure is required. With a closer planting, it will not be possible to achieve good egg production and weight gain.
If we are talking about keeping adult individuals for the purpose of obtaining maximum quantity eggs then technical specifications cells can be like this:
- height - 170–240 mm;
- width - 1 thousand mm;
- depth - 600 mm;
- watering front - 10 heads per drinking bowl;
- feeding front - 25 mm per head.
A homemade feeder, used both for raising poultry for meat and for increasing egg production, must correspond to the optimal dimensions:
- width - 50 mm;
- outer side height - 80 mm;
- the height of the inner side is 50 mm.
Multi-tier cell batteries
Often for rational use spaces in the room, cells are placed on top of each other, creating a single block in several tiers.
When creating cell batteries, consider some nuances:
- raise the lowest cage above the floor by 80–100 cm. This allows for comfortable maintenance and protects the birds from the unwanted effects of drafts;
- the maximum number of tiers in a battery should be five, provided there are no more than 30 quails in one cage. This way it is possible to avoid pushing through the mesh floor, as a result of which the eggs stop rolling into the egg collectors.
- Place the door at the front of the structure. This option is convenient if you have several cell batteries standing nearby.
- To achieve maximum stability, attach the battery to the wall of the room. This will help prevent the entire structure from suddenly falling.
Drawings and step-by-step manufacturing instructions
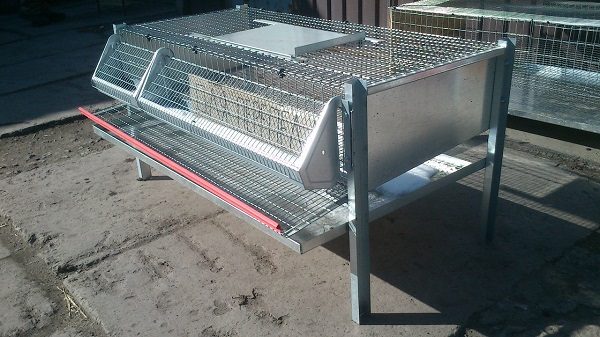
One of the simplest cages for quails is a structure made of galvanized mesh. It is useful for temporarily keeping older birds and can act as an element of a multi-tiered structure. To make it you will need:
- galvanized mesh - 1 m²;
- wire or plastic clamps;
- cutting tool.
- Measure 105x70 cm of material and cut out the main piece.
- After this, cut out two side walls measuring 30x30 cm from the remaining parts of the mesh.
- On the main workpiece, make bends corresponding the following parameters: height of the front wall - 16 cm, back wall - 14 cm, width - 30 cm.
- The rest of the material will be useful for organizing the egg collector. When creating it, be sure to bend the end to a height of 3 cm to prevent the eggs from rolling out.
- Fasten the structure using plastic clamps or pieces of wire.
- Equip the floor of the cage with an additional mesh with a smaller cell, cut to size. Secure it with wire staples.
- At the top of the structure, cut out a door, the dimensions of which will allow you to easily place the bird inside.
When bending the mesh, it is not always possible to make right angles. You can cope with this problem by using two edged boards connected by loops. Carefully insert the mesh into the gap between them and, having measured the required length, fold the boards together.
Making a cage from galvanized mesh - video
To make a litter box, you can use any materials treated with antiseptics. In this case, the side walls of the structure act as a support, allowing you to easily insert a manure container of the required size.
Cages made of plywood or wood for young and adult birds
Cages made of plywood are no less convenient and functional. The low cost of this material allows for significant savings on their production. Such designs are suitable for keeping a small number of birds and are the best option for young animals.
The process of assembling a plywood cage involves the initial creation of a reliable frame. However, in some cases, the walls can be secured using wooden blocks.
Instructions for making a cage from plywood with your own hands.
- To begin, cut the plywood or fiberboard based on the following dimensions: side walls - 350x200 mm, ceiling - 700x350 mm, end wall - 700x200 mm.
2. Equip the sidewalls with holes with a diameter of 30 mm, which will provide the required level of ventilation.
3. To comply with hygienic standards, coat wooden workpieces clear varnish water-based or antiseptic.
4. Start assembling the box. Use self-tapping screws and glue as fasteners for additional strength.5. From a mesh with a cell of 16x24 mm, cut out a blank for the floor measuring 700x350 mm.
6. Secure it to the main box with nails, ensuring an angle of inclination to the front wall of 7–10 degrees.
7. Attach the mesh door to the front wall of the structure using special awnings.
8. Equip the finished cage with feeders and a drinking bowl.
Several of these cells, installed one on top of the other, create a battery that saves space in the room.
DIY version of a plywood cage - video
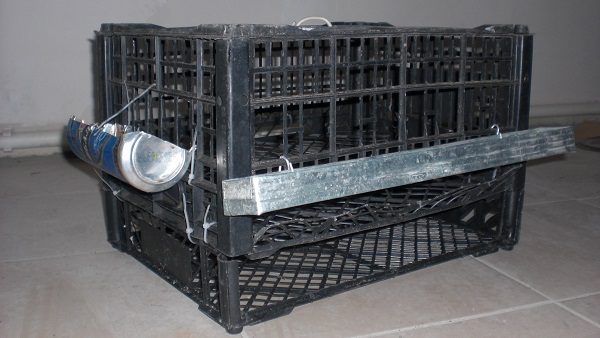
Plastic cage
Plastic cage for quails - simple and economical profitable option. It can be made from ordinary lattice boxes used as packaging elements. The advantages of a plastic cage are its low cost, ease of manufacture, maintenance and durability.
To create such a cell you will need:
- three boxes of equal dimensions;
- flexible strong wire;
- file for working on plastic and metal;
- sharp knife.
When choosing suitable boxes, you should take into account that the height of one of them should be 30 cm. It will be located in the center of the structure, and all the rest will become its parts, including the ceiling, lid and tray.
Instructions for assembling the cage.
- Cut off any protruding parts of the main box along the top edge.
- Connect it to the bottom drawer using the existing legs and grooves.
- Secure a second low box at the top. Use double-sided mounting tape, rope or wire as fastenings.
- Attach a door cut like a hatch to the roof of the cage. To do this, make slits on three sides and bend the fourth up. It is advisable to attach a wire lock loop to the hatch.
- Cut the outer front wall in several places for birds to feed.
- Below, mount a hanging feeder in the form of a trough and a drinking bowl.
The holes in the front wall should be large enough so that the bird can easily stick its head through and reach the feeder.
Making a simple plastic cage - video
How to make your own brooder for little chicks
Quail chicks require special conditions, which a brooder can provide. To make it you will need:
- plywood sheet 10 mm thick, size 1525x1525 mm;
- wooden beam with a section of 20x30 mm and a length of 1200 mm;
- galvanized mesh with a cell of 10x10 mm;
- PVC panel;
- self-tapping screws;
- two piano hinges 300 mm each.
Dimensions of required parts - table
| Details | Quantity (pcs.) | Size(mm) |
| Side walls | 2 | 480x500 |
| Rear wall, bottom and ceiling | 3 | 700x500 |
| Pallet slides and mesh bottom | 6 | 4 pcs. - 460x20, 2 pcs. - 660x20 |
| Upper part | 1 | 640x50 |
| Bottom part | 1 | 640x60 |
| Sidewalls | 2 | 400x50 |
| Frame for mesh bottom | 4 | 2 pcs. - 660x20 and 2 pcs. - 480x20 |
| Doors | 2 | 400x445 |
| Rails for pallet frame | 4 | 2 pcs. sizes 655x20 and 475x20 |
| Facial detail | 1 | 700x95 |
Instructions for making a brooder.
- First you need to make blanks from which the main structure, equipped with a pallet, will be assembled. To do this, cut four planks measuring 460x20 mm from plywood. They will serve as side walls. You will also need two end strips measuring 960x20 mm.
- Then fasten the planks using self-tapping screws as shown in the photo in steps 2 and 3.
- Create a frame from pre-prepared parts, which you will install as shown in the photo (step 4 and 5). Install door hinges on the front of the side strips. Attach the structure to the main body.
- Next comes the stage of making a mesh bottom resembling a sandwich. Fix the cut piece of mesh between the wooden planks using self-tapping screws (step 6).
- The manure catcher is made in the same way as the floor, but instead of mesh, use solid material. On the front side, equip the structure with an additional bar to prevent droppings from spilling out (step 7).
DIY brooder for quails - video
Quails are one of the popular farm birds, domesticated many decades ago. Birds are bred to produce nutritious meat and eggs, which are considered delicacies for their extraordinary delicate taste. The size of quails is very small, therefore, in order to get a good final product from them, you need to try and feed the birds correctly, as well as create comfortable living conditions for them. We will help you cope with the difficult task of arranging a quail's life by telling you how to make quail cages with your own hands.
Like any other area of agricultural activity, poultry farming requires the farmer to strictly adhere to specific rules that accompany the competent and successful process of breeding the chosen variety of birds.

Thus, there are certain requirements regarding the selection of a place to place quail cages. Let's look at them in order.

Now that you have looked at the list of requirements for premises for breeding quails, let’s move on to considering the features of cages suitable for birds.

How to choose the right quail cage option
Of course, the simplest (and at the same time the most expensive) step is to purchase quail cages in specialized stores as soon as the decision to acquire feathered wards has been made. However, in order to make the right choice of product from all the options presented, you need to know the following points for sure.
- Decide whether you are buying chickens up to 10 days old, or young animals up to 1.5 months old, or maybe you already have a flock of mature birds.
- The purpose of raising quails on a farm will be to obtain eggs or meat products, or maybe to breed high-quality, pedigree parent stock for sale.

By determining the above two points, you will get a clear picture of what your future poultry farming business will look like, which means you can choose the right store cage. However, we advise you to pay attention to homemade options dwellings for birds. Let's see why in the comparison table.
Table. Comparative characteristics purchased and homemade cages for quails
As you can see, homemade cages definitely outperform store-bought ones. The most important factor is the desire of manufacturers to spend as few resources as possible on the production of cells and earn as much money as possible from them.

This can be achieved only in one way - to use cheap materials for construction that look good and thereby imitate quality. When buying a fairly expensive product, farmers expect it to last for many years, however, the cage breaks after a few months of use and the money goes down the drain.
Breeding quails at home as a business
Find out all about how. Writing a correct business plan, commercial prospects of the enterprise, income and expenses. In a separate article “How to breed quails?” you will learn how to choose a breed, what to look for when buying, what conditions quail need and how to feed them.
Another controversial issue is transportation. Many manufacturers sell cages that are not disassembled, which forces them to hire freight transport. And this means serious additional costs. In the case of a homemade product, there is no need to take more care of the car, since the materials necessary for the cage are lightweight and can easily fit into any passenger car. You should also pay attention to the fact that a store cage is standardized and does not take into account all the features of your existing premises, flock of birds, etc. You, on the contrary, know everything about these circumstances, which means you can create for your ward ideal conditions accommodation.

Experienced farmers give beginners interesting advice: if the cage has not yet been purchased, and the quail chicks have been delivered to the farm’s address by an efficient seller, you can put the babies in a mouse, hamster or parrot cage, provided that they have enough space inside. The measure is considered urgent, but effective. Most importantly, do not forget to solve the problems and make a real cage for the quails before the improvised one becomes too small for them.
Requirements for quail cages

These requirements are the “three pillars” of constructing quail cages. In addition to them, there are requirements for rigidity and practicality, as well as the quality of materials, the fullness of cells with everything necessary equipment, For example:
- feeders;
- drinking bowls;
- nests, etc.

All of these elements are also easy to make with your own hands. Believe in yourself! If you take up the cage and build it yourself, you can handle it easily.
Brooders for quails
Brooders are houses that imitate their mother hen for little chickens. These devices are used not only for breeding quails, but also for other poultry. We will not talk about the features of making a brooder in this article, however, we will discuss some important points.

The brooder looks like a box. Its back and side walls are made of plywood or other dense material. The ceiling and front wall are made of mesh or welded grating, with cell sizes no larger than a centimeter per centimeter. Feeders and drinkers are located inside the brooder.
Since chicks enter the brooder immediately after hatching, the various natural mechanisms of their body cannot independently withstand the influences of the external environment. So, their body temperature, for example, is not enough to prevent them from freezing to death without additional heating. This leads to one of the main requirements for a brooder - equipping it with a heating system. As a rule, it is made from incandescent lamps of the following two types:

Table. Temperature conditions required for quail within a month
In addition to heating the brooders, it is necessary to illuminate them, but this issue is comprehensively solved using incandescent lamps, even of low power.
Cages for young animals and adults
For birds older than a month, the situation changes slightly. They no longer need a brooder, because their body’s defense systems have begun to work independently and prevent harmful external influences much better.
Thus, at the age of more than one month, birds are considered strong young animals and no longer need a cage closed on four sides from the outside world. Now the walls can be made entirely of mesh or lattice. The cells of the mesh, which acts as a floor, also increase in size, because the birds have grown and can no longer fall through them. Typically, for this age, cells measuring 1.6 by 2.4 centimeters are taken.

Adults also do not have to install non-mesh walls in the house, but they can have them if desired. The frame material is usually wood or metal, but for calm individuals inhabited inside in small numbers, a plastic structure will do. The size of the floor cells remains the same. In the nesting compartment for laying quails flooring solid, usually made of wood or plywood, installed at an angle so that eggs laid by birds roll into the egg collector on their own.
Birds raised for slaughter for meat are housed in low cages with little room for movement. This is done to encourage the bird to eat more and exercise moderately, gaining weight.

Besides speed dial weight, the minimum activity of quails affects the sexual maturation of individuals in an inhibitory manner. The later birds become ready to mate, the more tender and juicy their meat.
Required materials
To make a high-quality quail cage with your own hands, we will need the following materials:

The material for the frame can be not only timber, but also a metal profile, and the mesh can be easily replaced with a welded grid. Here, each farmer chooses for himself what material is convenient for him to work with. In addition, the timber does not necessarily require a welding machine, because the mesh is attached to the frame in many different ways.
When all the items necessary for construction have been collected, we will begin making cells.
Instructions for making a cage for 20 heads in order to obtain eggs as the final product
Let us explain why, first of all, we decided to introduce a cage for 20 heads for laying eggs individuals. The fact is that it will be easiest for novice poultry farmers to cope with just such a number of birds so as not to burn out emotionally and at the same time feel the profitability of the business. It is much easier to control the production of eggs than the average daily weight gain of meat animals and the breed quality of the breeding parents raised for sale.

The cell sizes described in the instructions vary depending on the preference of the farmer, the number of individuals to be populated, and so on. The main thing to remember is that you can’t make cages that are too cramped or too spacious. Follow the rule of the golden mean.
So let's get started step by step construction cages for quails.
Step 1. Making blanks
We cut the following blanks from the timber:

It is very important to treat the timber with antiseptics before making a frame out of it. This will protect the tree from rotting and becoming a breeding ground for various infections, which will certainly spread to birds.
Step 2. Assembling the frame
We assemble the cage frame by placing the posts at a distance of 70 centimeters from each other on the back and front sides, and 60 centimeters for the sides. We attach four corresponding parts to them. The lower limit of the fastening is 20 centimeters from the ground.

Step 3. Cover the frame with mesh
From the existing mesh we cut out canvases suitable for the resulting wall niches, as well as the floor and ceiling space. You can attach the mesh to the tree using the following materials:
- construction staples;
- self-tapping screws;
- nails

When driving nails, pay attention to whether they extend into the cage, or vice versa, outward, with sharp ends. They can cause damage to both the bird and you.
Step 4. Install the floor
The floor net is installed at a slight angle, so that the laid eggs roll into the egg collector and so that the quail can stand on their own feet. It is best to install it on a welded grid made of thick wire with large cells. This is necessary to give rigidity to the easily sagging mesh by giving it an additional frame.

Large grid cells are needed so that bird droppings passing through the grid do not settle on it, but fall further into a tray for collecting feces and other debris. This will help to avoid many problems with skin and other diseases in birds that appear due to unsanitary conditions inside the bird house.
The floor grid must pass through the front wall of the house; the distance between the floor and this wall must be sufficient for the passage of the egg. Usually it is about three centimeters, but it’s okay if you decide to make it a little larger.
Step 5. Making an egg collector
The egg collector itself is also made of mesh. In our design it runs along the entire length of the cage. It can be a continuation of the floor; the front wall of the device is bent upward using pliers or another tool, and inserts made of iron or wood are mounted on the sides so that the eggs do not roll down the sides and fall to the ground, damaging the fragile shell.

Step 6. Making the lid
You can open the quail cage using a folding roof or a door in the front part of the structure. If you choose the option with a roof, you need to make a rectangle of wood that fits tightly into the upper part of the frame and sew a metal mesh into it. Then, place it on the hinges to the frame and enjoy opening and closing the finished roof.

If you decide to make a door in the front, cut a square hole in the lattice, attach the resulting part to the cage with canopies and/or hooks to secure the exit and prevent the quail from voluntarily leaving the room.
Sheds can be made from cut galvanized iron or other available materials.
Step 7. Mount the pallet
We install a tray under the cage to collect quail excrement. For this purpose you can use:

It is at least impractical to use boxes made of plywood or fiberboard as a pallet, since they will absorb the smell and become dirty very quickly, which will significantly reduce the sanitary well-being in the life of your feathered charges.
Instructions for making a frameless structure
Above, we looked at a fairly high-quality and durable version of a frame cage that will last on the farm for many years. As already mentioned, you can make a frame not only from wooden beams, but also from a metal profile to which the mesh is simply welded.

However, for those who like to do everything simply, quickly and as efficiently as possible, we decided to provide step-by-step instructions for building a frameless mesh cage.
Let's list the materials we will need this time:
- mesh with large and small cells;
- metal wire;
- welding machine;
- props.
Step 1. Cut out the parts
We cut out fabrics of the following sizes from the mesh:

Step 2. Assembling the base
We weld the resulting canvases one by one to each other using thin metal wire.

You can cut out only the side walls separately, and the remaining parts can be made from a single sheet, bent to the shape of a box and welded at the point where the side parts are attached.
Step 3. Install the floor with the egg collector
The floor of the structure is also equipped at an angle and at the end is bent under the egg collector. A metal cap is installed on the sides of the egg collector to prevent the eggs from falling out.

Step 4. Give the cage rigidity
It wouldn’t hurt to weld the existing wire in the form of a lattice with large cells to the bottom of the cage to add a little rigidity to the structure.
Step 5. Install supports and pallet
The cage is installed on strong supports made of any material. It should be at least 20 centimeters from the ground so that rodents, insects, predators or other pests do not get inside the birds.
A pallet made of galvanized sheet metal or purchased in a store is installed under the cage. You can use any washable and non-absorbent container with edges from which bird feces will not spill onto the ground.


You can already assemble two universal options for quail cages. Let's move on to considering the plywood product.
Video - Quail cage in 45 minutes
This housing option for quails is preferred by those farmers who raise a small number of birds in the conditions of even a country house. They are also suitable for poultry farmers whose region of residence is northern, because plywood is a material that protects against drafts and excess moisture and is warmer compared to the same mesh.

Assembling a cage from plywood is done in two ways:
- frame;
- in the form of a box.
The second option implies the absence of a “skeleton” of the structure; the plywood sheets are fastened at the joints directly to each other, using special parts.
To complete the intended design, we will need the following materials:
- sheets of durable plywood;
- mesh mesh with hole parameters 1.6x2.4;
- self-tapping screws;
- wooden corners;
- construction tools.

Let's start with step-by-step instructions.
Step 1. Cut out the parts
From the sheets of multilayer and thick plywood you have, you need to cut out parts with the following parameters:
- 2 pieces of 35x20 centimeters for the sides;
- 1 piece 70x35 centimeters for the ceiling;
- 1 piece 70x20 centimeters for the back wall.

In the side parts of the cell, passage holes are drilled, the diameter of which is about three centimeters, in order to pass into the cell:
- lighting;
- ventilation system.
Step 2. Disinfect the parts
The plywood sheets are treated with antiseptics; if desired, a special varnish is also applied to protect the sheets from rotting, insect infestation, odor and water absorption, etc.
Step 3. Assembling the side walls
The structure is assembled using corners made of wood, as well as screws and nails. To further strengthen the structure and at the same time coat the joint gaps, it would be good to additionally glue the sheets in the openings.

Step 4. Attach the floor and front wall
Let's take a mesh and cut out a part from it that plays the role of a floor. The size of the part will be approximately 70x35 centimeters. After the part is received, using a construction stapler, we attach it to the plywood in the place where the floor is supposed to be located. We also cut out the mesh fabric for the front wall. We install it in the same way as the floor and cut a square hole large enough to stick your hand inside and grab the bird the farmer needs.
Step 5. Install the door
We equip awnings, hooks and attach a mesh door. That's it, the plywood cage is ready.
Quail cage made from vegetable plastic boxes
There is another economical option for creating an ergonomic cage for quails, especially suitable for farms that sell vegetables, fruits, seedlings, etc. It consists of connecting several plastic lattice boxes into a cage.

The benefits of plastic are obvious to many experienced farmers. They are:
- ease of cleaning the material;
- long service life;
- strength and lightness at the same time.
Step 1. Preparatory stage
To assemble such an extraordinary quail cage with your own hands, you will need:
- 3 plastic boxes of different sizes;
- tools.
We take three plastic boxes, one larger, the other two smaller. At the top of each we cut off the protruding corners.
Step 2. Assembling the frame
We install the large box with the bottom part in one of the small boxes. Cover it with the second one on top.
To make the two steps described as easy as they are now read, select boxes with the same perimeter. Otherwise, you will have to stuff a box that is too big into a box that is too small and vice versa.
We connect the resulting parts with metal wire, which we wrap tightly with pliers.
Step 3. Making the roof
In the bottom of the top box, that is, the roof of the structure, we make a cut along three of the four sides. We bend the resulting roof towards the uncut part at any time when we need to pull out one of our charges or put him inside. The opening sides can be equipped with wire hooks.

Plastic is a hygienic, lightweight and durable material
Step 4. Install feeders and drinkers
Feeders and drinkers in plastic cages are attached to the outside, so you will have to manually expand the cells of the box so that the birds can freely stick their heads through them.
Now that we have told you how to make cages for 20 or fewer heads, it is worth considering the option that describes a large battery cage, suitable for farms seriously involved in quail breeding.
Battery cage for breeding more than 50 heads of quails
So let's get started doing this. most interesting option cells. Making it is no more difficult than the previously presented options. The only difference is that instead of wood it is better to take a metal profile, since total weight design, and even with chicks inside, will be very impressive.

Step 1. Prepare materials
The materials we need to build a universal battery cage for a large number of quails are as follows:
- metal profile;
- welded wire grating;
- faeces trays;
- plywood;
- metal slats;
- galvanized iron;
- construction tools.
Step 2. Assembling the frame
We cut out 6 racks from a metal profile, the length of which is about 165-170 centimeters.
We attach the racks to each other with metal slats so that they are approximately the same distance from each other. Using slats, it is necessary to visually form 6 identical cells, three on each side of the frame, inside which the quails will then be placed. The length of each cell will be 70 centimeters, width – 60 centimeters.
The optimal number of tiers for a battery cage is no more than four. The density of birds per cell is approximately 30 birds, since more will already feel severe discomfort and tightness.
The first tier of the battery cage should be located at a height of at least 80 centimeters from the floor, since quails are very susceptible to colds due to circulating drafts.
Step 3. Install the pallets
Under each of the proposed cells we weld metal corner holders, inside of which we install pallets. There should be six pallets in total; you can install purchased options inside, or you can cut and bend galvanized iron yourself so that the sheet takes the shape of a convenient pallet.

Step 4. Making the side walls
The side walls of the cells are made of welded metal lattice. You can take a ready-made one, or you can weld it yourself from wire. There should be nine wall plates in total. Mount them on the sides of the battery cage and along its interior to separate the bird houses from each other.
Step 5. Making the front walls
In battery cages, feeders and drinkers are attached from the outside, so we also make the front wall from a welded lattice with large cells, so that the bird can consume food and water by sticking its head out. The number of front walls is six pieces. It is better to make them not welded, but hinged, so that they act as doors through which you can place or add birds inside the room at any time.
Step 6. Making the roof
The roof of the cells is made of welded lattice. Trays for feces are never placed directly on it; a special space is left for them between the levels.

Step 7. Install the floor
The floor of the cage is assembled from a fine-mesh welded grid, located at an angle of 10 degrees to the floor, ending with a egg collector.
Since metal wire is thinner and harder than mesh, it is best to line the egg collector with plastic or put a softening lining inside.
Step 8: Increase Resilience
To give the structure additional stability, it is best to secure the entire back wall battery cages to the wall of the barn or other building inside which it will be located. This will protect the quail from falling and dying, and will also allow you not to be careful when cleaning the pallets and adding food.
So, the quail battery cage is ready! Anyone can make it, but only a farmer who is serious about raising quails needs it.
Feeders and drinkers
Feeders and drinkers for quail cages are quite simple to make. So, if you plan to place them outside the cages, the materials you need may be:
- plastic pipes;
- galvanized iron;
- plywood, etc.
In the case of pipes, everything is very simple. Plastic is a universal and hygienic material. Cut the pipe in half vertically and get the perfect feeder or drinker, from which no water will spill or spill a large amount of food.

You can make a feeder yourself from galvanized iron by welding it in a trough, into which water is poured or food is poured. The same can be done with plywood, using self-tapping screws or nails, but it is no longer advisable to pour water into such a vessel, because over time the wood fibers will completely absorb it, swell and deteriorate.
As automatic options installed inside the cage, homemade nipple drinkers made from buckets, bottles and other containers are used.

You can make an automatic drinker by placing a water bottle with holes in the roof upside down in a container on stands. As the birds drink it from the plate, the water will flow again and fill the vacated space.
Feeders are made in the same way. The bucket is lowered into a tray alone and v-shaped cuts are made on its bottom. The food enters the pan gradually and the birds are always full. The advantage of this method is that there is no need to constantly add water and food. With automatic feeding accessories, you can look into the birds’ cage no more than once a week.
Feeding quails at home
Find out all about proper diet for quails kept at home! Industrial feed and feed own production, nuances of feeding young animals. How to feed quails in winter? By the way, you can read a separate article on our portal.
Lighting and heating
It is most logical to arrange lighting and heating inside cells of any type using incandescent lamps. The following heating options are also available:
- wood or coal;
- gas;
- electric.
As we understand, the cost of electricity is very high, so it is better to give preference to stoves, gas or wood-coal.

This is only relevant for farms with large rooms for quails that need to be heated with something more powerful than lamps. The temperature inside the cage house must be maintained at a specific temperature, so it is better to get a temperature sensor or at least a thermometer.
If the cells are heated without the help of lamps, use LED lighting. Bright light bulbs in a row will illuminate all the corners of the quail's rooms and at the same time consume minimum quantity energy.

Let's sum it up
The options for constructing quail cages described in the article are simple; every willing farmer who is determined to engage in poultry farming can handle them.
Quails are birds that cause minimal trouble to their owners. Among other things, they are not only profitable, but also interesting to cultivate. The benefits of breeding these birds include:
- pure meat product;
- a delicacy in the form of tiny eggs;
- soft feather;
- money for the sale of individuals or the final product.
By constructing a cage and providing the birds with ideal living conditions, you will maximize profits. We wish you good luck in this field!
Video - DIY quail cage