During macro photography, the depth of field can be so shallow that it is not possible to get enough of the subject in focus. Even with a closed aperture, macro photography significantly limits depth of field. Today we'll look at combining photography with special Photoshop techniques to enhance depth of field beyond what can be achieved in a single photo.
Preparation
What we'll be doing today is called staking. This technique consists of taking several frames at different focusing distances and then combining them. That is, we will take several photographs focused on different areas of the subject, and then combine these areas in one frame. The result will be a photograph in which much more is in focus than could be captured in one shot.
We chose the camera Olympus OM-D, Micro 4:3 standard with Nikon 55 mm lens. Micro-NIKKOR connected using an adapter. This lens has effective focal length 110 mm. taking into account the crop factor 2x. Creating a shot where the clock is completely in focus will require using the stacking technique we're looking at.
This technique is especially useful when using macro lenses. I chose an old Nikon 55mm lens. Micro-NIKKOR f/3.5 and Olympus OM-D camera. This kit takes incredibly sharp macro photos. I used an adapter to mount Nikon lens on OM-D. The only thing to note is that the OM-D is a Micro 4:3 camera with a 2x crop factor, doubling the effective focal length of our lens to 110mm. This long focal length also reduces depth of field, so the stacking technique is especially useful in this situation.
I chose the clock to illustrate the possibilities of increasing depth of field using stacking. Since the clock is on the table, the scene has some depth. From the closest point of the bracelet to the farthest part of it, we cannot place all the watches in the sharpness zone in one shot. Let's get acquainted with the possibilities of staking.
I wanted to illuminate the clock and used inexpensive spotlights (instead of flashes) to do this, carefully placing them around the set. I used blue fabric for maximum contrast between the subject and the background, and a small piece of Velcro tape to hold the clock in position. This is an inexpensive watch, but it is quite suitable for our lesson.

Simple spotlights and a piece of blue fabric as a backdrop allowed us to build a simple set on the kitchen table.
Finally, whenever possible, I highly recommend shooting with a camera synced to a computer. Our camera does not support this, but using a computer with a synchronized camera allows you to view the images you shoot directly on your computer monitor. This will ensure that you get the part of the frame you want in focus.
Filming
To demonstrate the benefits of staking, I used a clock as an object. When the watch has been mounted, as you often see in advertising photographs, from the near edge of its bracelet to the far edge, the image has noticeable depth. As I mentioned earlier, the long focal length of the lens and macro mode result in a shorter depth of field, which is why using the stacking technique produces great results.

This photo shows that our depth of field is too shallow. At the end of the lesson, we will demonstrate how the stacking technique allows you to get more than fits into the focus.
After some consultation and testing, I decided that six photos would be needed to properly cover the depth of field I wanted to achieve. My goal was to take separate frames with different parts of the clock in focus, and then combine them in post-production.

In the end, I made sure that I took six shots with different parts of the clock in focus. Using stacking in Photoshop will give me one merged file with all the clocks in focus.
When taking the shots needed to combine, I started by focusing on the front edge of the watch, gradually moving the focus towards the back of it. I took two shots of the front piece of the bracelet, two shots of the dial, and then two shots of the back of the bracelet.

The first frame taken also shows that each frame does not include all the clocks in focus. Here we see in sharp focus only the front fragment of the watch bracelet.
Once again, the idea is that each frame alone does not provide enough depth of field, but six frames combined can give us unlimited depth of field. Getting a sufficient number of frames during the shooting process - necessary condition for successful post-processing. The photos were taken at f/5.6 to add clarity and some depth of field to the original images, but even using larger apertures in macro photography is often not enough to increase the depth of field to an acceptable level.
You should use a tripod and try to minimize camera movement while shooting a series of shots. Photoshop has great capabilities in coordinating our images, but we should always strive to get the original images as close as possible high quality and consistency already during shooting.
Post-processing
Among many other vital options, Photoshop has great stacking capabilities. In just a few minutes, we can assemble the final image with increased depth of field.
First of all, let’s make sure that all the necessary photos are on the computer and are in one folder. I place each series of photos to be combined in its own separate folder.
Next, launch Photoshop and we can begin the staking process. From the File menu, go to Automate, and then select Photomerge. This command will open all our photos in one document in Photoshop.

From the Photo Montage menu, select Auto for the layout, and make sure none of the squares at the bottom are checked.
When the Photo Montage menu appears, select the folder where your photos are stored. Leave the checkbox set to "Auto" in the left menu, and then uncheck the bottom boxes if they are checked. After clicking the “OK” button, Photoshop will go to work, reconcile and combine the images into one document.
It may take a few minutes for Photoshop to work, but once it's finished you'll have a new document with all your original images arranged in separate layers. There is only one step left to obtain the merged image.
First, select all layers. You can select any layer and then press Ctrl + A to select them all (on a Mac, instead of Ctrl + A, press Command + A, in both cases you mean the English "A"), or you can hold down the Ctrl button and click on each layer to select them all. Once all layers are selected, go to the Edit menu and select Auto Blend Layers.

Making sure all our layers are selected, use Edit > Auto Blend Layers to open the stacking menu. Leave a checkmark on “Stack Images” and it will automatically carry out the stacking process.
From the Auto Blend Layers menu, select Stack Images. Click "OK" again and Photoshop will do everything. necessary work on staking for us. Once the processing is complete, you will see its results both in the form of the final image and in the form of layers on the right in the Photoshop window. You'll see that the masks have automatically aligned and Photoshop has intelligently chosen which parts of the layers to mask out in the final image.

The final image is good example staking opportunities. Compared to previous images, here the entire clock is in focus, rather than small fragments. Stacking allows us to increase depth of field using computer processing.

Photoshop relies on masks to highlight the focused parts of each image. Automatic processing perfectly prepared the image layers with drawn masks. Photoshop intelligently selected the focused parts from the original photos and then combined them.
Photoshop does almost all the work related to the staking process. The only downside is that if you're unhappy with the result, it's difficult to set up the automatic evaluation it performs. However, I think the built-in capabilities are extremely powerful and may be the best way to increase depth of field using computer processing.
Conclusion
Stacking is a unique technology that allows us to achieve seemingly incredible depth of field. With a series of photos and a little post-processing magic in Photoshop, achieving additional depth of field is easily accomplished with just a few clicks. Photoshop is an advanced application that can intelligently combine our images and automatically create and apply masks.
During macro photography, the depth of field can be so shallow that it is not possible to get enough of the subject in focus. Even with a closed aperture, macro photography significantly limits depth of field. Today we'll look at combining photography with special Photoshop techniques to enhance depth of field beyond what can be achieved in a single photo.
Preparation
What we'll be doing today is called staking. This technique consists of taking several frames at different focusing distances and then combining them. That is, we will take several photographs focused on different areas of the subject, and then combine these areas in one frame. The result will be a photograph in which much more is in focus than could be captured in one shot.
We chose an Olympus OM-D camera, Micro 4:3 standard, with a Nikon 55mm lens. Micro-NIKKOR connected using an adapter. This lens has an effective focal length of 110mm. taking into account the crop factor 2x. Creating a shot where the clock is completely in focus will require using the stacking technique we're looking at.
This technique is especially useful when using macro lenses. I chose an old Nikon 55mm lens. Micro-NIKKOR f/3.5 and Olympus OM-D camera. This kit takes incredibly sharp macro photos. I used an adapter to mount a Nikon lens on the OM-D. The only thing to note is that the OM-D is a Micro 4:3 camera with a 2x crop factor, doubling the effective focal length of our lens to 110mm. This long focal length also reduces depth of field, so the stacking technique is especially useful in this situation.
I chose the clock to illustrate the possibilities of increasing depth of field using stacking. Since the clock is on the table, the scene has some depth. From the closest point of the bracelet to the farthest part of it, we cannot place all the watches in the sharpness zone in one shot. Let's get acquainted with the possibilities of staking.
I wanted to illuminate the clock and used inexpensive spotlights (instead of flashes) to do this, carefully placing them around the set. I used blue fabric for maximum contrast between the subject and the background, and a small piece of Velcro tape to hold the clock in position. This is an inexpensive watch, but it is quite suitable for our lesson.


This photo shows that our depth of field is too shallow. At the end of the lesson, we will demonstrate how the stacking technique allows you to get more than fits into the focus.
After some consultation and testing, I decided that six photos would be needed to properly cover the depth of field I wanted to achieve. My goal was to take separate frames with different parts of the clock in focus, and then combine them in post-production.

In the end, I made sure that I took six shots with different parts of the clock in focus. Using stacking in Photoshop will give me one merged file with all the clocks in focus.
When taking the shots needed to combine, I started by focusing on the front edge of the watch, gradually moving the focus towards the back of it. I took two shots of the front piece of the bracelet, two shots of the dial, and then two shots of the back of the bracelet.

The first frame taken also shows that each frame does not include all the clocks in focus. Here we see in sharp focus only the front fragment of the watch bracelet.
Once again, the idea is that each frame alone does not provide enough depth of field, but six frames combined can give us unlimited depth of field. Obtaining a sufficient number of frames during the shooting process is a necessary condition for successful post-processing. The photos were taken at f/5.6 to add clarity and some depth of field to the original images, but even using larger apertures in macro photography is often not enough to increase depth of field to an acceptable level.
You should use a tripod and try to minimize camera movement while shooting a series of shots. Photoshop has great capabilities in coordinating our images, but we should always strive to obtain source images of the highest possible quality and consistency during shooting.
Post-processing
Among many other vital options, Photoshop has great stacking capabilities. In just a few minutes, we can assemble the final image with increased depth of field.
First of all, let’s make sure that all the necessary photos are on the computer and are in one folder. I place each series of photos to be combined in its own separate folder.
Next, launch Photoshop and we can begin the staking process. From the File menu, go to Automate, and then select Photomerge. This command will open all our photos in one document in Photoshop.

From the Photo Montage menu, select Auto for the layout, and make sure none of the squares at the bottom are checked.
When the Photo Montage menu appears, select the folder where your photos are stored. Leave the checkbox set to "Auto" in the left menu, and then uncheck the bottom boxes if they are checked. After clicking the “OK” button, Photoshop will go to work, reconcile and combine the images into one document.
It may take a few minutes for Photoshop to work, but once it's finished you'll have a new document with all your original images arranged in separate layers. There is only one step left to obtain the merged image.
First, select all layers. You can select any layer and then press Ctrl + A to select them all (on a Mac, instead of Ctrl + A, press Command + A, in both cases you mean the English "A"), or you can hold down the Ctrl button and click on each layer to select them all. Once all layers are selected, go to the Edit menu and select Auto Blend Layers.

Making sure all our layers are selected, use Edit > Auto Blend Layers to open the stacking menu. Leave a checkmark on “Stack Images” and it will automatically carry out the stacking process.
From the Auto Blend Layers menu, select Stack Images. Click OK again and Photoshop will do all the necessary staking work for us. Once the processing is complete, you will see its results both in the form of the final image and in the form of layers on the right in the Photoshop window. You'll see that the masks have automatically aligned and Photoshop has intelligently chosen which parts of the layers to mask out in the final image.

The resulting image is a good example of staking capabilities. Compared to previous images, here the entire clock is in focus, rather than small fragments. Stacking allows us to increase depth of field using computer processing.

Photoshop relies on masks to highlight the focused parts of each image. Automatic processing perfectly prepared the image layers with drawn masks. Photoshop intelligently selected the focused parts from the original photos and then combined them.
Photoshop does almost all the work related to the staking process. The only downside is that if you're unhappy with the result, it's difficult to set up the automatic evaluation it performs. However, I think the built-in capabilities are extremely powerful and may be the best way to increase depth of field using computer processing.
Conclusion
Stacking is a unique technology that allows us to achieve seemingly incredible depth of field. With a series of photos and a little post-processing magic in Photoshop, achieving additional depth of field is easily accomplished with just a few clicks. Photoshop is an advanced application that can intelligently combine our images and automatically create and apply masks.
A beautiful picture just to attract attention.
Technology staking - the addition of several frames of the same plot has been known for a long time. Essentially, this is the same multiple exposure, but aimed at solving technical rather than creative problems.
Today we will briefly classify the different types of staking and look at one of them in detail - stacking multiple frames to reduce noise and increase detail .
Staking exists in several forms.
Best known to landscape painters stacking with exposure bracketing - HDR . If the scene is very contrasty and does not fit into the range of brightness recorded by the sensor, then several frames are taken with different exposure compensation relative to the starting point, which are added to an image with a large dynamic range. Further, such a photograph can in different ways(for example, due to tonemapping) is compressed to a normal dynamic range adequate for the output device (monitor, printer), but this image already preserves the entire brightness range of the scene.

One of my photographs of Prague, HDR from 3 frames (the contrast of the morning cityscape did not fit into the DD of the Canon 5D sensor)
Also known to those involved in macro photography stacking with focus bracketing . If the object does not fit into the depth of field, and diffraction does not allow the aperture to be clamped, then several frames are taken with refocusing (or with the camera shifting in depth relative to the object) and combine them into one using special software. The result is a completely sharp subject (within the range of the refocus made).

The ring does not completely fit into the depth of field at reasonable apertures; stacking of two frames with different focusing is used
There are also more exotic types of staking. For example, stacking frames with different white balance (usually converted from a single RAW) for scenes with mixed lighting. Or adding black and white frames taken with different color filters to obtain a color photograph (a method that was also used by Prokudin-Gorsky).
There are several other types of stacking, in which the parameters and shooting conditions are the same for all frames, but There is a difference in shooting time between photos in a series .
- Addition of continuous shooting frames in order to obtain a storyboard of the phases of movement of the object (for example, in sports). The same type of stacking essentially includes adding time-lapse frames to obtain the effect of star tracks in the sky.

About 60 frames, shot over an hour, were stacked using the StarStax program (the technology is described)
-Stack Frames to Increase Exposure (pixel brightness values of several photographs are added together). For example, several frames with a short shutter speed can be added together to obtain an analogue of the total shutter speed, and the amount of dynamic noise will be less than when shooting with a similar single continuous shutter speed. This method is often used in astrophotography when the luminosity of the celestial object is very low, and a frame with a shutter speed of several tens of minutes will be too susceptible to thermal and photon noise, especially if the infrared filter is removed from the sensor.
- Stacking to reduce noise and increase detail. In this case, the brightness value of each pixel is calculated by averaging its brightness values over all frames. Due to this, visible noise is reduced, and even detail increases.
This material is dedicated to such stacking.
Why can all this be useful to us?
There are hopeless situations when the lighting conditions are not the best, you don’t have a tripod with you, but you need a photograph. Have to raise ISO to get enough short shutter speed, there will be a lot of noise.
Sometimes photographic equipment does not provide the desired noise level even at low ISO values, especially if aggressive color and contrast processing is used, profiles are used, etc.
Few people think that the problem can be solved quite easily. Almost at the touch of a button on the camera. And after that - literally in a few clicks during processing.
When shooting, just switch the device to burst mode and shoot a burst of ten frames. Modern mirrorless cameras have good speed, for example, my E-M5 allows you to get 8-9 frames in a second (that is, essentially with a single shutter press). This will be quite enough for stacking; however, if we shoot handheld, the frame itself as a whole and individual objects will not have time to move much.
So, to show you how it works, I went out onto the balcony and fired a series of shots at the first thing I saw (of course, in M mode, so that the camera did not change the shooting parameters). The plot does not carry any semantic meaning, the first thing that came across for demonstration :)
Converted 7 original RAW to typhus using RPP. As you can see from the previews, I pulled up the exposure very decently (of course, in this scene it would be advisable to use exposure bracketing and stitch HDR, but I need to demonstrate stacking in order to reduce noise, so all frames are exposed equally).

After conversion, the picture looks pretty deplorable, especially in the shadows, although the photo was taken at ISO 200. The fact is that in addition to strong exposure compensation, I also applied a film simulation profile and greatly increased the saturation.

1. Open all received typhus in Photoshop.
2. In the menu File select an item Scripts -> Load Files into Stack...

3. In the window that opens, click the button Add Open Files and click OK.
4. We get a document where all the frames of the series are stacked on top of each other in the form of layers. To avoid cluttering up your memory and workspace, close the source files.
5. Since the shots were taken handheld and not on a tripod, they are framed differently and need to be aligned with each other. The built-in tools of Photoshop do a good job of this. Let's go to the menu Edit -> Auto-Align Layers :

If the frames are not very different, then usually the auto mode works fine.
6. Now you need to combine all the layers into one smart object, for which we select all the layers and press the right mouse button, select from the drop-down menu Convert to Smart Object .
7. So we have a group of layers that are aligned with each other and combined into a smart object, otherwise - into a Stack, a single group.
For this group, you can apply various modes of mixing and averaging information, which are available in the menu Layer -> Smart Object -> Stack Mode
.

I will not go deeper into studying all the modes now. From the entire list we only need a couple - Mean And Median . However, the difference between them needs to be understood.
Mean - this is common arithmetic mean . That is, the sum of the values of the elements divided by their number. Let's say that in seven layers the brightness values of one pixel vary like this:
5, 7, 3, 9, 4, 6, 5.
Then the arithmetic mean of these values will be approximately 5.6.
Median - This median . This statistical function differs from the arithmetic mean in that it averages not all numbers, but only 1 or 2 values (depending on the even or odd number of elements) located in the middle of the ranked series of all values . In our case, the series will be built like this:
3, 4, 5, 5 , 6, 7, 9
And the median for this series will be the number 5, located in the middle of the series. If there were not 7, but 8 images, then we would take the arithmetic mean of the two median values as the median.
The median compares favorably with the arithmetic mean in that strong single differences do not affect it. Let’s say that in one of the frames a hot pixel suddenly appeared (either a person or a fly flew by, it doesn’t matter), and the brightness of this area jumped from the usual 9 to 20. The median will remain equal to 5. But the arithmetic mean will already become more than 7.
For us, this means that the arithmetic mean of the layers is better at reducing regular noise, while the median copes with this a little worse, but it is more resistant to sudden strong changes in brightness. For example, if there were moving objects in the frame, then the median will leave their trace only in those areas where these objects were present in all frames of the series .
Well, let's apply Mean mode to our stack. This may take a long time, depending on the number and resolution of photos.
Let's compare the results before and after:
As you can see, the noise is almost completely gone.
In terms of detail, the median looks a little better (but there is also more noise there).
Now let's look at the football field:

When using the arithmetic average in the final frame, we received all phases of human movement with the same intensity (100%, divided by the number of frames).
The situation with the median is different - only those parts of the moving guys that were present in the same place in all frames were included in the final frame. Since the guy is in plaid shirt is in different places in all frames, then it is not included in the resulting image at all. And from the guy in red, only those areas that were unchanged in all frames were preserved.
Using the "Median" stacking mode, you can, for example, completely "clear" a street from passers-by or even moving cars without additional software (of course, a sufficient number of frames must be taken so that for each section of the street there is at least one frame in which this there is no car or person in the area).
But now we’re still talking more about noise, so let’s look at a couple more crops (with a slight sharpe):

You can see how much less noise has become. The readability of high-frequency parts, such as wires, has been greatly improved.
This is how, with the help of simple serial shooting and literally 5-minute processing, you can save almost any relatively static frame in difficult conditions.
Based on ten years of prepress experience, I can say with confidence that not even the most advanced noise reduction can cope with noise and preserve details as well as simple stacking of just half a dozen frames does.
Note:
Some modern cameras have the ability to get different types of stacking directly while shooting.
However, the main disadvantage of this implementation is the strict need to shoot from a tripod, while when processing in Photoshop it is possible to combine not perfectly matching images taken in a series handheld.
What this wonderful program can’t do. This is a rare case when a mega-harvester copes well with a thousand tasks. We pay for this with some glitches and freezes during operation and sometimes unstable versions.
For example, version Adobe Photoshop CS6 In terms of staking, it works absolutely correctly. And in the photoshop version Adobe Photoshop CC 2014 From time to time the staking function does not work as expected.
Example of using Adobe Photoshop for staking
So we have two camera images Canon which we did in the previous article. In one frame the focus is on the lens, and in the other on the “body” of the camera itself. Why we did this, I explained again in the previous article.
Now we will stitch these images together.
Both of my images were shot in RAW format, but this is not so important. We open both in Adobe Photoshop without horizon correction, etc. in a RAW converter (this can cause problems when stitching, so shoot well right away). White balance can be set quite well.
Let's go to the menu File->Scripts->Load files into stack
If you just opened the files and immediately went to the menu, then you can move on. If you have made some manipulations in Photoshop, but Photoshop will prompt you to resave the files.
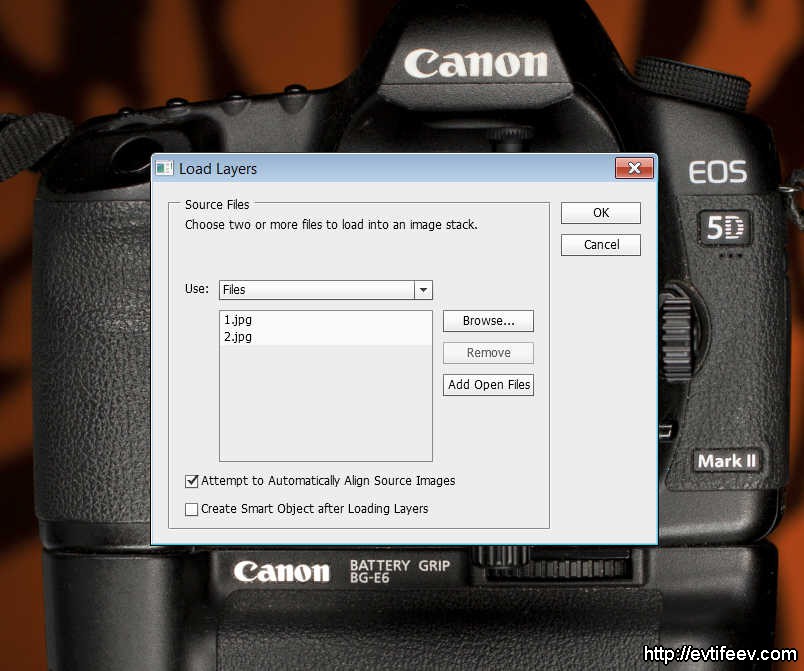
Here we choose "Add opened files", so that Photoshop fills the stacking list with open files (I assume that you only have the images open that you will use for stitching). Your 2 images appear in the list.
Put a tick in the box "Attempt to automatically align source images". This checkbox tells Photoshop that in the process of combining files with one, you need to try to align them in size and other distortions.
If you took pictures carefully, did not shake the tripod and did not change the angle during shooting, then, as a rule, Adobe Photoshop aligns images perfectly.
You click “OK”, Photoshop “thinks” for a while, creates a separate file, loads two of your images there, aligns them in all respects and transfers control back to you.

Be sure to click the layers, turning off the top ones and connecting them. Make sure the object and its blurrier counterpart are properly aligned. They must be the same in size and shape. In real stacking there can be a lot of layers.
If everything is fine, then you select all the layers and go to the menu: Edit->Auto-blend layers->stack

This is the stacking process itself (image stitching).

As you can see, there are two options for stitching images. One is a panorama, i.e. stitching into one long shot. And the second is stacking, focusing stitching.
Someday we will discuss the possibilities of the first point, unknown to the general public, and now further about staking.
Click “OK” and, depending on the size of the files and their number, we get the result quickly or wait for some time.

As a result of the “Auto-blend” function, we received masks for our layers that reveal those places where it is sharp in a given layer and hide those places where it is blurry. This is ideal, but the program may incorrectly identify these places.
Accordingly, those places where it is sharp in the mask are left white to open this part of the layer, and those places where it is blurry are painted over with black, i.e. hidden. As a result of hiding some of the unsharp parts of the upper layer, the sharp parts of the lower layer appear underneath and we see the overall picture, where everything is sharp.
This is the mask Photoshop created for my example.

In this case, the mask reveals the front element of the lens and hides the blurry camera body. The bottom layer mask does the opposite.
Please note that the mask is somewhat “clumsy” and does not exactly follow the shape of the front lens of the lens.
Your job is to analyze what should actually be sharp and adjust the mask if necessary by painting on it with a black and white brush.
Black - completely hides the area
White - completely opens the area
Gray - partially hides. The transparency of the brush can be adjusted.
Well, the resulting frame, which I already posted.

And also here is an example from my practice of subject photography.

Rings made of Damascus steel, having a complex small pattern, which is worked out only by focusing in all possible places and then stitching it into a single frame.
Helicon Focus image stacking software
On our list, this will be the first specialized software product for stacking (stitching images by focus).
Since I am not an affiliated person Helicon Focus, then I can freely write about it.
Firstly, there is a completely working version online Helicon Focus 5.3, which you can try if you wish. When the question arose about the staking program, this was the first thing I did. First I wanted to decide what suits me best: Helicon Focus or its competitor Zerene Stacker.
I will first talk about the version that is online, and then about the newest version Helicon Focus, which I purchased after realizing it was a good product.
The first step is to take several frames of the same subject with focus in different places. Open the folder with frames in Helicon Focus.

First comes the wild joy - on the right there is a list of directories and files, where you can conveniently mark the files that you select for stitching.
Helicon Focus 5.3 already understands RAW files.
But this is where some disappointment sets in - Helicon Focus does not make it possible to set white balance, and without this extremely useful function, the ability to read RAW files turns out to be completely useless for the reason that it is no longer possible to adjust the white balance as a result of stitching using a non-destructive method. the result of stitching is already in best case scenario tiff, not RAW.
However, if you convert files to JPG with the correct white balance, then they can be processed correctly in Helicon Focus 5.3.
The program has three staking options (different mathematical methods that can give results of different quality depending on the plot):

Method A - Weighted Average
Method B - Depth Map
Method C - Pyramid
All three methods are the best that exist today and are usually sufficient. You choose, try, and if the result is not satisfactory, switch to another method. The program works quite quickly.
The program is able to create a 3D model of your object, where you will see how your object on the plane rotates by specified angle along different axes. Interesting feature.

An extremely useful function implemented in the program is image retouching. This is not a retouch traditional sense, and hiding and revealing various parts the selected image on the stitching result. Those. if the program has chosen a sharp section incorrectly somewhere, you can restore justice in one move and take a sharp section from the image in which it seems better to you.

On the right, in the list of images, you switch between the original donor images, and on the left you have two windows, in one the donor image, and in the other the result of stitching.
Using a brush that can be adjusted for hardness, you work on problem areas, visually checking which areas in the donor image are better than the stitching result.
The principle itself remains the same here Adobe Photoshop when using masks, but visually everything is more clear.
In the next “text/ruler” tab, you can add some text to the stitching result, for example, your copyright or a picture of a ruler, which will allow the viewer to appreciate the scale of the image. Very convenient when shooting particularly small insects and details.

Now let's talk about the newest version Helicon Focus 6.2.2.
She greets us even more friendly. We are asked to simply drag and drop the original images into the window.

The built-in example gives a good idea of how the process is organized.

In fact, little has changed in the organization of the process itself (in the demonstration the program hints to us that it is good for photographing minerals).
But in the accompanying program Helicon Remote a useful feature has been added: “Disable live view during shooting”, which allows you to shoot with flash. Otherwise, in LiveView mode, the studio flash would not fire via radio synchronizer.
In addition, it became possible to save projects and return to retouching them later.
Some RAW conversion settings appeared, but I still didn’t understand where to set the white balance. There are only two options: 1) from the camera, 2) automatically.

Both options for installing the BB do not suit me. I want to bet color temperature manually. Maybe I missed something and the developers will correct me.
Helicon Remote
The program comes with an add-on - the program Helicon Remote, which allows you to shoot directly to your computer.

A word from the developer (Alexander Zubritsky):
The program implements two shooting algorithms with stacking, namely:
1) shifting the focusing plane by rotating the focusing ring of the macro lens (works only with autofocus lenses),
2) shifting the focusing plane by linear movement of the carriage of automated macrorails StackShot(manufacturer - company Cognisys) or carriages of homemade rails (a stepper motor produced by Trinamic).
First way has the preferences that there is no need to buy anything additional, it is enough to have any reflex camera(though production is only Canon or Nikon), supporting the function Liveview, and an autofocus lens. In addition, this method allows stacking not only for macro photography, but also for landscapes. The main disadvantage of this method is that it is practically impossible to shift the plane of focus to sufficiently small and identical distances (shift step).
Second way(most often used in real macro photography - here you can very clearly and very accurately implement a linear shift of the plane of focus) has the advantages that it allows you to use not only autofocus macro lenses, but also any scheme - manual focus lenses, inverted lenses, microscopic lenses, etc. .p.). Moreover, in the case of macrorail control StackShot all specified settings in the standard (included with the rails) control unit are blocked, and in return they are in the program itself Helicon Remote the most important settings are set - the start and end points of sharpness, the stacking step size (in mm) and the pause after the shooting step (in seconds). The same settings are set when connecting a stepper motor Trinamic.
Switching between these modes (first and second) in the program occurs semi-automatically - when connecting macrorails StackShot the following message appears in the program interface: StackShot and in addition you need to put a tick in front of the window "Stack Shot"(only in latest version programs)
I’ll add on my own that I liked that LiveView in the program Helicon Remote made to fill the entire screen, which at 27" gives a very good overview.
Helicon Focus Program Summary
Program Helicon Focus very nimble, stable and ergonomically designed. In order to start working with it, you don’t even need to read the instructions. The program produces good staking results.
There are a couple of disadvantages - it is impossible to set white balance for RAW Files that make their use pointless.
Secondly, the program can work together with a satellite program Helicon Remote, which allows you to control the process of shooting images for the stack, but for some reason does not use information about the position of the carriage of the electric focusing rails with which it works (the rails are connected via USB).
The potential of the program is very great, I hope it will be realized in the future.
On at the moment It turns out quite well too.

Zenere Stacker image stacking software
Zener Stacker is an analogue Helicon Focus and the operating principle is the same here.

I installed the latest version on March 12, 2015 Zener Stacker 1.04 Build T201411272115. It's easy to get confused in such version numbering...
It is worth noting that as Helicon Focus, so Zerene Stacker offer a free trial mode.
Those. You can install the product for yourself and try it for 30 days. If you like it, then buy it.
Menu in Zerene Stacker organized classically. “File”, “Edit”, “Stack”, “Tools”... Needless to say, the option Helicon Focus seems more modern, where files can simply be dragged and dropped into the window.

By the way, it is worth noting one important detail. Helicon Focus is being developed in Ukraine by a group of programmers, and Zerene Stacker in the USA, by one person, recognized in the USA as a “makrushnik” guru, Rik Littlefield. You can search for his work in the forum, where he is constantly present.
Perhaps Rick is not strong enough to create a modern interface in addition to the part of the program directly responsible for staking. Well, this is not the main thing in such programs if there is an advantage in the quality of staking. Let's see if it exists...

I stacked my stack in several ways (PMax and DMap with different parameters).
IN Zerene Stacker You need to pay attention to the bottom window during the retouching process.

Here you will see a stack assembled by two different methods PMax(pyramid method, available in Helicon Focus) And DMap(depth map, also available in Helicon Focus). One collects smooth gradients better, while the other collects fine contrasting details. Both of these images can be used as donor images when retouching the resulting image. This allows you to treat small fibers on insects and so on. small contrasting details.
IN Helicon Focus You can also use the resulting images, constructed using different methods, as the initial ones. To do this, select them in the “Use result” menu

During the retouching process Zener Stacker you can navigate through the source images by holding down the key SHIFT and search for the most suitable donor image.
In addition, through the menu, in the tab Preferences there are settings for the method DMap, which allow you to better work out the contrasting boundaries of objects (you can create several resulting images and use all of them in the retouching process).

Retouching is organized similarly Helicon Focus. On the right in the list, a donor image is selected and its areas can be applied with a brush to the resulting image.
There are brush adjustments. Only in Zerene Stacker additional brushes are hidden under the “Pro” label and using the “Pro” brush begins a 30-day trial of the brush in the regular version of the program. Then the function is disabled.

Here is a similar menu from Helicon Focus.

The program also allows you to manage electric rails Stackshot, but I couldn’t test this function because... It belongs to the Pro version, but I have the regular one.
Summary of Zerene Stacker
1. The program works quite well. Builds a stack efficiently
2. I did not find any noticeable advantages in stack building compared to Helicon Focus.
3. The programs are implemented so similar that it’s obvious that someone did it with an eye on the other. For us, this is important only in terms of the convenience of moving from one program to another if it is necessary to combine results. And it is in this regard that I am glad that the programs are similar.
I'm surprised that neither Zerene Stacker, neither in Helicon Focus Reducing/enlarging an image using Ctrl+"+" is not implemented. In my opinion, it made sense to adopt Photoshop shortcuts. Moreover, Zerene-I finally adopted the increase/decrease of the brush using square brackets.
Program interface Combine ZP looks like this:


After this, an image of the first file appears in the empty field below.
2) Alignment of downloaded files
Select in the taskbar window Align and Balance Used Frames(usually it is already installed by default) and press the green key GO:
3) Stitching aligned files Select in the taskbar window Do Stack and press the green key GO:
4) Saving stitched files
To save the resulting file with stitched images, you must press the key SAVE.
In general, the program produces good results.

But with some artifacts. Also, the program is not free from “glitches”. It crashed several times while working.
If we talk only about stacking, then the artifacts of the shooting object itself are the same as those of commercial programs.


But there is no retouching function here.
Addition on the Combine ZP program from blog reader Klapauciy
A few notes about CombineZP, maybe it will help novice users, because it is not the most convenient program to use.
It has two alignment modes (Align and Balance Used Frames), Quick (and Thorough. Fast is selected by default, but gives the worst result.
There are several staking algorithms in it - five, if I'm not mistaken. Basically, the default Do Stack gives best result in most cases, but sometimes it is worth trying others. You can run everything at once (All Methods item) and select the best one from the results.
In general, there are quite a lot of fine settings and modes. For example, alignment can be done manually, setting control points yourself. Etc. But all the users I know only use the basic ones automatic modes. I'm no exception
A couple of unobvious disadvantages. The main thing is that you cannot change the sequence of pack assembly; it is specified only by the alphabetical order of the names of the input files. The situation when they shot a series, looked at it, discovered that there was a missing layer in the middle (or simply got a defect), and simply completed the missing frame - it doesn’t work. You have to rename the files in such a way as to restore the focusing order. On long episodes it's depressing.
Second, less sad, staking can only be started once. Theoretically, you can then load and process the next batch, but in practice, the program always crashes. So after each build you need to exit the program and run it again.
Brief Summary of Combine ZP
I'm glad they are like that free programs exist and give amateurs the opportunity to try the possibilities of image stitching, even using advanced methods. With due diligence, you can get results no worse than using commercial programs (albeit with the use of Adobe Photoshop for retouching images). On the other hand, if you look at this program from the point of view of a professional, then it is more profitable to buy a commercial one right away. It is not that expensive and it is much more convenient to work in it.
Summary of software methods for image stitching
All three methods allow you to achieve high results. Adobe Photoshop is the cheapest, most understandable, but also the most inconvenient staking method.
Helicon Focus And Zerene Stacker provide similar tools for working with the stack. The quality of their stitching seemed to me to be close and more dependent on the experience of the stitcher and what parameters he would set.
Helicon Focus definitely more convenient in terms of work.
Both programs lack the implementation of the “ruler” function. IN Zener Stacker it simply doesn’t exist, but in Helicon Focus her presence is rather formal. I would like to be able to set the starting and ending points of an object in order to enter its size, and then the program could give the dimensions to all other objects in the frame simply by drawing a ruler, as in medical programs.
But in general, we have more than enough tools to create and create...
Don't be limited by your imagination. The stacking method can be used not only in macro photography, but also in landscape, expanding the boundaries of what is possible!

here I shot the grass in the foreground separately and “stitched it” with the rocks in the background. This is Cliffs of Moher
In this lesson you will learn how to process evening and night photographs taken with ordinary inexpensive digital camera. Well, the photographs taken SLR camera, in this way you can almost completely get rid of noise.

The effectiveness of this method surpasses all known noise reduction plugins. The only condition: you need to shoot stationary objects; this method is not suitable for portraits. Although...maybe there will be enthusiasts, because at the dawn of photography, portraits were shot with shutter speeds of several minutes!
So let's get started.
Step 1. We take several shots of the object we need. In this case, it is best to use the burst mode in the camera (read the instructions for the camera). I took 10 frames, you can take more.
An inexpensive Canon Powershot A580 camera was used. The shooting was carried out handheld, and the maximum sensitivity was specially set to ISO 1600. At this value, noise literally filled the entire image. One of the frames is shown below.
Step 2. Go to the menu File - Scripts - Load files onto stack(File - Scripts - Load files into stack).

A dialog box will appear.

Click Review to select the files you want, select your captured images and click OK. Place a tick in the checkbox Automatically align images(Attempt to automatically Align Source Images).

Now each image will open as a layer in one file.

The image turned out like this, with transparent areas around the edges, since the shooting was done handheld and not from a tripod (for the purity of the experiment). These areas appeared as a result of automatic layer alignment.

Step 3. Now right-click on the name of the top layer and in the drop-down list click Select Similar Layers.

Now you have all the layers selected.

Step 4. Right-click on the layers palette and select Convert to Smart Object(Convert to smart-object)

Now we only have the smart object left in the layers palette. All layers will be inside it.

Since the noise of a camera matrix is random in nature, that is, different pixels make noise from frame to frame, it is quite logical that by averaging the values of a sample of pixels from several images, noise reduction can be achieved, and with a slight loss of image detail. This is what we see in the final picture. Further correction is at your discretion. Just remember to rasterize the smart object, otherwise many of the tools will become unavailable. This can also be done by right-clicking in the layers palette and selecting the command Rasterize the layer.
To compare the effectiveness of this method, I present a picture that was processed with the Noise Ninja plugin (one of the best plugins for combating noise).

I think that after studying this lesson, you will discover not only new capabilities of Adobe Photoshop, but also your camera.
I wish you all creative success!
Evgeny Kartashov.