The amount of built-in memory is something that many smartphone manufacturers save on. This is especially true for budget devices based on operating system Android. In such budget models can be 8, 4 or 2 gigabytes of memory. You also need to take into account that part of this memory will be occupied by files of the operating system itself. As a result, users end up with a device with very little free space to install applications.
But, there is a solution to this problem. If you have an Android operating system version 2.2 or higher, then you can use the application transfer feature. This will free up some space and allow you to install new applications. If you are interested, then you have come to the right place. In this article we will talk about how to transfer applications to a memory card on Android.
Step #1: Open Settings and go to Applications.
First of all, you need to open Android settings and go to the “Application Manager” section. In some firmware, this settings section may simply be called “Applications”.
Step #2: Open the desired application.
After going to the “Application Manager” section, you will see a list of all installed applications. Here you need to find the application that you want to transfer to the memory card and open it.

Step No. 3. Transfer the application to the memory card.
After selecting an application from the list, you should see a page with information about this application. Here you can see how much memory this application takes up, as well as get other information.
In order to transfer the application to a memory card, you need to click on the “To SD memory card” button. In other firmware, this button may be called “Move to SD card” or something else. But the meaning is the same – transfer of the application.

Pay attention! In some cases, the app transfer button is missing. This means that this application cannot be transferred. Select another application from the list.
Step #4: Wait until the application transfer is completed.
After clicking on the application transfer button, the operating system will begin to copy data from the device’s built-in memory to the memory card. During this time, the transfer button will be unavailable.

After a while, the “Move to device memory” message will appear on the transfer button. This means that the application transfer is complete and you can use it.
Mass transfer of applications on Android.
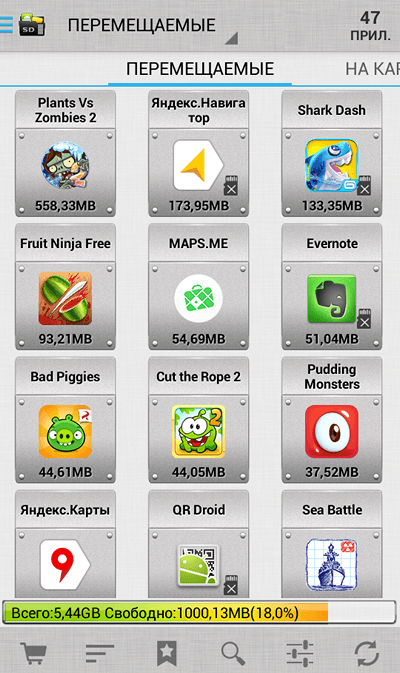
This application sorts all adopted applications into three categories:
- Movable (applications that can be moved to a memory card and back);
- On the SD card (applications that were previously transferred to the memory card);
- In the phone (applications that are located in the phone’s built-in memory);
This sorting of installed applications allows you to quickly figure out which applications can be transferred and which cannot. You can also quickly go from the program to the application page in the “Application Manager” and actually transfer the application, as described above.
Today we will find out how to save applications without any services, copy music, photos, videos to an SD memory card in Android 6. The complexity of this action lies in the different handling of the memory card in devices with Android 5 and 6.
First, let's try to make a copy of the application without any root or special applications. For example, the same Titanium Backup requires superuser rights. But what if we need a copy of an application that has already been updated on the market and has advertising or refuses to work normally. In this case, it would be good to save the old application to your personal archive before resetting it. Of course, you can find applications of the required version in numerous directories like , but for one or two applications I do not do this. I keep copies.
How to transfer files to a memory card in Android 6
Let's transfer all the data that, by default, is stored on internal memory smartphone/tablet to a memory card. Let's make our own archive with music, photos. Yes, Android 5, everything was easy and simple. Starting from the fifth version and in the sixth version of Android, saving to a memory card has changed due to Android’s very attitude towards using this very card.
For example, just create a folder on SD from Explorer There is no way to use the map - there are no appropriate permissions. But let’s not go deeper into the process; the result is important to us.
Let's try the following:
We get access to write to the memory card.
Copy the application to the memory card. We copy any files to an SD memory card.
How to access recording on an external SD memory card in Android 6
For work we needTotal Commander. Can be used ES conductor or any other. To record to a memory card in the Android 6 system, do the following:

Go to the menu Settings. Finding the point All applications. In the section All there will definitely be a line like Documents. We are interested in exactly what I have highlighted. Go to the application settings and activate it. That's it, the preparation is complete. Let's move on to the second stage.
Copy applications to the memory card
Total Commander is convenient because it displays a list of installed applications. To be fair, I note that ES Explorer also does this, as I wrote about in the post.
So, let's choose My applications and among them the necessary. Long press to call up the menu in which we are looking for the item Copy to clipboard. Go to the SD memory card and select the desired folder where you want to copy the application. Again, long press on the folder to bring up the menu and select the item Paste here (Copy).

That's it, the application has been copied to your personal archive. For subsequent installation, you only need to go to your folder and click on the desired application in order to install it.
You can copy any files from download folders, photos in exactly the same way. Nothing complicated or unusual. Good luck!
UPD 26/02/18. Transferring data to an external flash drive and a smartphone memory card is even easier using .
(8 ratings, average: 4,75 out of 5)
http://site/wp-content/uploads/2017/02/a1-1024x609.pnghttp://site/wp-content/uploads/2017/02/a1-150x150.png 2018-02-26T21:59:43+03:00 Anton Tretyak Android and iOS Today we’ll find out how to save applications without any services, copy music, photos, videos to an SD memory card in Android 6. The complexity of this action lies in the different way of working with the memory card in devices with Android 5 and 6. First, let’s try to make a copy of the application without any services there. root and special applications. For example...Anton Tretyak Anton Tretyak [email protected] Administrator website - reviews, instructions, life hacks
Every owner of a modern Android tablet or smartphone has to deal with the problem of lack of internal memory from time to time. One solution to the problem is to transfer programs and games from the built-in memory to a card, if, of course, there is one. But when trying to transfer a program or game to a flash drive, many have to face various kinds of difficulties. I will tell you about solving the main problems of such an operation and recommend a couple of useful applications that will allow you to complete the transfer without any extra effort.
Transfer an application to a removable card without third-party programs
First, you need to check whether your version of Android supports transferring applications and games natively. It also depends on the specific application. Quite often, developers exclude the possibility of transferring, usually for the reason that when installed on internal memory, programs and games, especially modern and resource-intensive ones, work faster than when they are placed on a flash drive.It's very easy to check if this is possible. You need to go to Settings, open the “Applications” section there (the name may differ slightly in different versions OS) and see if you can click on “Move to SD card”.
If this button is active, you can transfer the selected game or program to a removable memory card. If the button is inactive or simply does not exist, the transfer will not be possible using standard means. In this case, you will have to use third-party programs.
Transferring an application to a card using the AppMgr Pro III application
This application, previously known as App 2 SD, allows you to transfer a program or game to a flash memory card in literally a matter of seconds. The application has an intuitive interface, so transferring problems usually does not arise. In addition to the main function, AppMgr Pro III successfully copes with clearing the cache with one click, notifying the user when the program installation is complete, and hiding applications in the menu.The main advantage of the application is the automatic sorting of installed products according to their location. The user immediately sees which programs and games are installed in the device’s memory, which of them can be transferred to the card, which are already on the card and which cannot be transferred.

Instructions for transferring cache to a memory card
This method is suitable for those who were not helped by the first recommendation. This is usually relevant for owners of devices running on latest versions Android.The methods discussed earlier are simple and effective, but they do not work in all cases. In addition to this, after transferring an application or game, the cache still remains in the memory of the phone or tablet. And it weighs, especially in the case of modern resource-intensive games, quite a lot.
The FolderMount program will allow you to transfer not only a game or application to the card, but also the accompanying cache. To run the program, you need .
Everything is done in a few simple steps. First you run installed application FolderMount, find the “+” in the upper right corner and click on it. A menu of several items will appear. In the “Name” column, you need to indicate the name of the game or application whose cache you need to move. In the “Source” item, specify the folder with the cache – Androin/obb/Application name. Next, you need to specify in the “Destination” item the folder on the card to which the cache will be moved. Double-check that each item is filled out correctly, then click on the checkmark in the upper right part of the display, and then click on the “pin” icon located next to the name you specified in the first item.
IN Android there are 3 effective ways to transfer applications to a memory card.
System Methods- V Android there is a built-in function for transferring any application to a memory card (if the application itself supports this, of course). To check if the application can be transferred, open Settings - Applications, and then select the one you need from the list of applications.

After that, pay attention to the button with the name "Move to SD card". If it is active, then you can safely press it, then wait a little while the system transfers the application and voila, the application is already on the external memory card.
Using the AppMgr application (it is App2SD)- enough popular app among Android users, which will allow you to transfer applications to a memory card much more conveniently than using system methods. After launching the application, please note that there are 3 tabs available: Movable(applications that are located in the device memory and support moving to the memory card), On SD card(applications that are located in at the moment on the SD card and can be moved back to the device memory) and On the phone(applications that cannot be moved and can only run in the device memory).


The main advantage of the application is its mass selection, which will allow you to transfer to external card memory for all applications. To do this, open the menu and then select the item "Move All". In the window that appears, mark the applications you want to move and click « OK» . After this, you will only need to press the button "Move to SD card" and that's all.


Sooner or later, every user of Android devices is faced with a situation where the internal memory of the device is about to run out. When you try to update existing applications or install new applications, a notification pops up in the Play Market stating that there is not enough free space; to complete the operation, you need to delete media files or some applications.
Transferring Android applications to a memory card
Most applications are installed in internal memory by default. But it all depends on what installation location the program developer specified. It also determines whether it will be possible to transfer application data to an external memory card in the future or not.
Not all applications can be transferred to a memory card. Those that were preinstalled and are system applications cannot be moved, at least if you do not have root rights. But most downloaded applications tolerate the “move” well.
Before you start transferring, make sure there is enough free space on your memory card. If you remove the memory card, the applications that were transferred to it will not work. Also, you should not expect that applications will work in another device, even if you insert the same memory card into it.
It is worth remembering that programs are not completely transferred to the memory card; some of them remain in the internal memory. But the bulk is moved, freeing up the necessary megabytes. The size of the portable part of the application is different in each case.
Method 1: AppMgr III
The free AppMgr III (App 2 SD) application has proven itself as best tool to move and delete programs. The application itself can also be moved to the card. It's very easy to master. There are only three tabs displayed on the screen: “ Movable», « On SD card», « On the phone».
After downloading, do the following:
1. Launch the program. It will automatically prepare a list of applications.
2. In the tab " Movable» select the application to transfer.
3. In the menu, select “ Move application».

4. A screen appears that explains which features may not work after the operation. If you want to continue, click the appropriate button. Next, select “ Move to SD card».

5. In order to transfer all applications at once, you need to select the item with the same name by clicking on the icon in the upper right corner of the screen.

Another useful feature is automatic application cache clearing. This technique also helps free up space.

Method 2: FolderMount
FolderMount is a program designed to completely transfer applications along with the cache. To work with it you will need ROOT rights. If you have them, you can even work with system applications, so you need to select folders very carefully.
To use the application, follow these instructions:
1.After launching, the program will first check for root rights.
2. Click on the icon + " in the top corner of the screen.

3. In the field " Name» Write down the name of the application that needs to be transferred.
4. In the line " Source» Enter the address of the application cache folder. As a rule, it is located at:
SD/Android/obb/
5. " Purpose" - the folder where you want to transfer the cache. Set this value.
6. Once all the parameters are specified, click the check mark at the top of the screen.
Method 3: Move to SDCard
The easiest way is to use the Move to SDCard program. It is very easy to use and takes up only 2.68 MB. The app icon on your phone may be called " Delete».
Using the program looks like this:
1. Open the menu on the left and select " Move to map».

2. Check the box next to the application and start the process by clicking " Move" at the bottom of the screen.

3. An information window will open showing the moving process.

4. You can carry out the reverse procedure by selecting “ Move to internal memory».
Method 4: Standard means
In addition to all of the above, try to transfer using the built-in tools of the operating system. This feature is only available for devices with Android version 2.2 and higher installed. In this case, you need to do the following:
1. Go to " Settings", select the section " Applications" or " Application Manager».

2. By clicking on the corresponding application, you can see whether the button is active Transfer to SD card».

3. After clicking on it, the moving process begins. If the button is not active, then this function is not available for this application.

But what to do if the Android version is lower than 2.2 or the developer did not provide the ability to move? In such cases, third-party software, which we talked about earlier, can help.
Using the instructions in this article, you can easily move apps to and from your storage card. And having ROOT rights provides even more opportunities.


