How to play Minecraft online?


Minecraft is a kind of virtual sandbox in which you can fight monsters, master crafts and make items, and create entire worlds of your own. The Minecraft gaming community is one of the largest in the world. Many people call this game a real revolution in the indie gaming industry. The game does not have any official manuals, which has earned it even more respect from fans. In this article we will tell you only about the basic steps that any user must take in this game, and how to play Minecraft online.
Game setup
Beginner users should first complete the following steps:
- Set up game mode and options. When you first turn on Minecraft, the first thing you need to do is decide how you want to play: single player or over the network. The multiplayer game, in which multiple players play simultaneously on servers, is only available for paid accounts.
- In addition, you will need to set the basic settings, which include, among other things, the difficulty level and sound settings.
- The game has four difficulty levels: survival, creative, adventure and hardcore. The difficulty level mainly affects whether monsters or "mobs" can appear at night or from underground. In addition, on the difficult level you will also encounter zombies that can destroy wooden doors and kill the character.
- In multiplayer mode, you don't have to create your own world. You can join someone else's game. To select a multiplayer server, you will need to go to the game's website, such as PlanetMinecraft. After you have chosen the server on which you are going to begin developing the land, you can begin setting up the online game.
Enabling multiplayer mode
In order to start playing Minecraft online, you need to do the following:
- Launch the game.
- Click the Edit button in the upper right corner.
- Click External.
- Enter the name of your selected server, IP address and port number.
- Click the Add Server button.
- Sometimes the server fails to launch the game the first time. If the game does not load, try again.
Perhaps the main thing in the game is to survive the first night. The whole game is built on the cycle of day and night. Your task is to build yourself a shelter before sunset, before monsters appear ready to kill your character. Next, everyone chooses their own style of play, builds special strategies and determines a plan of action. Some people focus on building and collecting various valuable artifacts, while others prefer to focus on weapons. This game is especially good because it does not have any linear plot and clear rules of the game. Everyone can find something for themselves in it.
Let's start with the fact that you only need a friend and Minecraft itself. To begin with, one of you, for example, you create a world in which you want to play together. It is also very important that you and your friend have the same versions of Minecraft. For example, if you created a world on version 1.8, then your friend should also have version 1.8. Now you need to find out your ip, you can do this on this site, or just type my ip on the Internet. Here is a screenshot from that site (2ip), the arrow shows where your ip will be (click on it and it will be copied) -
After you have found out and copied your IP, temporarily write it down somewhere, for example, in a notepad. Now go into the world and open it to the network, ESC -> Open for the network -> select the necessary parameters and open the world online. Now a port should appear in your chat, for example - 51166 . See screenshot -
Then we take the IP that you learned from the previous paragraph, after the IP we put a colon (the colon is ‘ : ‘) and insert the port after the colon. This is what it should look like, I came up with an IP on the fly (this is not my IP) - 28.355.85.212:51166 . Now transfer this to your friend and your friend should log into Minecraft in Network game -> Add -> and insert there what you threw to him, for example, I have this - 28.355.85.212:51166 . See screenshot -
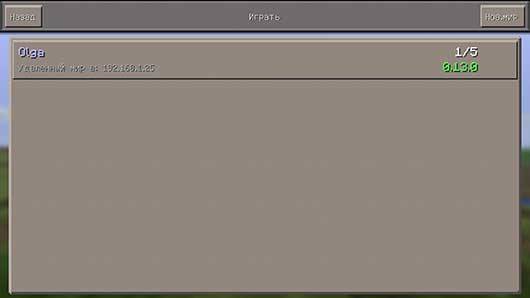
That's all, if everything is ok, then your friend will have your world in the list of servers and he just goes to it and that’s it, you can play together. The server description will look something like this (it will most likely be at the very bottom of the server lists) -
Now you can play with your friends!
Note, after you have opened a world online, do not exit it, because when you exit, the port will close and your friend will not be able to enter. If you have any questions, leave them in the comments or write to my group
Using only a local network, without being able to connect to the Internet, in this news we will look at several options on how to do this. The first option will be simpler, but will require an active connection to Wi-Fi router, and most importantly, the router may not be directly connected to the Internet; in our case, it will simply work as a means of transferring data from one phone to another, or to a friend who plays on a tablet. These methods are completely free.
The second method will be a little more complicated, but does not require you to have a Wi-Fi router; the connection between devices will occur through the created mobile point, which can be any Android phone.
Wi-Fi Router. Method number 1
As you understand from the text above, we will need a Wi-Fi router, thanks to which you will transfer information between devices. Just connect all devices to one Wi-Fi, then from any of the devices, preferably the most powerful one available, enter the game.After that, click on the "Play" button and go to the game world creation menu. Choose the settings based on your needs, if you just want to have fun, then choose the creative mode, if you want teamwork, definitely choose the survival mode.


After you create game world, ask your other friends to go into the game and go to the game world selection menu, where after a few seconds, they can see the local server you created and start playing Minecraft PE on local network.

As you can see, this method of playing over a local network in Minecraft PE is very simple and only requires the presence Wi-Fi router, even if there is no internet cable connected to it, you will still be able to play. This method is perfect if you are in a place where there is no Internet, but there is electricity.
The phone is like a Wi-Fi router. Method number 2
This method is somewhat different from the previous one in that you will not need a Wi-Fi router, since one of your Android devices will be configured to transmit mobile data and essentially become a router itself.First, we need to go to the settings of the Androdi-based phone and find the “Modem and access point” menu item there, on different versions OS Android, it may be called a little differently.

After that, click on it and you will be taken to a menu where you will see the item "Mobile hotspot"

We click on this inscription and we will see a description of this method of creating a Wi-Fi router to which up to 10 other devices can subsequently connect.

After that, find the “Settings” button on the screen; in my case, it is located in the upper right corner of the screen, you can have it anywhere, even at the very bottom.

Going to the mobile hotspot settings, you will be asked to select the name of the hotspot, I called it “Minecraft PE” to make it easier to find later. After entering the name, you must enter a password, which must be at least 8 characters, after entering these parameters, click "Save".


Next, turn on the access point using the horizontal slider, after which a warning will appear on the screen that the Wi-Fi module of your device will switch to router mode and will not be able to connect to other routers, click “Ok”.

After this, you can safely enter the game and create a game world in Minecraft PE. After the creation of the world, you need to connect other devices to the access point you created, this is done in the same way as the process you use to connect to a regular Wi-Fi router. On the list available networks, select the one you created and enter the password.


After which, all players can safely launch Minecraft game PE and enjoy playing on a local network, where only your friends will be and where no one can interfere with your joint gameplay.


As you can see, this method of playing over a local network in Pocket Edition is somewhat more complicated than the previous one, but it allows you to play anywhere, be it a street, a school classroom or a deep forest.

The only limitation that such a game imposes is that the same version of the game must be installed on all devices (phones, tablets), since if you create a game in version 0.13.1 people with earlier ones (0.13.0 or 0.12.3) or later (0.14.1 or 0.14.0) versions will not be able to connect to you, keep this in mind!
Play via Bluetooth. Method number 3
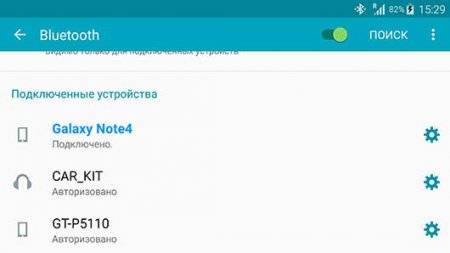
This method will talk about playing over a local network without using Wi-Fi at all. This method has several advantages over others, but at the same time it has significant disadvantages, but let's talk about everything in order. In this method you will learn how to play Minecraft PE via Bluetooth. To do this, you will need to create a Bluetooth modem from your device so that other devices can connect to it.The first thing to start with is to turn on Bluetooth and make it visible to other devices; to do this, check the box next to the name of your device; this menu appears automatically after turning on Bluetooth. After you check the box, a timer will start counting down, which shows how long your device will still be visible to everyone else.


Then go to the settings and find the “Modem and access point” menu item, go into it, you can see an example of this item in the screenshot below, but for you it may be called a little differently or located in a different place.

After going to the “Modem and access point” menu, find the “Bluetooth modem” item and turn it on, this is required so that several phones or tablets can connect to your device at once via a Bluetooth network.

Now you need to go into the Minecraft PE game and simply create a world, after which everyone else can safely turn on Bluetooth on their devices, find your device in the list and calmly connect to you.

Now let's talk about the disadvantages of this method, firstly, it imposes a restriction on playing on different versions of the game, all players must have the same version of the game. Another important disadvantage of this method is that the bandwidth of the Bluetooth channel is much lower than that of Wi-Fi, so the more players connect to you, the more glitchy the game will be. I would also like to note that when using this method, you must be at a fairly close distance with other players, since the signal strength compared to Wi-Fi is much lower and the closer the devices are, the more stable the gameplay will be.
The advantages of this method are lower energy consumption, high mobility thanks to which you can play anywhere and of course ease of use.
It seems like everyone plays online, you go to the server and play for yourself. But what to do if you don’t particularly feel like running in singles, and you don’t feel like running with just anyone. With friends, or at least one. But for this you need to make your own server. You can also run locally if there are two or three of you. In general, there are options. Since the multiplayer function appeared in Minecraft, this is basically how people have played. It was only later that they began to create full-fledged servers. In addition, not all servers can be accessed if the game is not purchased. Moreover, if you officially have to pay for the client part of the game, then the server part is initially freely available, that is, if the machine can handle it, and even better, if there is a separate computer where you can install the server, then you can run a full-fledged “adult” server for free, and without breaking any laws. In order to play Minecraft online for free, and without registration, you will have to create your own server. Here are some solution cases.
How to play Minecraft online. Creating a local network
The local network will be convenient if we want to play with one or two friends. The more people we are going to let into our games, the further we move away from the local network, and the closer we get to a full-fledged server. You can create a local network:
- Physically, having two computers in one room or building, network cable between them, Wi-fi or via a router.
- Programmatically, and computers can then be located in different cities, countries, and so on... Such a local network is created using VPN, tunneling and other scary things. For our purposes, there is a fairly convenient program - Hamachi, which manages the tunnels independently. The main thing is that all participants have the same version of hamachi.
Physical local network
To do this, you need to establish a connection between computers, bypassing the Internet. If both your computers have the same Internet access source (same Wi-Fi network, cable connection to one router, etc.), then there is a high probability that they are physically already on the same local network, or within the same “network node”. In this case, additional configuration is most often not needed; the same router is responsible for distributing IP addresses. In case two computers connect directly to each other, you may need to configure the IP addresses manually.
After this, you can launch Minecraft, create a network game, and start playing. Players will simply need to find a server on the local network. The only negative is the high load on the distributing computer or mobile device. Yes, having the appropriate versions of Minecraft, you can play both through a smartphone and a tablet, but the server takes a lot of resources. To solve this problem, it is better to appoint a computer that is not participating in the game as the server.
Logical local network
Let's figure out step by step what you need to do to play Minecraft online via Hamachi. To do this:
- First of all, you need to download Hamachi. Link to official website.
- After downloading the same version on all computers, install it.
- On one of the computers, preferably the one that will be the Minecraft server, we create a connection in Hamachi. Enter the network name and password to connect other participants to the network.
- On other computers you can now connect to the created network by entering the appropriate name and password.
- Now that the connection is established, you can run Minecraft on your main computer and create a world. After creation, we open the world to the network. We remember the port that will be indicated in the chat when opening the world over the network.
- Participants, having launched Minecraft, copy the IP address of the main computer (IPV4 - it’s easy to copy it in Hamachi), select a “direct connection” to the server in Minecraft and insert this IP into the “Server Address” field, and after it, without spaces, “:” and port number. After that, click the “Connect” button and get to the server.
Creating a server for Minecraft
If you want 5-10 people to participate in the game, then it will be more convenient to create a normal server.
In order to do it, you need
- First, download the server part from the site https://minecraft.net/ru/download/server.
- Place the downloaded file in a separate folder, which will also be the root of the server directory. We run the file and let the files necessary for the server to operate be unpacked.
- The server is ready to go. For its settings you will need to make changes to the file server.properties. There are many parameters in it, but first of all they will be useful gamemode, which allows you to set the default game mode, white-list, which will allow access only to certain players, and max-build-height primarily to limit the load on the server .
It is worth noting that files in progress are subject to change, and the changes you make take effect only after the server is rebooted. Therefore, it would be more correct to edit the server settings when it is turned off.
How to play Minecraft online. Connecting to your server in Minecraft
If we still want to connect to our server from the same computer on which it is running, then we need to launch the Minecraft client, and when connecting to the server, specify localhost or 127.0.0.1 as the IP. The default port is usually 25565.
To connect to your server via the Internet, it is better to have a static IP on it, otherwise you will have to enter a new address almost every time you reconnect. To determine the IP address of the server (where to connect?), the easiest way is to use an online service such as http://2ip.ru. “Your computer name”, consisting of four series of numbers, is your IP address. The port for Minecraft is still the same - 25565.

If the server connects to the Internet indirectly, through a router, then this port may be closed on the router. In this case the best solution will open or “forward” this port on the router. Opening a port on a router requires accessing it through its web interface, and sometimes downloading additional software.
In the very simple case you can log into the router’s web interface using the settings indicated on its case. The IP address can change, and when entering the web interface itself, the combination of login: admin and password: password almost always works.
Depending on the router model and its firmware version, the “forwarding” function may be called NAT or Port Forwarding. Having found the appropriate menu item, you should fill in the start and end port fields with the desired value (in our case 25565), and in the IP address field indicate the address of the computer that we use as a server. Ports are configured for TCP and UDP protocols. After such an operation, the server must be accessible to users via the Internet.
In order for a server with high traffic to work stably, it must be administered, but this is a separate topic. Stable servers are usually made not on Windows, but on Linux, and this operating system has many of its own features. In addition, additional mods and scripts will be required to maintain public interest. All this will take time and effort, and it will take more than one article to describe the administration process itself.
Video on how to play Minecraft online on smartphones and tablets:
This guy did it, and you can do it too.
In Minecraft, you can choose one of the game modes - single and multiplayer. If you like to play with other people, then check out one of the methods presented below.
LAN (Local Network)
- Servers
- Minecraft Realms
Before joining a multiplayer game, you must make sure that you are using the same version of the client that the server is using. For example, if version 0.14.0 is installed, then you will not be able to access servers with 0.15.0+.
Minecraft Pocket/Windows 10 Edition can be purchased and updated directly from the application store, or downloaded for free latest version on the site minecraft10.net or planet-mcpe.com/category/mcpe/
- Game over LAN (Local Network)
To play via a local network, you and your friends must be on the same network, be it Wi-Fi, or an activated Access Point for one of you.
First, make sure everyone who wants to join is connected to the same network. Then select the host device on which the World will run and make sure that everyone has the same version installed.
Creating a game over LAN
1. Go to the “Settings” menu
2. Activate the “Multiplayer game” and “Broadcast to local network” items
3. Launch the World you want to play in
Connecting to the game via LAN
1. Go to the “Play” menu
2. Click on the “Friends” tab and find available games on LAN

- Play on Servers
To connect to a server, you need to know its IP Address and Port.
Many players can play on the servers, sometimes their number reaches more than a thousand, but most have no more than a hundred places. You can create your own server, or join an already created one.
What do you need to connect to servers in Minecraft PE?
To connect to the servers, follow the steps below:
1. Go to Minecraft
2. Click “Play”
3. In the “Worlds” tab, select “Create a new world”
4. Tap on the plus and arrow icon.
5. Enter the name, IP/address and Port.
6. Click “Add server”
7. Done!
To play on servers, you must have the same version installed as them.
- Play through Minecraft Realms
Minecraft Realms is a multi-user service created by Mojang AB. Installation is quick and allows up to ten players to play.
The only downside is that there is a monthly fee for use, although you can try one month for free.
A full description of this service is presented in this article: