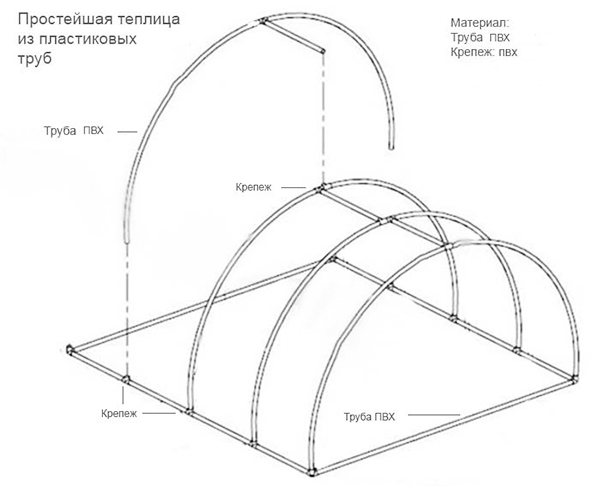
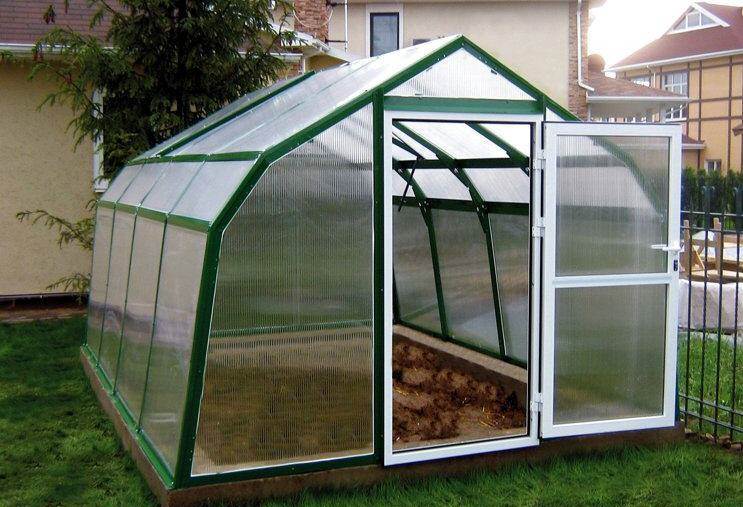
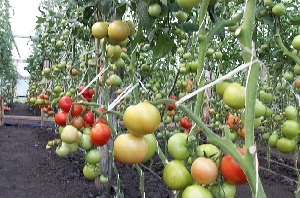
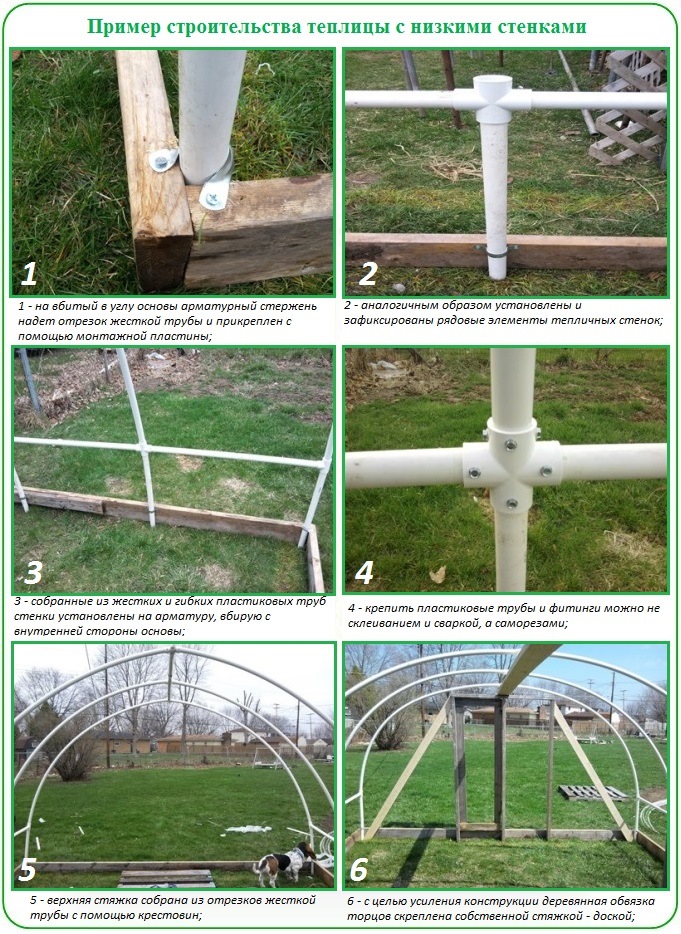
Today on suburban areas it is not uncommon to see such a design as a compact and convenient greenhouse made of polypropylene pipes. The relevance of such buildings among summer residents is explained, first of all: by comfort in use, reliability and durability. The greenhouse will cost no more than a couple of thousand rubles, and will last for many years. Compared with the cheapest prefabricated factory structure, it will cost at least 15,000 rubles. How from propylene pipes will be described in this article.
Preparatory stage: polypropylene greenhouse
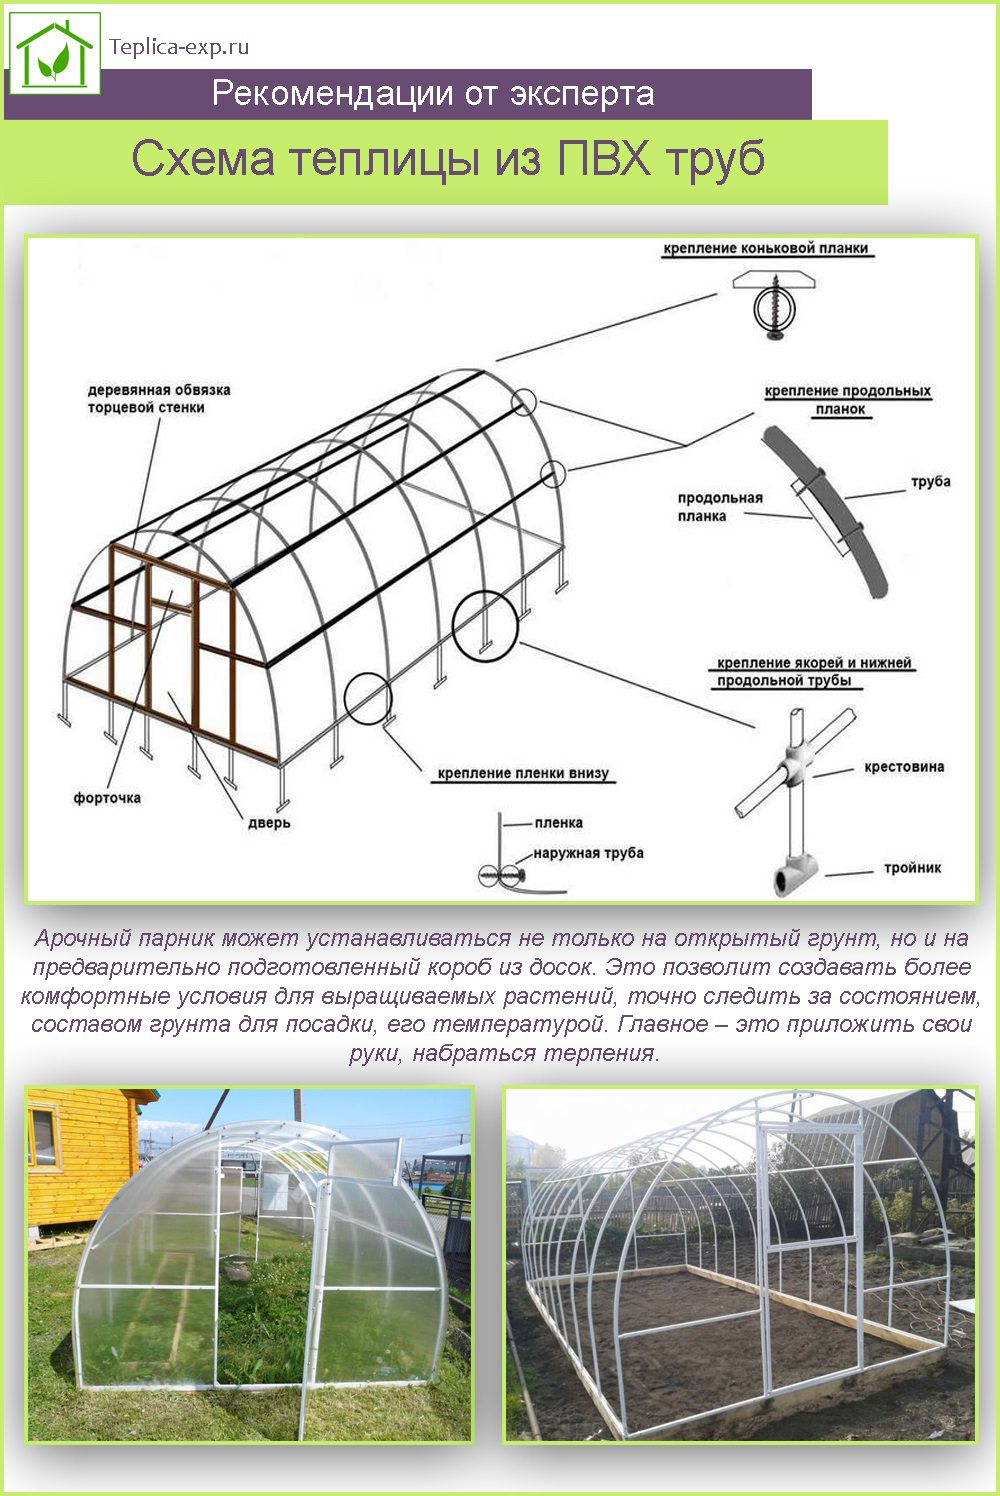
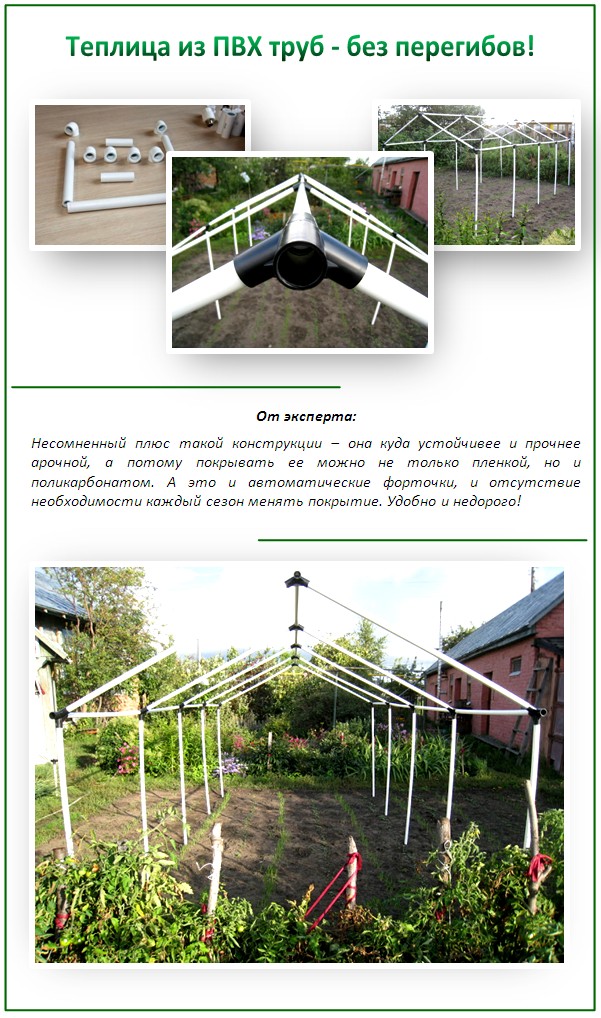
You can assemble a traditional arched PVC structure on your own in just 2 days.
The materials for its creation must be prepared as follows:
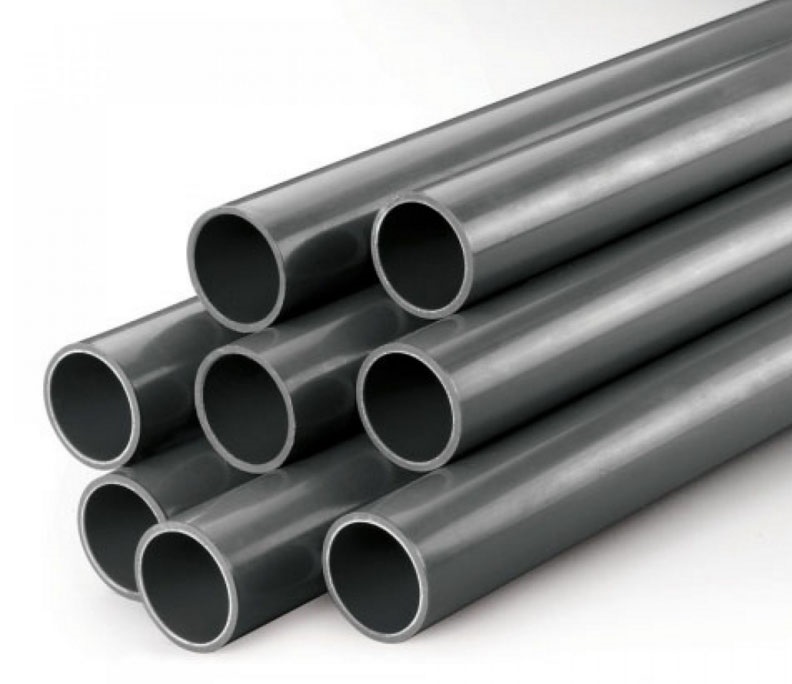
- Polypropylene pipes. It is better to take thick ones at least 16 mm in diameter.
- Reinforcing bars 75 cm. Diameter 12 mm.
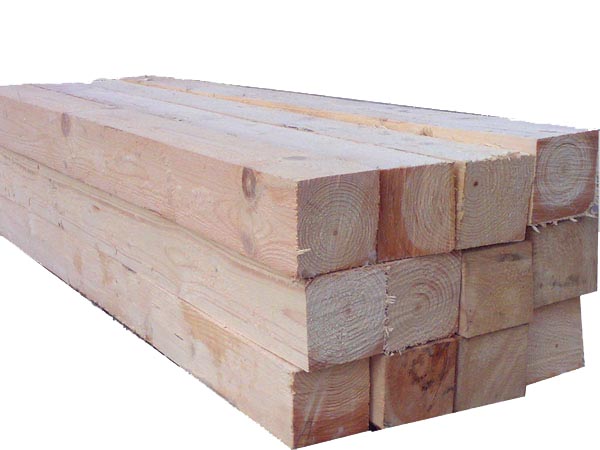
- Trimmed board 150x30 mm.
- Steel wire.
- Rails for fasteners.
- Reinforced film or polycarbonate sheets.
- Bars 50x50 mm.
- Self-tapping screws.
- Nails.
In addition to these building materials, it will be necessary to purchase 2 thick pipes, which will be used to build plastic latches and door hinges. Also, for assembly, you will need to prepare a hammer, a drill, a garden drill or a sledgehammer, a sharp knife for metal.
Site selection and assembly of a greenhouse from polypropylene pipes
It is clear that you need a sunny area that is fully ventilated. It is not recommended to arrange where too much snow mass accumulates in winter.
If the load is very large, the oilcloth may not withstand:
- deformed;
- Stretch;
- Will break.
It is not required to comply with this condition only if the greenhouse is planned to be dismantled for the winter. The area under the greenhouse structure should be as flat as possible. The soil on it should be slightly compacted. Then you can start assembling. So, further we will talk about how a greenhouse structure made of polypropylene tubes is assembled.
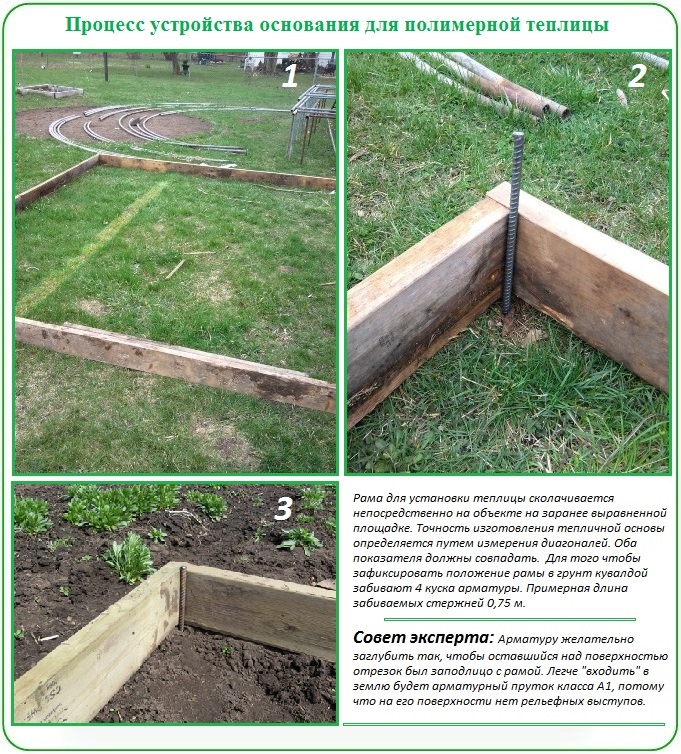
Before starting the assembly of the frame, you need to make a neat and correct marking of the selected area.
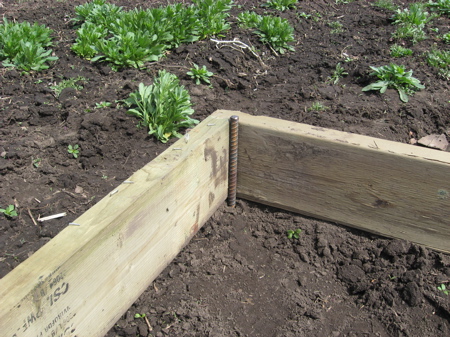
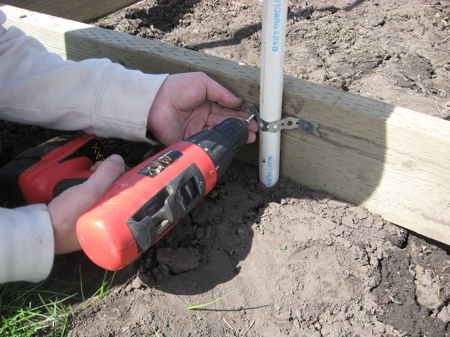
The corners of the wood frame from the board should be 90 degrees. It is possible to mark the soil, for example, using the method of the Egyptian triangle or "2 curves". The lower wood frame-tying is mounted on self-tapping screws or nails. After installation, in each corner inside, it is necessary to insert a reinforcing bar. This will make it possible to avoid deformation when the frame is assembled. After the strapping is done, you can arrange the most important element of the base - the reinforcement.
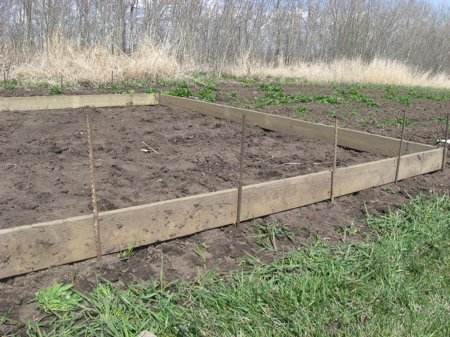
Holes must be made with a garden drill, as they must be at least 0.5 meters deep. If there is no drill, the rods can be hammered with an ordinary sledgehammer or hammer. But in this case it is more difficult to get full verticality. Above the ground, the rods should extend approximately 25 cm. They should be arranged on both elongated sides of the future greenhouse structure in increments of 50 cm.
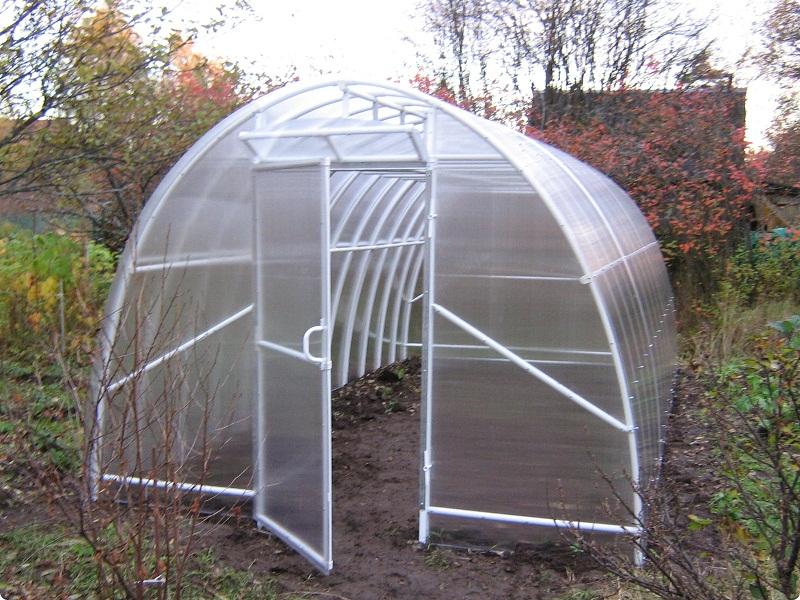
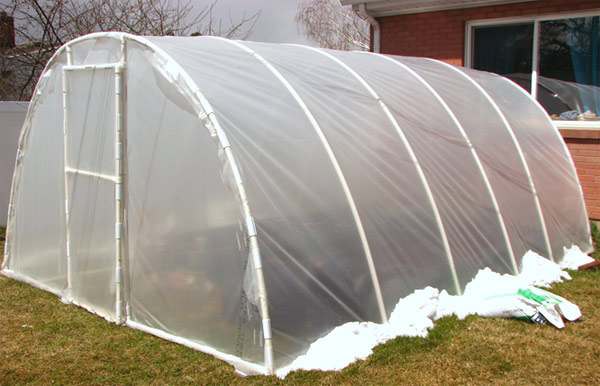
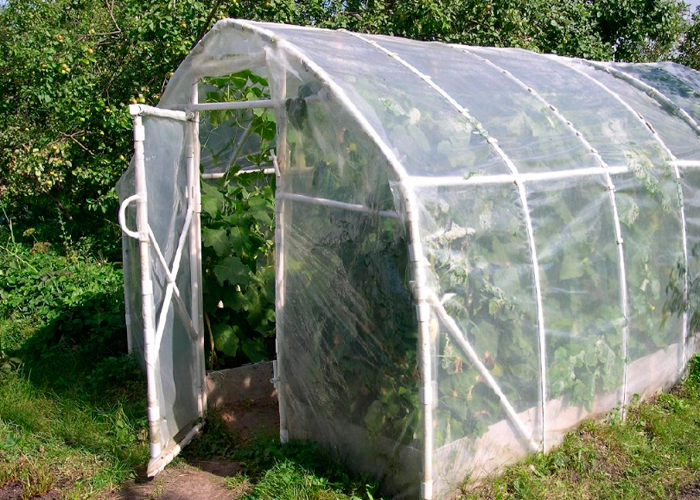
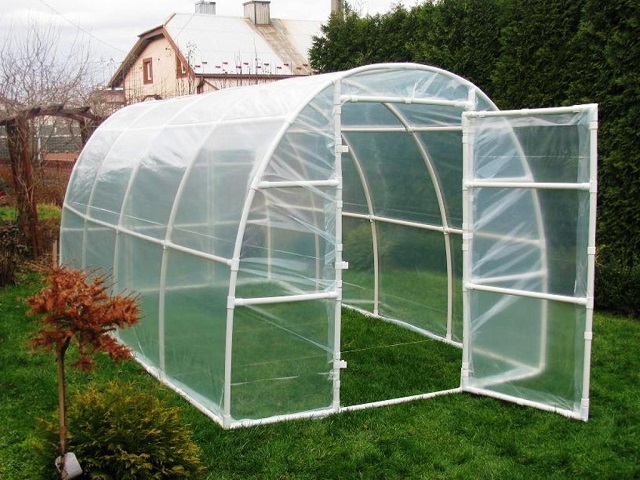
Do-it-yourself greenhouse made of polypropylene pipes: installation of the frame and ends
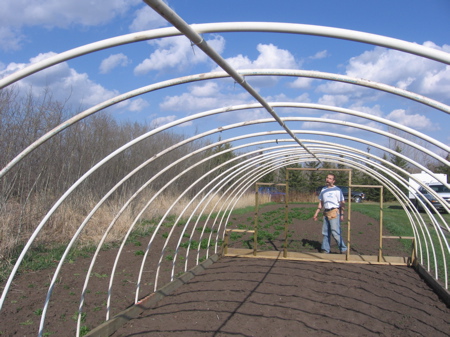
After the base is built, it is necessary to undertake the installation of the "ribs" of the greenhouse structure. To do this, the tubes must be put on reinforcing bars from 2 sides. As a result, sufficiently strong arcs are obtained. The next step is to fix the frame of the greenhouse structure with stiffeners arranged across. They are also made from PVC pipes.
In the 2nd case, the fittings must be put on the arched ribs in advance. They can be soldered to the tubes, but it is better to use self-tapping screws for fastening. In this case, the greenhouse structure can be disassembled and assembled when necessary, during the season. The number of crossbars depends on the size of the greenhouse. But even for a voluminous home-made greenhouse, more than 2-3 are rarely taken on each side. The most important element such PVC greenhouses is a transverse “skate” made of plastic at the top in the center. Without it, the oilcloth will sag.
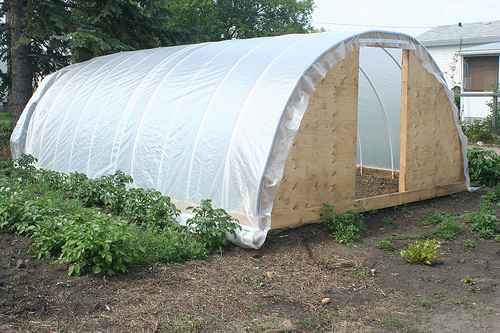
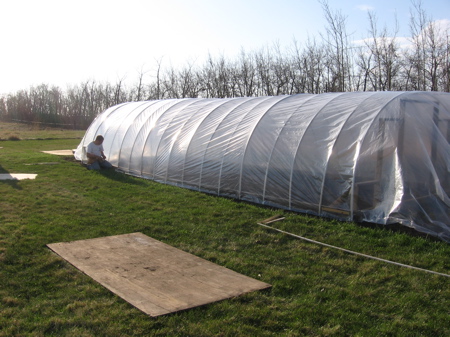
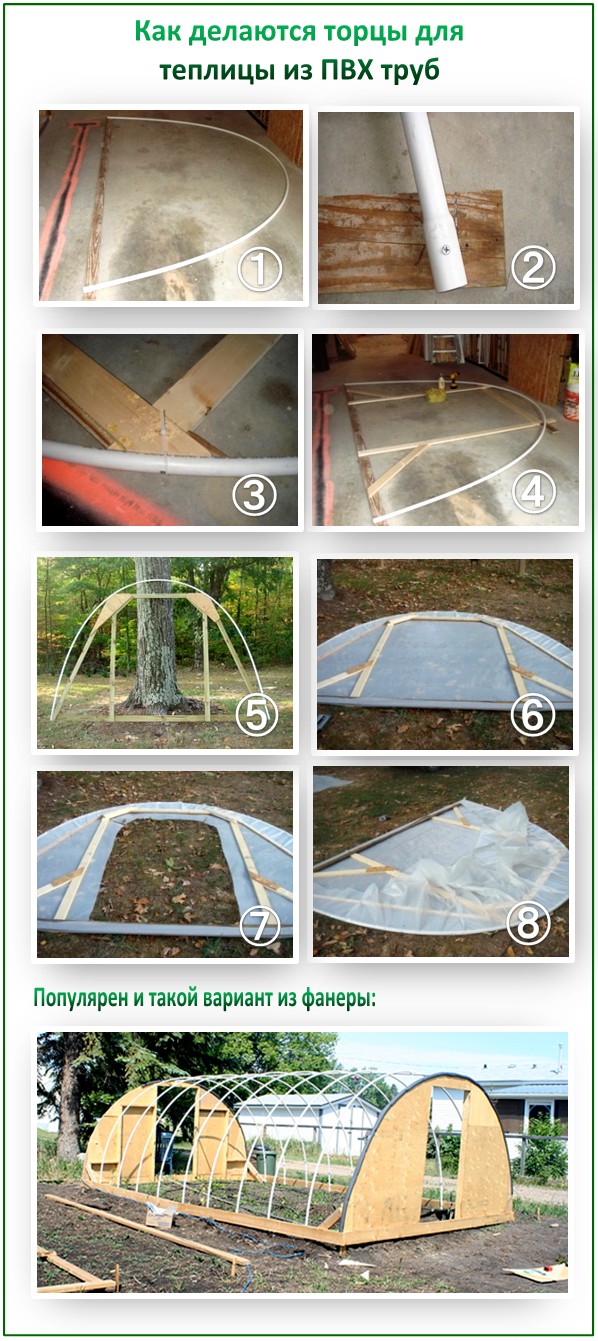
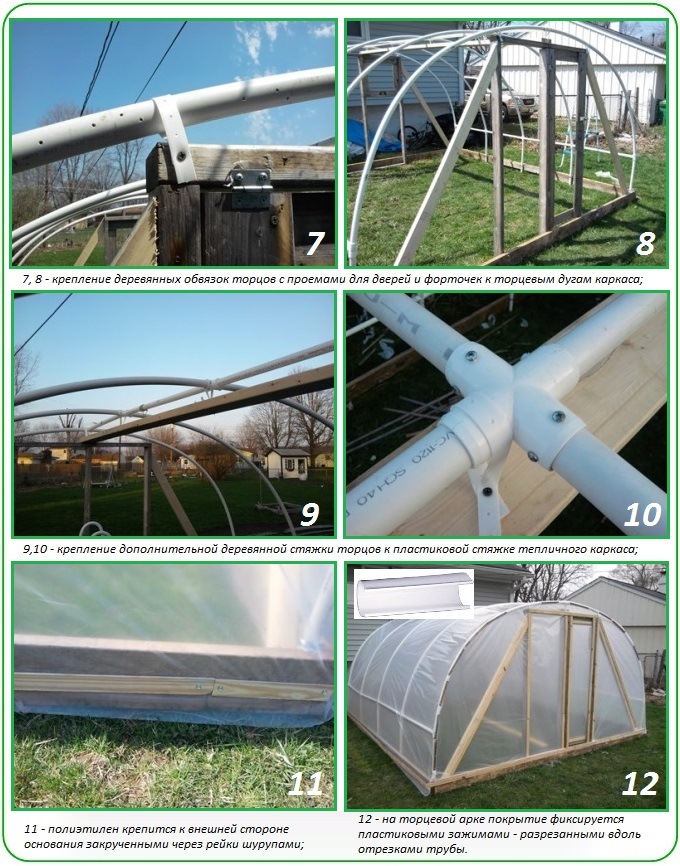
What does a greenhouse made of polypropylene pipes look like? Drawings and photos can be seen in the article. When talking about construction, one should not forget about the ends of the structure. The ends are assembled from bars, which are carefully treated with an antiseptic in advance. The film is arranged on a beam on self-tapping screws through slats.
If desired, wood can be replaced with PVC pipes. In this case, cuts of the required length are simply mounted on the ends in a vertical position along the edges of the future doorway. By the first arch, it is also good to strengthen them on tees. From below it is necessary to fix on the reinforcement. To the resulting “jambs” made of plastic, it will be necessary to attach a door made from cuts. To do this, one of the vertical racks from above and below must be soldered with short pieces of PVC pipes of a larger diameter. They need to put doors on them. A self-made greenhouse construction made of PVC pipes is usually covered with a reinforced film.
You should not use a simple oilcloth for this purpose, it:
- Breaks quickly;
- Not reliable;
- Not durable;
- Not durable.
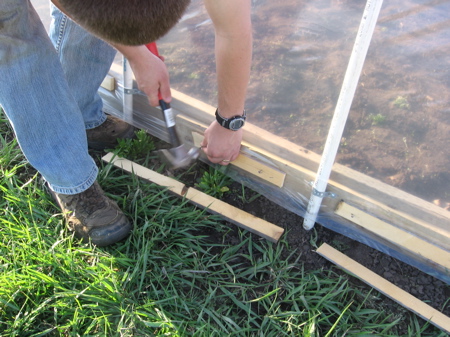
It is not economical to arrange such a sheathing. Reinforced film costs a little more, but will please many times longer. Cutting the cover is best done right in the greenhouse. This way you can avoid mistakes. The length of the strips should be slightly longer.
The fact is that oilcloth on final stage usually suit under the strapping. You can also mount it to wood under the rails.
To the arched "ribs" fixation is carried out on plastic clamps. The latter are made from short cuts of PVC pipes with a larger diameter. These pipes must be cut along the length on one side with a narrow strip. The result is a strong clamp. After the coating is securely laid, the assembly of the PVC greenhouse can be considered completed.
Do-it-yourself greenhouses made of polypropylene pipes: drawings and other designs
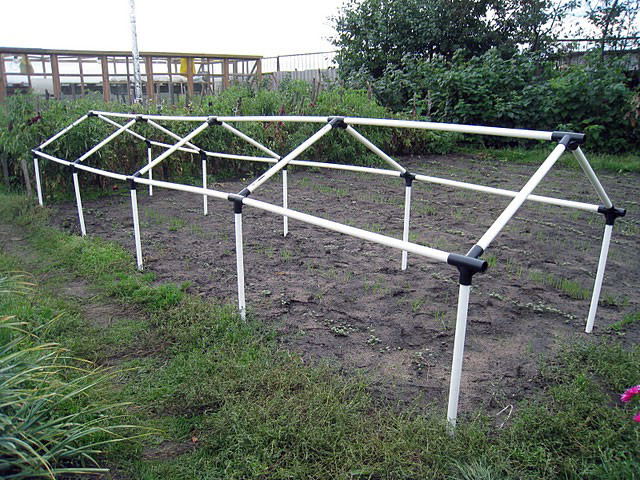
It is clear that greenhouse structures made of HDPE can have not only the traditional shape in the form of an arch. It is very easy to build, for example, a structure-house from this building material.
The installation procedure includes the following steps:
- The binding and installation of the rods is carried out in the same way as described above.
- Then it is necessary to arrange vertical racks of tubes on the reinforcement.
- Next, the installation of plastic rafters is carried out, the cuts are the same.
- The rafters must be connected to the ridge on the tees. With racks, they are connected to fittings. From above, it is important to make fasteners for a cross member made from a tube cut.
- Next, you need to arrange transverse stiffeners.
Greenhouse structures are sheathed not only with oilcloth. Good feedback received polycarbonate sheets. It is a durable flexible and not heavy building material. It will last longer than oilcloth, but it is expensive. It is mounted to the pipes on self-tapping screws for roofing with thermal washers.
Do-it-yourself greenhouse made of polypropylene pipes (video)
In conclusion, we add that, unlike reinforced oilcloth, polycarbonate sheets when changing temperature regime can expand and contract. Therefore, when using rigid fasteners, such a skin will quickly deteriorate. The diameter of the holes for simple self-tapping screws should be slightly larger.
WITH minimum investment, which can be a good help to the main income. Of course, growing vegetables in a greenhouse is a favorite pastime of any summer resident and gardener. However, not everyone has the money to buy a finished greenhouse or create an expensive structure that will pay for itself for many, many years. And someone just got used to doing everything with their own hands, including the greenhouse. We invite you to get acquainted with a simple and popular technology that will tell you how to quickly and cheaply build a greenhouse from plastic pipes with your own hands.
We note right away that a greenhouse made of polypropylene pipes is many times cheaper. ready-made solutions, do not be afraid of buying consumables.
Firstly, you can make a greenhouse of any configuration, which means you can place it exactly in a given area or corner of the yard. Secondly, PVC greenhouses are easily dismantled for the winter, thanks to the simplicity of the design and light weight, even a teenager can handle its dismantling. Thirdly, the design is not tied to one place, if desired, it can be moved to different parts of the dacha, which is very convenient with the active use of landings different cultures. Fourth, polypropylene pipes are environmentally friendly, heat-resistant and durable material. Many gardeners make irrigation wiring from propylene pipes, which remain for the winter and absolutely nothing happens to them. And fifthly, you are making a greenhouse with your own hands, give up your imagination, perhaps you will come up with new ideas, in addition to the classic gable and arched forms.
We want to dispel the main myth about plastic pipes, that they are fragile and cannot withstand winter snow. If the pipe is not made in artisanal conditions, but according to normal technology, then it can easily withstand the weight of a healthy man (we are talking about 25 and 32 diameters). In the literal sense, you can pull yourself up on it, using it as a crossbar. Don't believe? Check it out yourself.
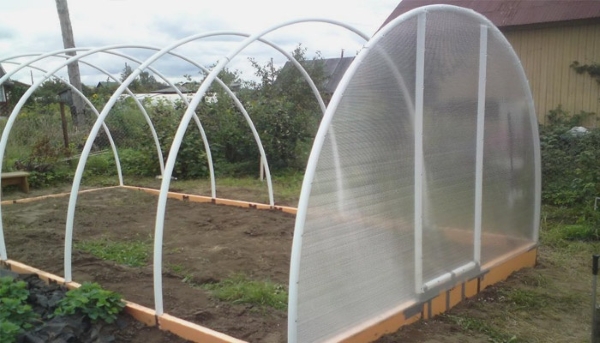
Greenhouse made of propylene pipes "Option 1"
Scroll necessary materials: PVC pipes (25 or 32 diameter), rods 60-70 centimeters long, 4 boards for the base, brackets (attach the frame elements to the base), strips for attaching the film to the frame.
First of all, we prepare a site for a greenhouse, place a rectangular frame of boards on it, try to make it even without visible distortions. To strengthen the strength of the frame inside, install rods at the corners. Now it's time to make markings for installing bars, of course, we do it along the longest side. Please note that if the distance between the bars is more than 50 centimeters from each other, the design will not turn out to be reliable. That is, on the outside of the frame we mark a distance of 50 centimeters (no more) and dig in the bars. The depth of digging in the bars depends on their length, you are guided by the fact that 20 centimeters should remain on the surface.
Now you can assemble the entire structure, as you may have guessed, we string PVC pipes onto rods. The main thing is to correctly calculate the length of plastic pipes, depending on your height and the size of the greenhouse. In the video example, which is at the very bottom of the article, the greenhouse was 4x2, pipes were cut at 4 meters.
We fix plastic parts with special brackets, they are sold in the same place as pipes.
It remains to build a frame, fasten the boards to the front of the greenhouse, do not forget to make a door and a window on the opposite side.
To make the structure more stable, we fasten several plastic pipes on top. If there is very little money for materials, one upper tube will suffice. easy way See video for fixings.
At the last stage, we fasten the film with self-tapping screws, leaving openings for the window and door. Vents and doors can be made using PVC pipes or wooden planks. It all depends on your budget, on average, such a “greenhouse made of plastic pipes with your own hands” will cost 2-3 thousand.
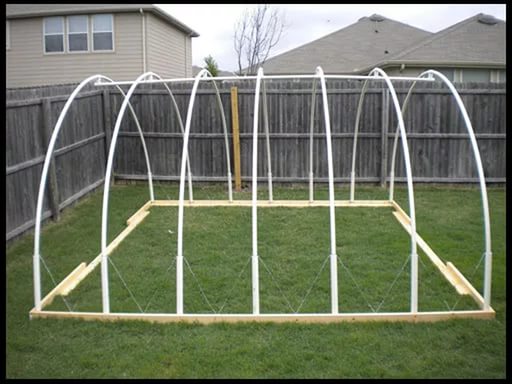
PVC greenhouse "Option 2"
A more complex version of the greenhouse consists entirely of polypropylene pipes. If you already have a special welding machine for plastic pipes, then it will not be difficult to build this design; special tees will be used. If it is not there, then the entire structure can be made on furniture bolts (which is shown in the video). The procedure is as follows:
- On the long sides of the base we weld tees at a distance of 50 centimeters, and we place crosses along the edges. Do not forget to weld additional tees in places of the door and window.
- We form arches, fasten from above with one or three transverse tubes for reliability.
- It remains to make windows and doors.
Such a greenhouse made of plastic pipes can withstand the winter indiscriminately, but it all depends on your climatic conditions. You can cover it with a film or make it out of polycarbonate.
How much does it cost to make a greenhouse with your own hands? A 4x2 greenhouse made of polycarbonate and PVC pipes will cost you 5500-7000 rubles. The main thing do not forget that pipes of 25 and 32 diameters are needed.
Greenhouse made of plastic pipes "Option 3"
As a result, we should get the following result:
Required list of materials:
Boards:
(4 pcs) 2×6cm – 5m
(2 pcs) 2×6cm – 3.7m
(14 pcs) 2×4cm – 3.7m
PVC pipe (19 pcs) 13mm - 6m
Armature (9 pcs) 10mm - 3m,
Film roll 6 mm thick, size 6 x 15.24m,
50 pcs wooden slats 1.22m each (trimmings of rails are suitable)
Plastic ties (clamps)
Nails or screws
Metal connections (for example, those used when working with drywall will work)
Door hinges and pens
Wooden parts must be pre-treated with an antiseptic.
1. Making the base frame of the greenhouse
Cut each rebar into 4 pieces, you will get 36 pieces of 75 cm each. We use 34 pieces to install plastic pipes. Divide two pieces of reinforcement into two more parts, we get 4 pieces of 37.5 cm each.
Using boards with a section of 2 × 6 cm, lay out and connect the base frame of the greenhouse, measuring 3.7 × 9.8 m. Check that the corners are right by measuring the diagonals of the rectangle (the diagonals should be equal). Fasten the frame in the corners with 37.5 cm pieces of reinforcement.
2. Installation of plastic arches
We take 34 bars of reinforcement 75 cm long and drive them along the long sides of the greenhouse to a depth of 40 cm in about 61 cm. From each long side of the greenhouse we get 17 bars.
Now put 17 PVC pipes on the protruding bars of the reinforcement to make arcs the width of your greenhouse.
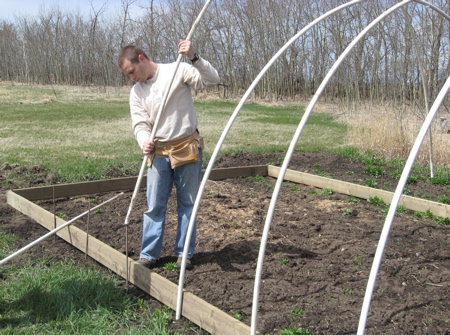
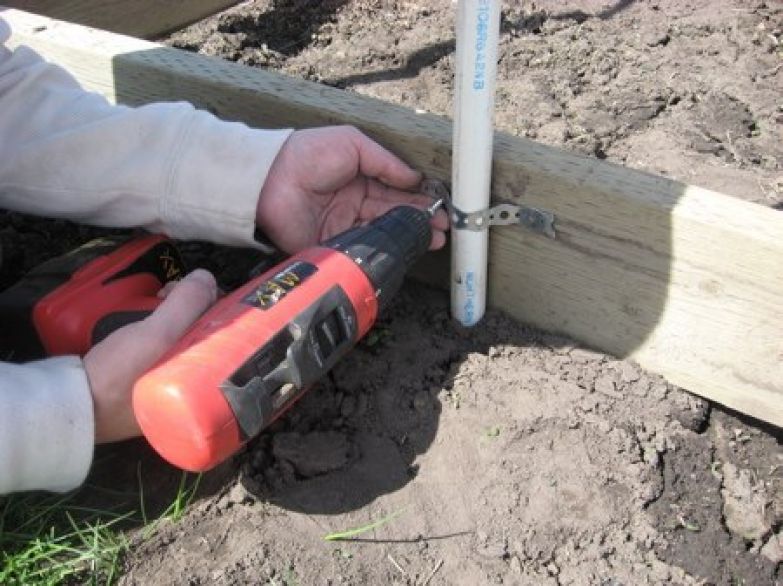
Attach the PVC pipes to the base frame boards using metal fasteners.
3. Greenhouse ends
From five bars with a section of 2 × 4 cm, a length of 3.7 m, we saw parts for assembling the frames of the ends of the greenhouse:
(2) 11’8¾” = (2 pcs) 3.6 m
(4) 1’6″ = (2 pcs) 0.45m
(4) 4’7″ = (2pcs) 1.4m
(4) 5’7″ = (2 pcs) 1.7m
(8) 1’11¼” = (2 pcs) 0.6m
(2) 4 ′¼” = (2 pcs) 1.23m
For each end of the greenhouse, assemble the frame according to the instructions in the photo:
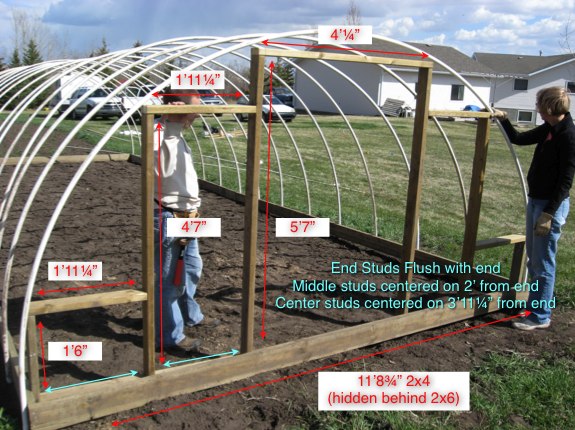
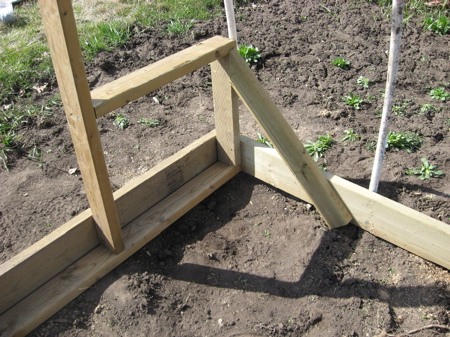
Place the frames in the ends and attach to the base frame with nails or screws.
We saw from a bar with a section of 2 × 4 cm 4 parts of 0.7 m each. We saw off one end at an angle of 45º. Use these pieces to reinforce the end by attaching the end frame to the base frame, as shown in the photo:
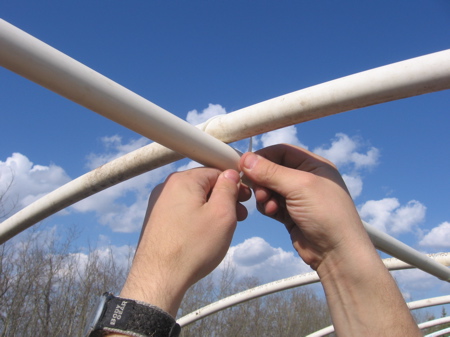
When all the arcs are attached to the base frame with metal fasteners at both ends, we will make a stiffener at the top of the greenhouse. To do this, connect the two remaining 6m PVC pipes together and cut them so that the total length of the rib is 9.8m. Attach this rib with plastic ties at the top of the arches.
4. Covering the greenhouse with film
Cover the entire greenhouse with foil. The film must necessarily cover the entire greenhouse in length and each end to the ground. Carefully secure the film with rails to the base frame on one side of the greenhouse. Then go to the other side, carefully stretch the film and attach with battens. Start fastening in the center of the base, then fasten the film, moving to the ends of the greenhouse.
Note: If you attach the film in warm weather, then it will sag less. Be careful not to damage the film.
Gently pull the film down on the ends of the greenhouse. Fold the excess film into folds from the center to the edges and fasten them to the base frame of the greenhouse with slats.
At the end with the door, cut the film in place of the doorway, leaving an allowance of a few centimeters to wrap wooden details doorway and fix the film inside the greenhouse.
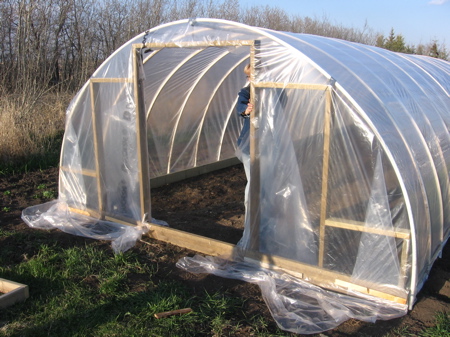
5. Door installation
Before installing doors, check the actual dimensions of the doorway, as they may differ slightly from the intended dimensions. The door may be too small or vice versa too large.
According to my measurements, I sawed the following parts for doors from bars with a section of 2x4cm:
(4 pcs) 1.5
(4 pcs) 1.2
Knock them together to make door frames. Nail a block along the diagonal of the door for rigidity. Attach the hinges to the door frame.
Choosing a heating system for a greenhouse
The greenhouse is not only decoration suburban area but also guarantee good harvest especially in temperate latitudes. Greenhouse prices industrial production are quite high, and the typical design is not suitable for all summer residents.
In this case, it is easier and cheaper to assemble a greenhouse with your own hands from improvised materials, for example, from plastic pipes.
Varieties of greenhouses
The classification of greenhouses is quite complicated: they can differ in form, seasonality, the presence and type of heating, the material used for the frame and shelter.
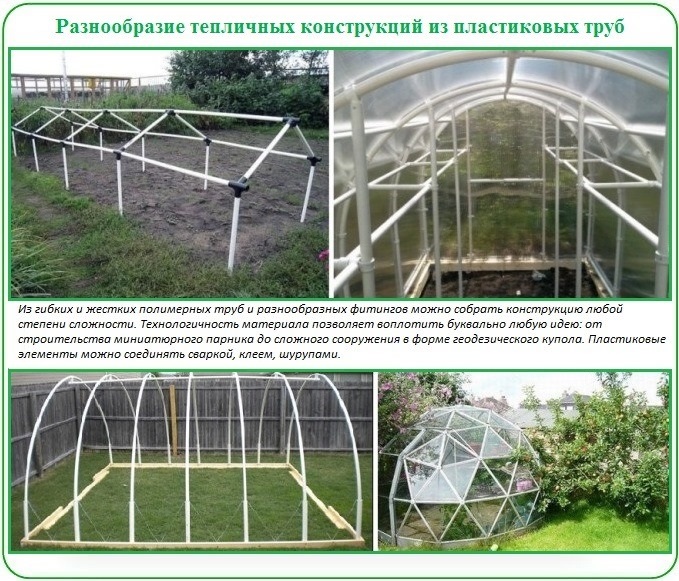
For the manufacture of PVC pipes, the simplest and most reliable designs are suitable, including:
- wall-mounted greenhouse;
- gable, in the form of a house;
- polygonal, with a complex shape of slopes;
- arched, with a frame in the form of a semicircle.

Wall greenhouses usually attached to the southern or southwestern wall of a house or other premises. At the same time, the wall plays the role of a thermomass: heating up during the day, it gives off heat at night, which reduces the average daily temperature fluctuations, and also protects from cold northern winds.
In wall greenhouses, a microclimate favorable for plants is created, and the cost is lower than that of stand-alone models. The main disadvantage of this design is the constant exposure of the wall to moisture and the lack of good ventilation, which can lead to the destruction of the wall material.
Gable design- one of the most convenient and popular. This is explained by the strength of the frame and its resistance to snow and wind loads. The reflection coefficient of gable greenhouses is low, most of the sun's rays penetrate inside, which increases the efficiency of lighting. By increasing the angle of inclination of the slopes, it is possible to achieve snow melting in winter, and the greenhouse does not have to be raked.
Gable greenhouses are equipped with one or two doors, as well as vents for ventilation. The side walls of gable greenhouses can be either strictly vertical or inclined. In the second case, the illumination in the greenhouse in the morning and evening hours will be higher, which is important for temperate latitudes.
polygonal design greenhouses almost repeats the shape of the arch due to several planes that form slopes and walls. Due to this, it increases inner space and at the same time, the main drawback of arched greenhouses is compensated - a large reflection coefficient of sunlight.
It is difficult to assemble a polygonal greenhouse from pipes with your own hands due to the large number of connecting nodes, so it is usually made from metal pipes by welding or from a profile for drywall, assembling the frame on self-tapping screws.
- perhaps one of the most common designs, and this is easily explained: it is distinguished by strength and stability, minimal amount connecting nodes and a large interior space. You can make it from almost any type of pipe, choosing any size and height.
The disadvantages of arched greenhouses include increased accumulation of snow on the roof in winter and a large reflection coefficient from the inclined plane of the film or polycarbonate.
Partial reflection compensate correct installation greenhouses - from north to south. With this arrangement, the side walls are illuminated by the morning and evening sun, and the rays hit the walls of the greenhouse almost at right angles. During the day, when the sun is high, it illuminates the south pediment and roof, where the refraction of the rays is not so strong.
Snow accumulation is dealt with in three ways:
- regular cleaning;
- dismantling the film or the entire greenhouse for the winter;
- changing shape to a lancet arch.
![]()
Lancet-shaped greenhouses have a more stable structure, and their increased height has a beneficial effect on the microclimate: hot superheated air accumulates at the top and does not depress plants. At the same time, the consumption of material and the planting area do not differ from those of conventional arched greenhouses.
PVC pipes and methods for their connection
PVC pipes are designed for installation of cold water supply systems and can be operated at temperatures up to +65 degrees. Due to the flexibility and a wide variety of connecting elements, it is easy to assemble a greenhouse of any configuration from them.
For greenhouses, PVC pipes with a diameter of 20 to 32 mm are used, they provide the necessary frame rigidity. The standard length of pipes can be 1, 2, 3 or 6 meters.
There are several ways to connect PVC pipes for a greenhouse:
- with the help of clamps, screeds;
- on furniture bolts through pre-drilled holes;
- on glue.
When connecting pipes to clamps or bolts, the greenhouse can be completely disassembled and moved to another place, ensuring crop rotation. In this way, film greenhouses and greenhouses are more often mounted. The film is usually removed for the winter in order to avoid damage by snow and wind, at the same time the frame is dismantled.
The adhesive connection is non-separable, but more durable. It is recommended to use it for greenhouses installed on the foundation and left for the winter. Such greenhouses are covered, as a rule, - it serves at least 5-7 years and does not require annual replacement.
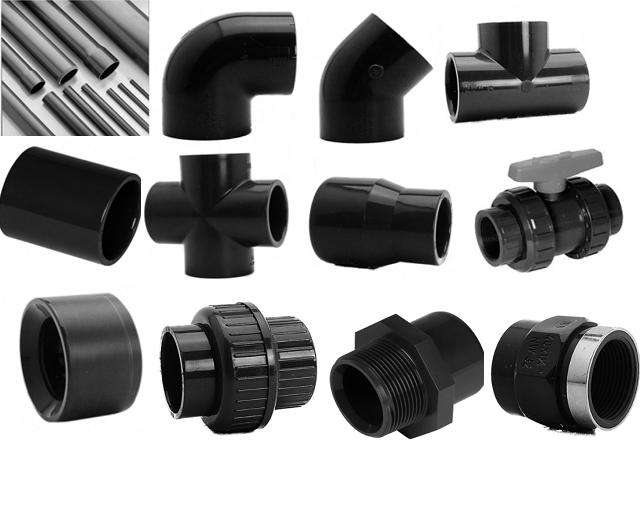
Connecting elements for PVC pipes used in the installation of the greenhouse:
- corners, allow the fastening of mutually perpendicular elements;
- tees- connect three pipes in the same plane or at an angle (one-plane tees can have an angle of 45, 66 and 90 degrees);
- crosses, for connecting four pipe elements.
The number and type of fittings used depend on the design of the greenhouse, as well as the type of connection chosen.
The procedure for connecting pipes and fittings with glue
The connection is made with Tangit PVC-U glue from the Henkel company or its equivalent. This adhesive provides a strong fastening of parts and quickly hardens, so installation does not take much time.
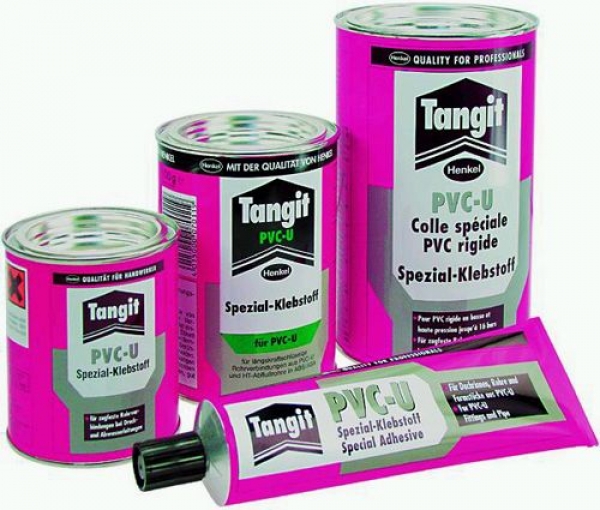
Sequencing.
- Cut the pipe to the required length with a cutter, hacksaw or construction scissors. Check the compatibility of the pipe and the fitting: the pipe must go into it by 2/3 of the length of the socket.
- Clean the edges of burrs, chamfer the end with a knife.
- Degrease the surfaces to be joined with any solvent. Apply adhesive to both surfaces to be bonded: the pipe and the inner surface of the fitting.
- Insert the pipe into the fitting strictly along its axis by 2/3 of the depth until it stops, then turn it 90 degrees inside the fitting so that the adhesive is evenly distributed.
- Fix them in this position for 15-30 seconds, then wait another 1-2 minutes until complete bonding.

The procedure for connecting pipes to bolts
Furniture bolts with a diameter of M6 or M8 are chosen as fasteners, depending on the diameter of the pipes. The length must be sufficient to connect two pipes.
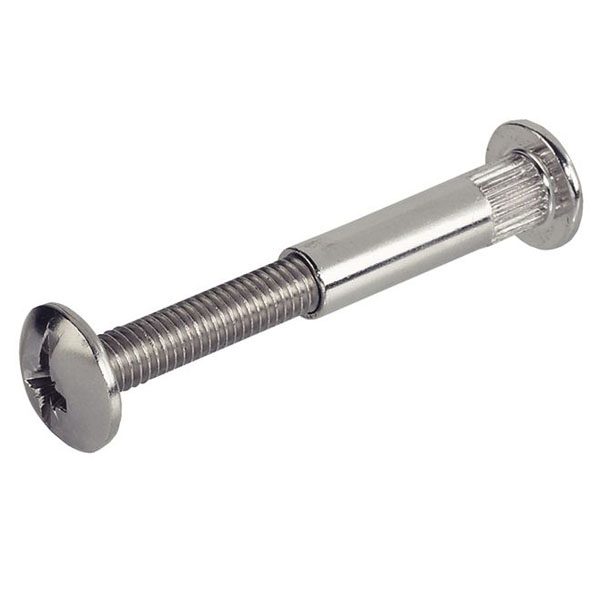
Sequencing.
- In pipes, prior to installation, mark places for drilling holes.
- drilled out through holes drill 2 mm larger than the diameter of the bolts.
- Connect the pipes by aligning the holes. Insert and tighten bolts.
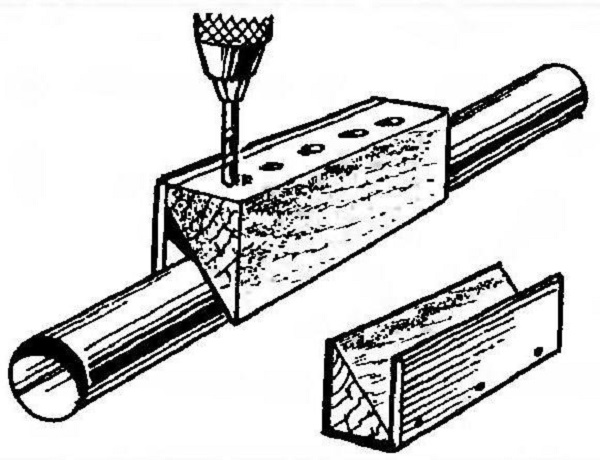
Holes can also be drilled in place, while the pipe is temporarily fixed to a wire tie or otherwise fixed.
Calculation of the necessary materials
First you need to decide on the shape and size of the greenhouse (length, width and height). As a rule, two beds are located in the greenhouse, separated by a passage. The width of the beds usually varies between 0.8-1.1 meters - this allows you to plant two rows of plants at the required interval and provide convenient access to them.
The width of the passage should be such that you can walk freely with buckets and other garden tools, including a wheelbarrow. Usually the path is made 0.6-0.8 m wide. As a result, the width of the greenhouse will be 2.2-3 m.
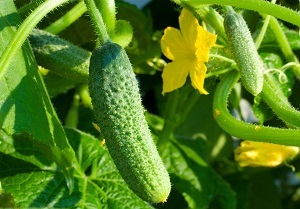
The length of the greenhouse depends on your needs and the placement rate. vegetable crops that you plan to grow in it. Planting rates per 1 m 2 of the greenhouse area are given in table 1.
Table 1. Norms for planting vegetables in a greenhouse.
| culture | Number of roots per 1 m2 |
|---|---|
| 2-4 |
| 1-2 |
| 4-6 |
| 2-4 |
| 4-6 |
| 2-4 |

Based on these standards, determine the length of the greenhouse. Usually the length is 3-6 meters - it is not advisable to install a smaller greenhouse, and for longer structures it is better to use more durable materials and capital construction technologies.
Note! If you plan to use polycarbonate as a greenhouse cover, choose a length that is a multiple of the width of the sheets (2 meters). This way you avoid unnecessary cuts.
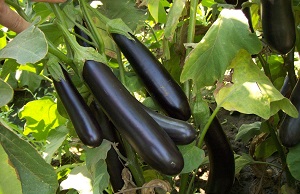
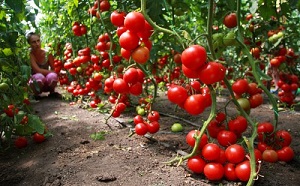
The height of the greenhouse should allow you to move freely in it, in addition, at least 50 cm of free space should remain above the plants - hot air accumulates there and air is exchanged during ventilation. For undersized crops - peppers, eggplants, undersized tomatoes - a height of 1.8-2.0 meters is enough. For tall crops, the height of the greenhouse should be at least 2.2-2.4 meters.
Another important parameter for an arched pipe greenhouse is the length of the arc, which is found by the formula:
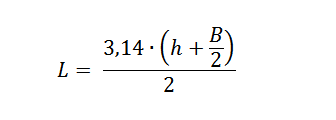
Here L is the length of the pipe for the arc, m; h is the height of the greenhouse, m; B is the width of the greenhouse, m. Table 2 shows the dimensions L for the most commonly used greenhouse sizes.
Table 2. Arc length for greenhouses of standard sizes.
| Width | h = 1.8 m | h = 2.0 m | h = 2.2 m | h = 2.4 m |
|---|---|---|---|---|
| B = 2.2 m | 3,1 | 3,5 | 3,8 | 4,1 |
| B = 2.4 m | 3,4 | 3,8 | 4,1 | 4,5 |
| B = 2.6 m | 3,7 | 4,1 | 4,5 | 4,9 |
| B=2.8m | 4,0 | 4,4 | 4,8 | 5,3 |
| B = 3.0 m | 4,2 | 4,7 | 5,2 | 5,7 |
To calculate materials, it is also necessary to determine the step between the arches. If you plan to remove the cover from the greenhouse for the winter, it is enough to place the arches in 0.8-1 meter increments. For a non-separable structure, the step should be reduced to 0.5-0.7 meters - this will protect the greenhouse from deformation under the influence of snow.
It is necessary to take into account the material for the manufacture of longitudinal ties, end walls, doors and vents. The total length of the longitudinal ties can be calculated by multiplying the length of the greenhouse by the number of ties. Usually there are at least five of them: two lower, two side and ridge. To strengthen the structure, you can use additional side ties.
Pipes will be needed on the end walls overall length 15-20 m. About 5 meters of pipe are needed for each door, 2-2.5 meters for a window leaf. For convenience, you can make a detailed sketch, which shows all the dimensions, as well as the number of connecting elements.
Step-by-step instructions for assembling an arched greenhouse
Below is step-by-step instruction assembling a greenhouse from PVC pipes with the following dimensions:
- width - 2.4 m;
- height - 2.0 m.
- length - 4 m.
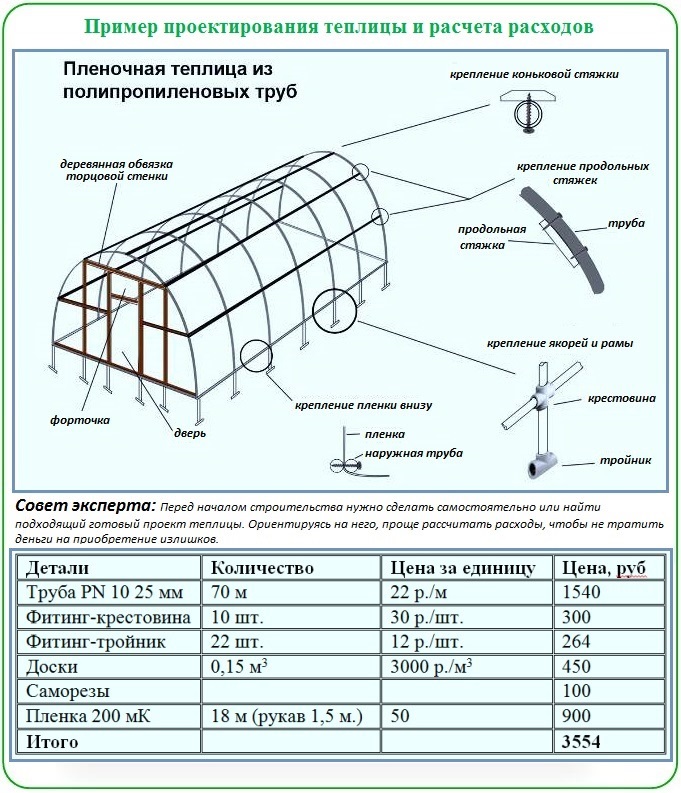
According to table 2, the length of the arc is determined - it is 3.8 m. PVC pipes of a standard length of 6 m with a diameter of 25 mm are used for the frame. Such pipes will provide the structure with reliability and rigidity. To connect the pipes, standard 25 mm fittings and a glue connection are used.
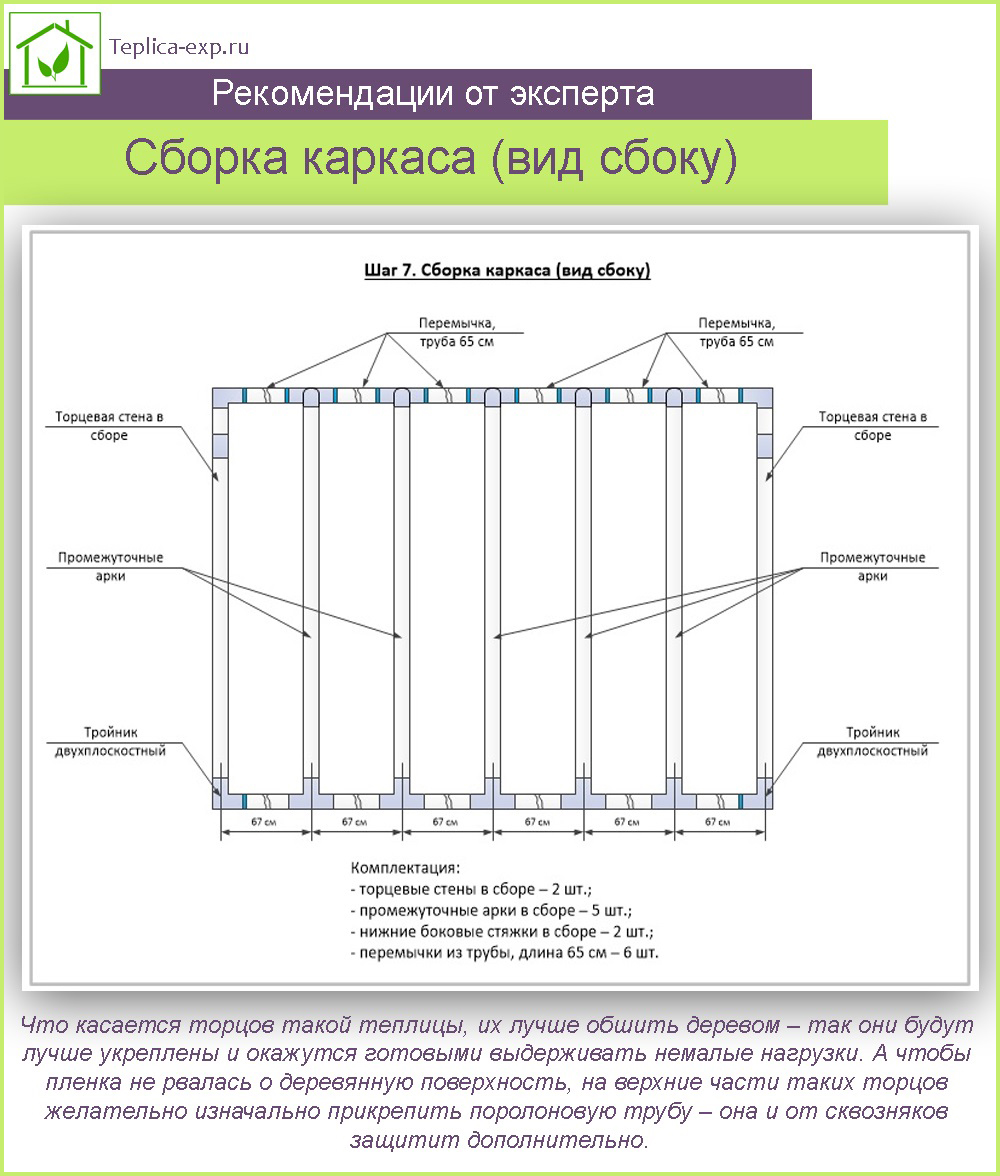
For a greenhouse of the indicated dimensions with two doors and vents and with an arch spacing of 67 cm, you will need:
- PVC pipe L=6 m, Ø25 mm - 16 pieces;
- single-plane cross Ø25 - 5 pieces;
- tee one-plane angle 90 degrees Ø25– 28 pieces;
- tee one-plane angle 45 degrees Ø25– 4 pieces;
- two-plane tee Ø25 - 4 pieces;
- corner 90 degrees Ø25 - 16 pieces;
- self-tapping screws or furniture bolts for attaching side ties - 36 pieces;
- two-arm clamps - 18 pieces, 55 mm self-tapping screws for them - 36 pieces.
- door hinges - 8 pieces, 24 mm screws for them - 48 pieces;
- polycarbonate - 3 sheets measuring 2x6 meters;
- self-tapping screws for fixing polycarbonate with a thermal washer - 100 pieces;
- connecting profile for polycarbonate or construction tape.
A film can also be used as a cover for the greenhouse, it will need about 8 linear meters with a width of 6 m.
Ground leveling and foundation installation
To avoid distortion of the structure during installation and operation, the area under the greenhouse must first be leveled. To do this, mark the location of the future greenhouse on the ground with the help of pegs and twine and check the site for level. With a slope of more than 1 degree, the site must be leveled. Under the foundation, it is recommended to make a sand cushion 5-10 cm thick.
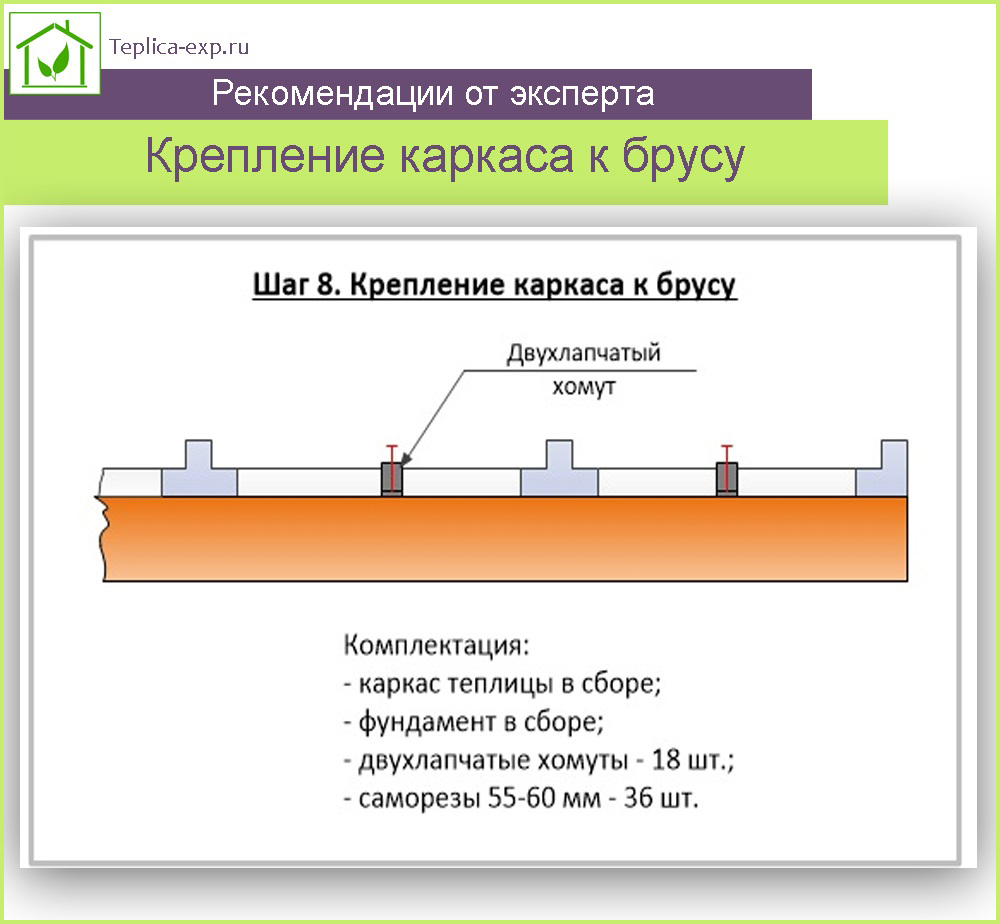
Traditionally used as a foundation for greenhouses wooden beam with a section of 10x10 cm. It provides load distribution and lasts at least 10-15 years, while it is inexpensive, and its installation does not take much time.
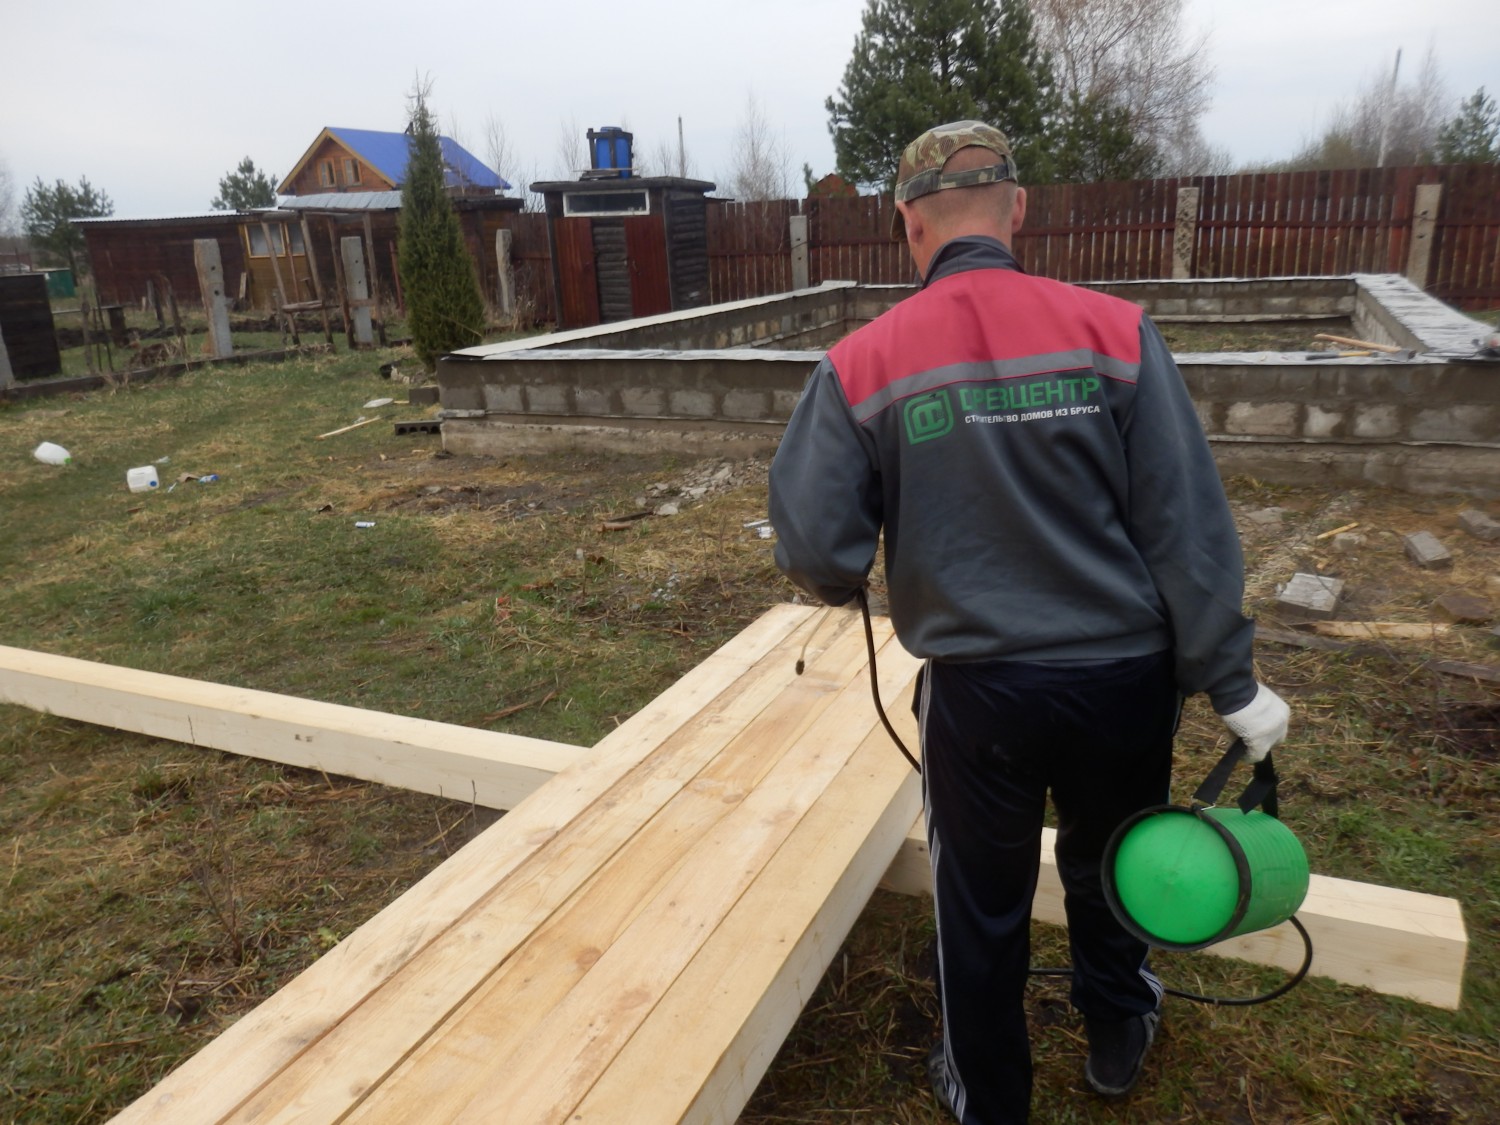
Step 1. The beam is sawn to the size of the greenhouse, impregnated with an antiseptic for lower rims log house or waste oil and dried. It is more convenient to treat with an antiseptic using a sprayer.
Step 2 They assemble the foundation on the site for the greenhouse, laying out the timber on a sand cushion or auxiliary brick posts, while using a level. Check the dimensions, as well as the diagonals - when correct styling they must be equal.
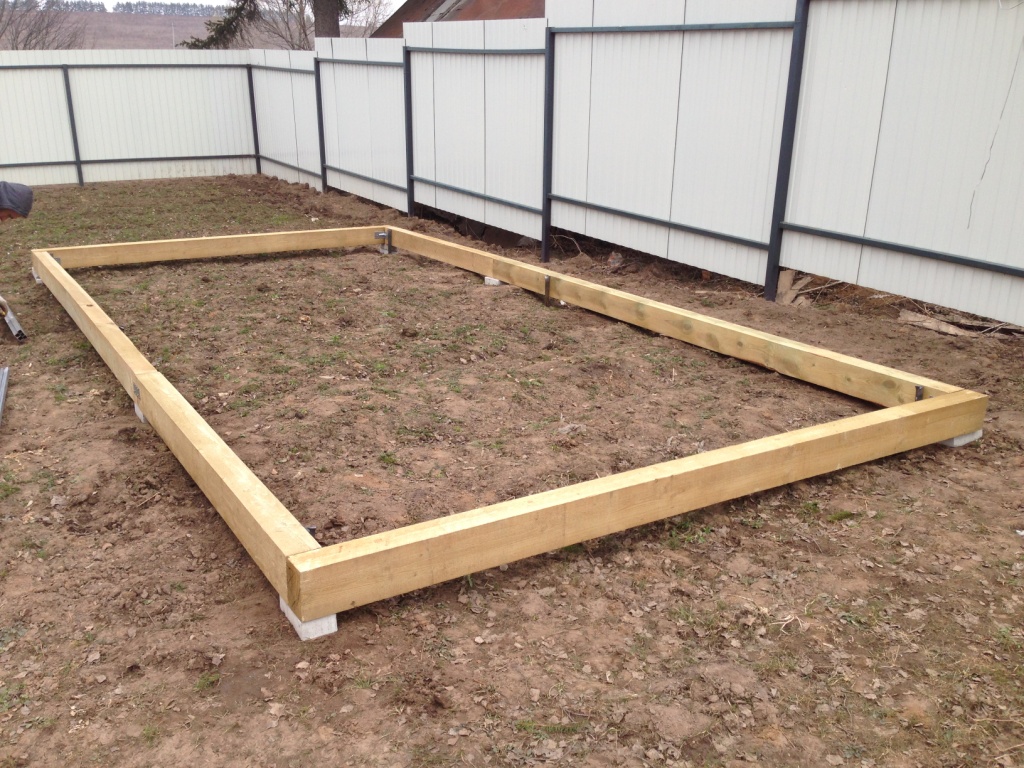
Step 3 Connect the bars with the help of metal corners and self-tapping screws. With insufficient length of the bars, they are fastened with brackets. For better adhesion to the ground, metal pins are used - lugs. All fasteners must be protective covering, it is best to take galvanized elements. After installing the foundation, they can be additionally painted or varnished.
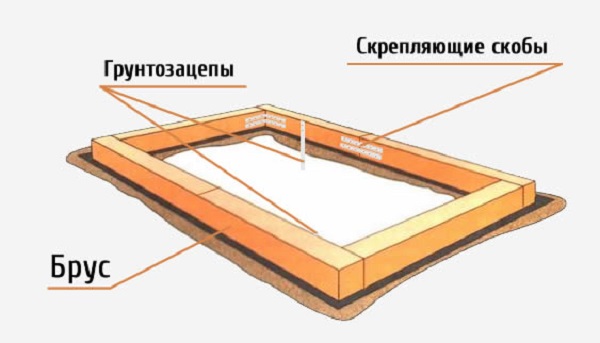
Step 4 Sand is poured around the perimeter of the foundation, finally fixing it. At the same time, you can immediately make paths in the greenhouse and fencing the ridges.
Assembling the frame of the greenhouse
The assembly of the frame begins with the preparation of the necessary pipe sections. After cutting to size, it is better to sign them with a marker so as not to get confused.
For the described design, you will need:
- pipe segments 400 cm long - 2 or 4 pieces;
- pipe segments 190 cm long - 10 pieces;
- pipe segments 180 cm long - 4 pieces;
- pipe segments 140 cm long - 4 pieces;
- pipe segments 76 cm long - 8 pieces;
- pipe segments 65 cm long - 18 pieces;
- pipe segments 46 cm long - 4 pieces;
- pipe segments 10 cm long - 4 pieces.
The remaining elements, including the frame of doors, vents and end ties, are cut out in place during the installation process.

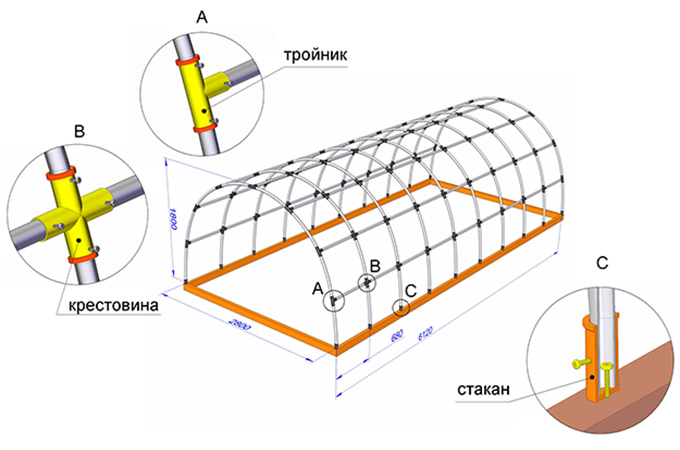
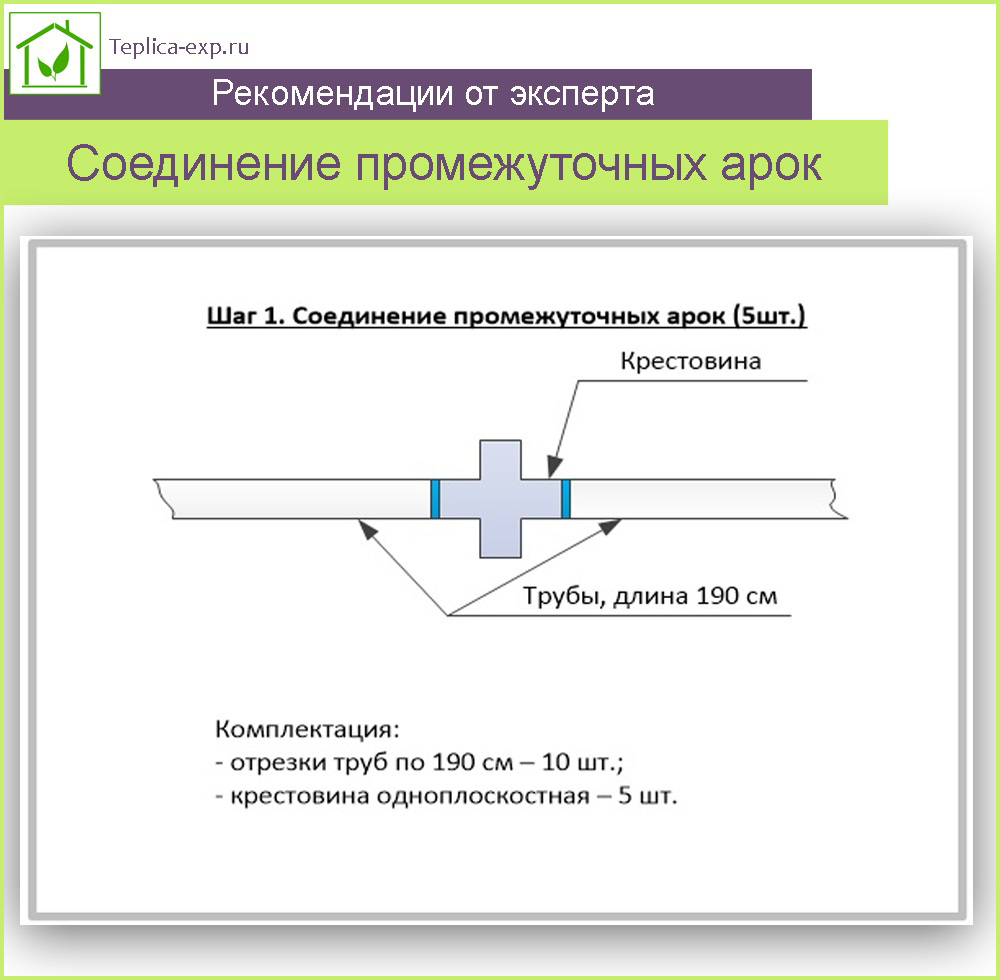
Step 1. Pipes for five intermediate arches 190 cm long are glued in pairs using crosses. In the illustration, the connection points are highlighted in blue.
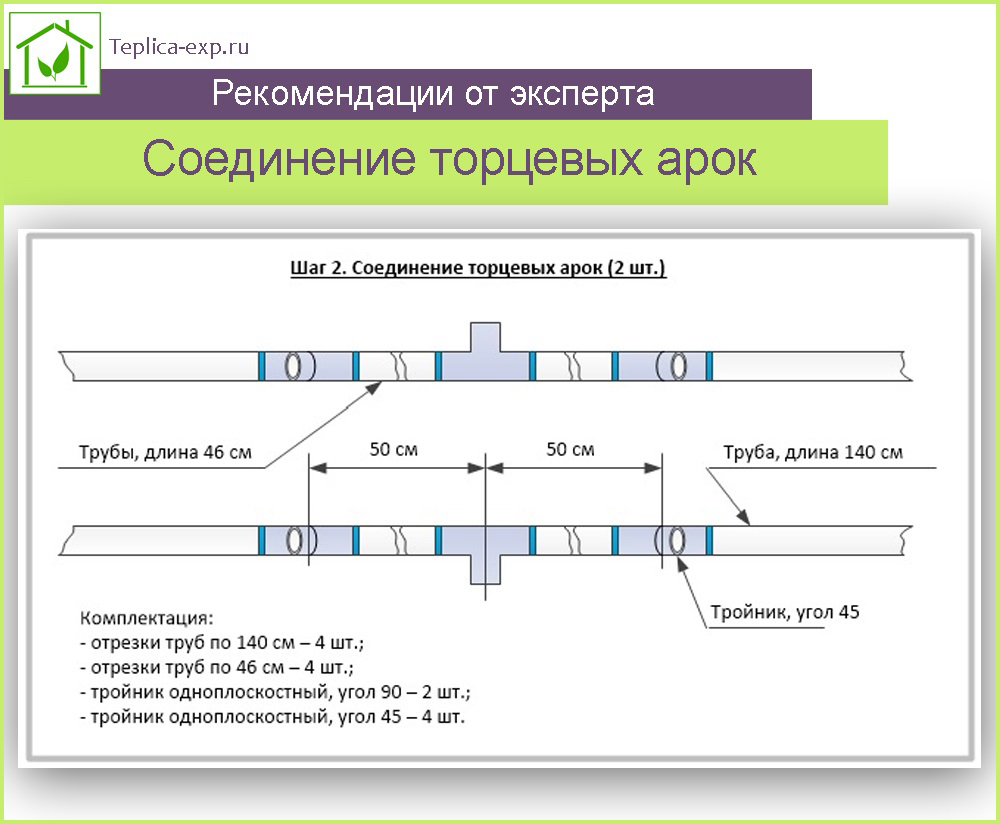
Step 2 The end arches are connected according to the scheme of four pipe sections and three tees. Two pipe sections of 140 cm each form side arcs that are attached to the tees with an angle of 45 degrees so that when the arch is bent into an arc, the free sockets of the tees are directed downwards - the doorway pillars will be attached to them. Pipe segments 46 cm long are connected to a 90 degree tee, then the parts are combined into a common structure, while the side socket of the 90 degree tee should be directed perpendicular to the axis of the 45 degree tees.
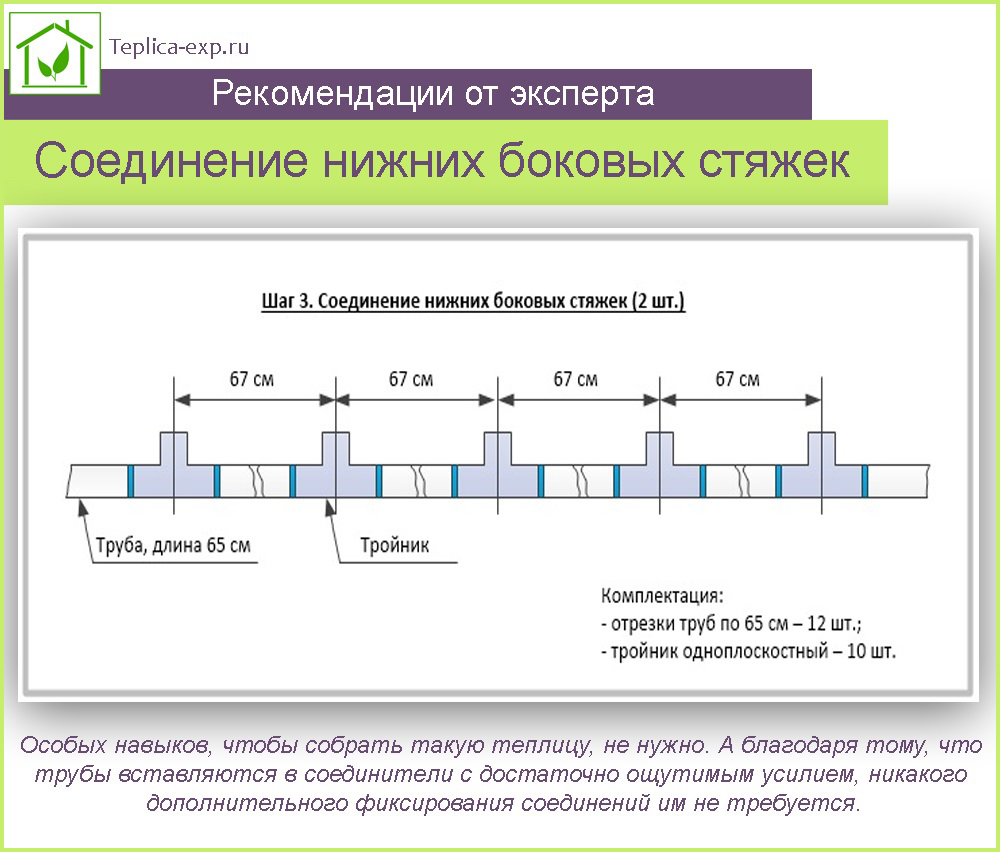
Step 3 Two lower side ties are assembled from six pieces of pipe 65 cm long and five single-plane tees per tie. The conclusions of the tees are directed strictly in one direction - arcs will be attached to them.
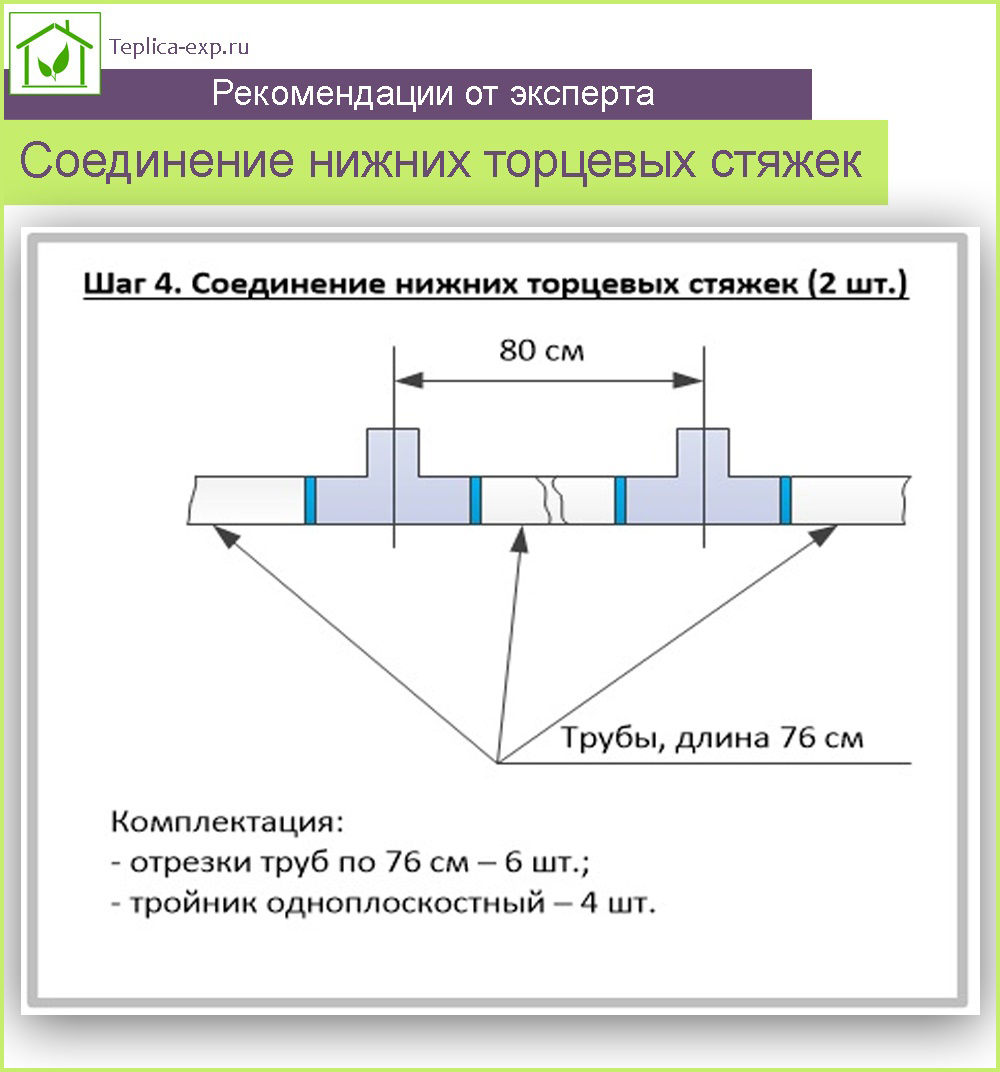
Step 4 Two end ties are assembled from three pieces of pipe 76 cm and two single-plane tees for each tie.
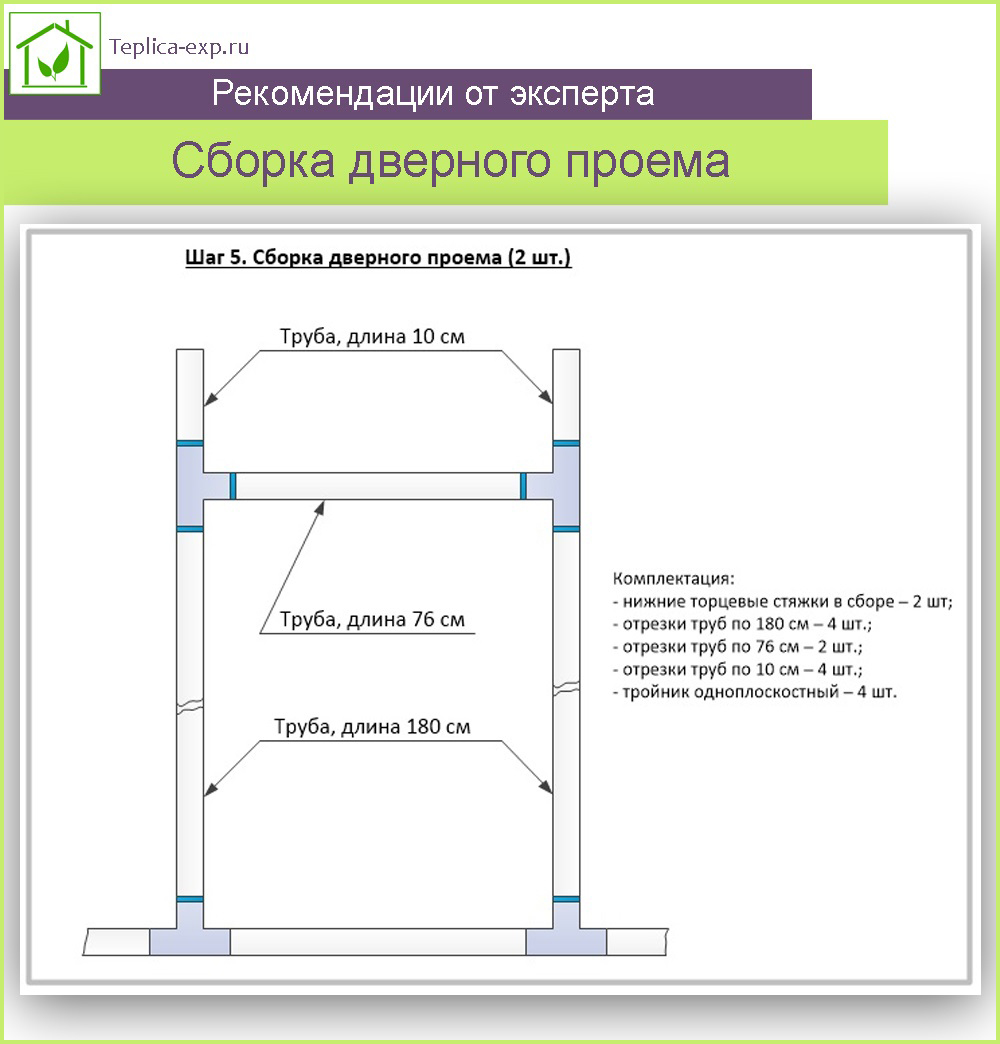
Step 5 Collect doorways according to the scheme. Pipe sections 1.8 m long are fixed in the lower tees, then they are connected using tees and jumpers 76 cm long. Pipe sections about 10 cm long are glued to the tees - the continuation of the racks. Later they are cut to size when connected to the arch.
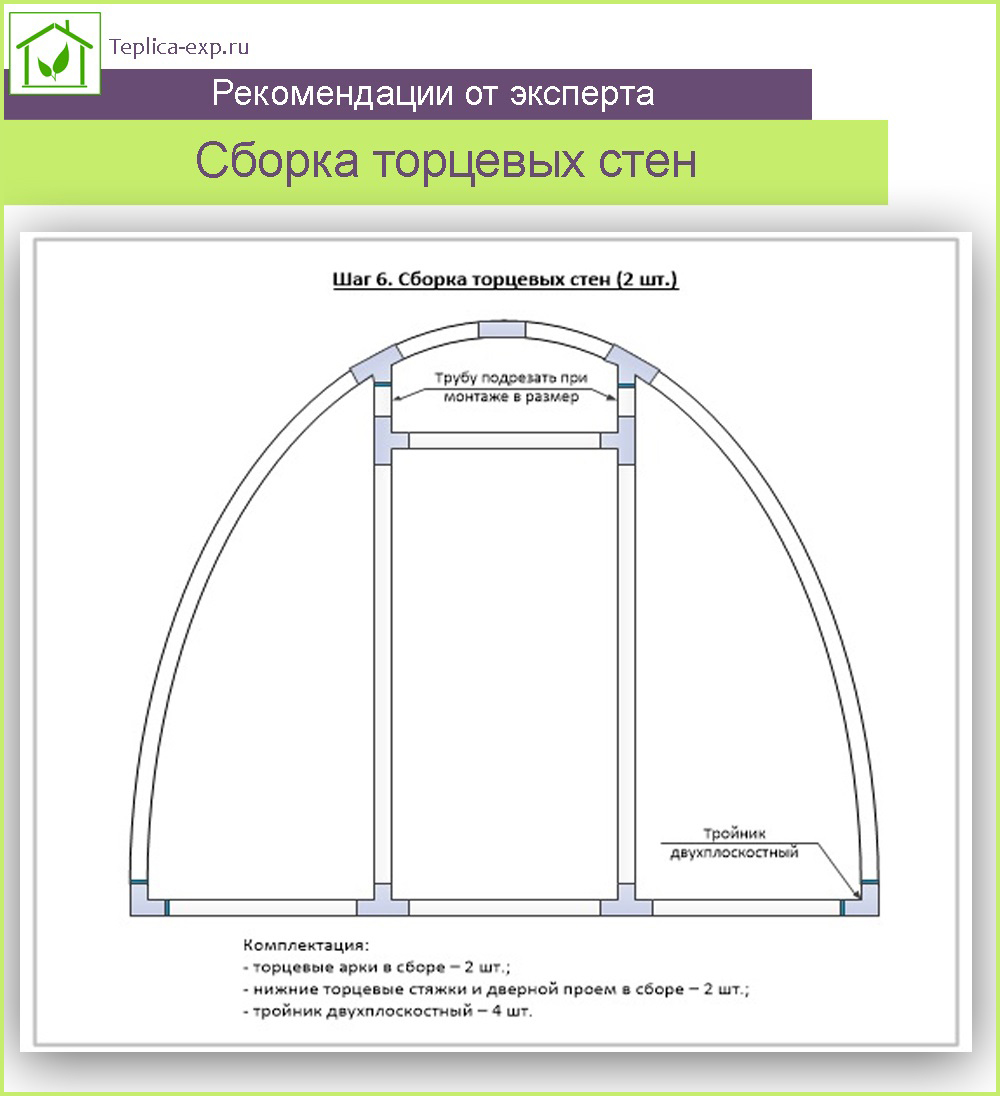
Step 6 Assemble end walls. Connect the end ties and end arches with the help of tees and racks, as well as two-plane tees in the lower part. The pipes at the top of the racks are cut to size.
Step 7 Assemble the frame of the greenhouse on the foundation. One end arch is installed and connected to the lower screeds. The first intermediate arch is installed in tees on the lower screeds and connected to the end arch using a 65 cm long jumper. All intermediate arches are successively fixed. A second end wall is installed, connecting it to the upper and lower side ties. For stability during assembly, temporary wire ties can be used.
Step 8 Check the diagonals of the frame, align it if necessary. The frame is fixed to the beam using metal two-blade clamps and self-tapping screws.
Step 9 Install side straps. They are attached to furniture bolts at a height of about 1.4-1.6 meters on both sides from the inside of the greenhouse. For greater rigidity, additional longitudinal ties can be fixed. The location of the bolts is marked with red crosses.

Step 10 Assemble doors and vents in accordance with the scheme of pipe scraps, tees and corners. Fix the vents to the door frames on the hinges using self-tapping screws. Attach the hinges to the door frame.
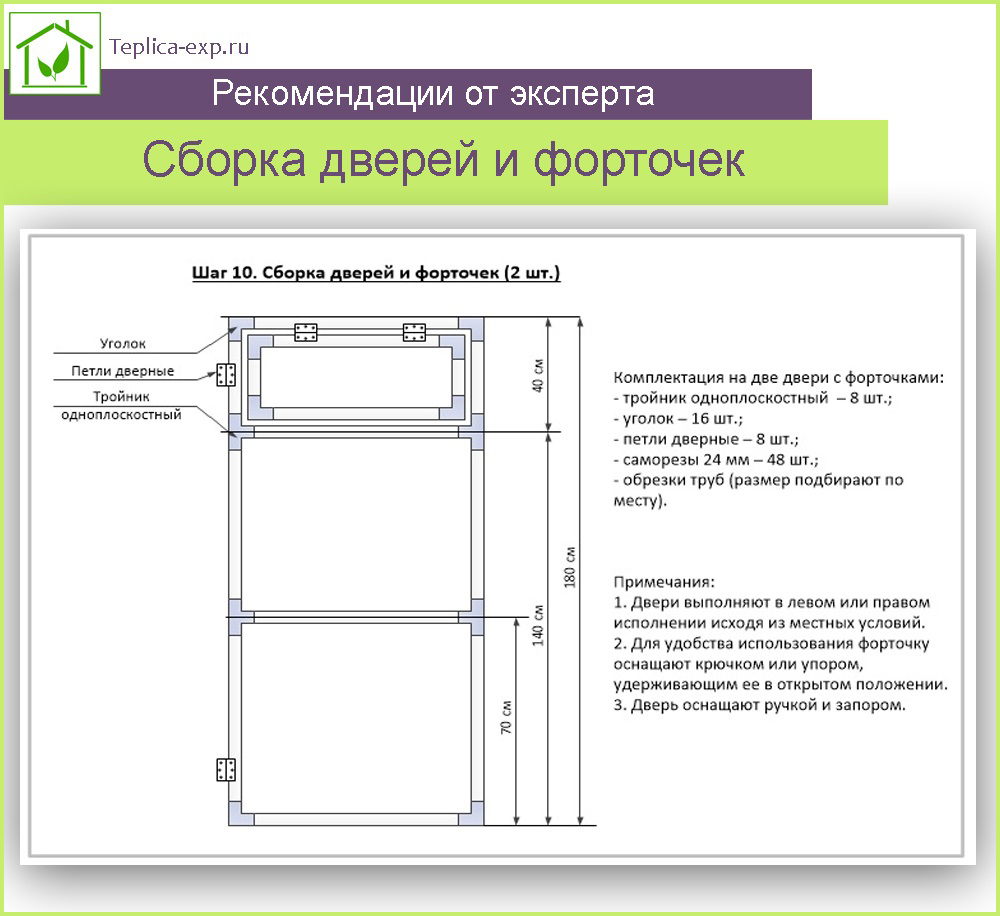
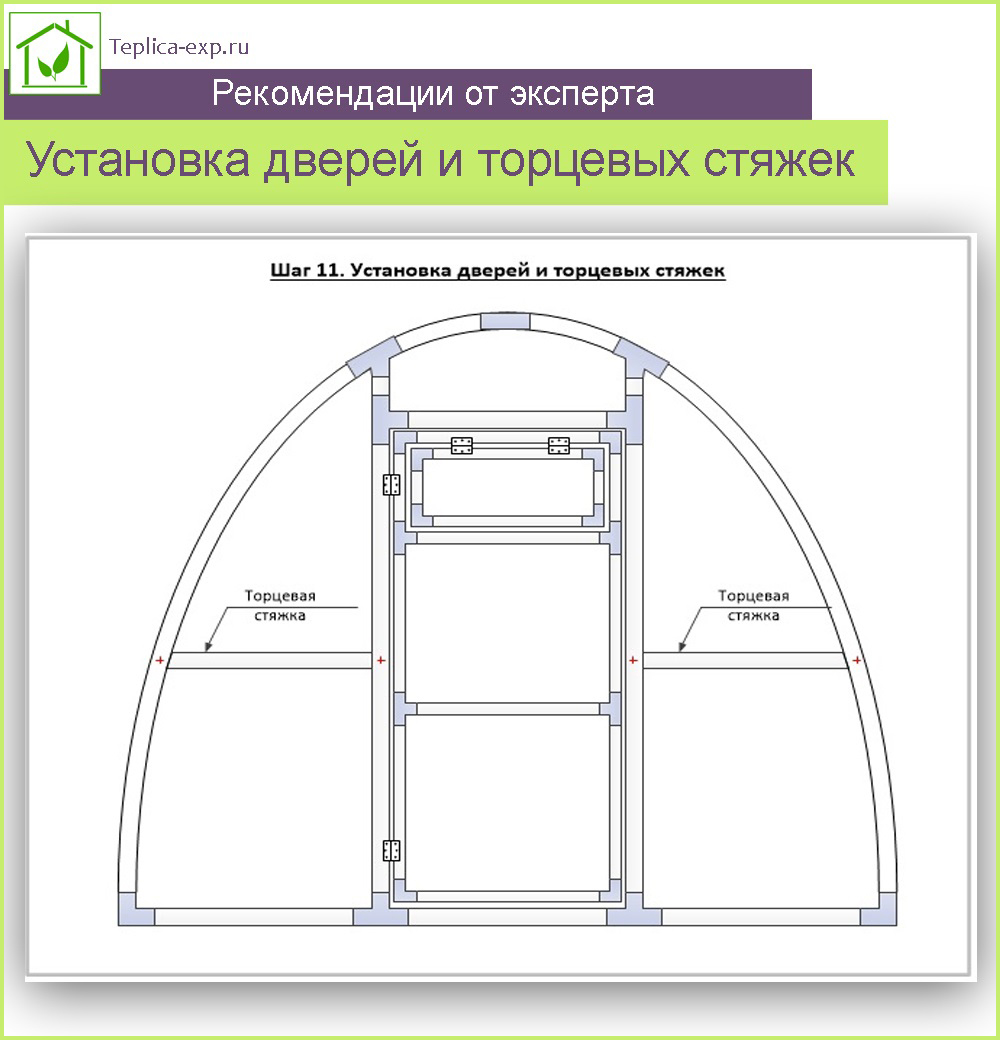
Step 11 Fasten doors with hinges in doorways. Install end screeds from pipes according to the scheme, fixing them to furniture bolts. The attachment point is marked with red crosses.
Alternative - non-kink design
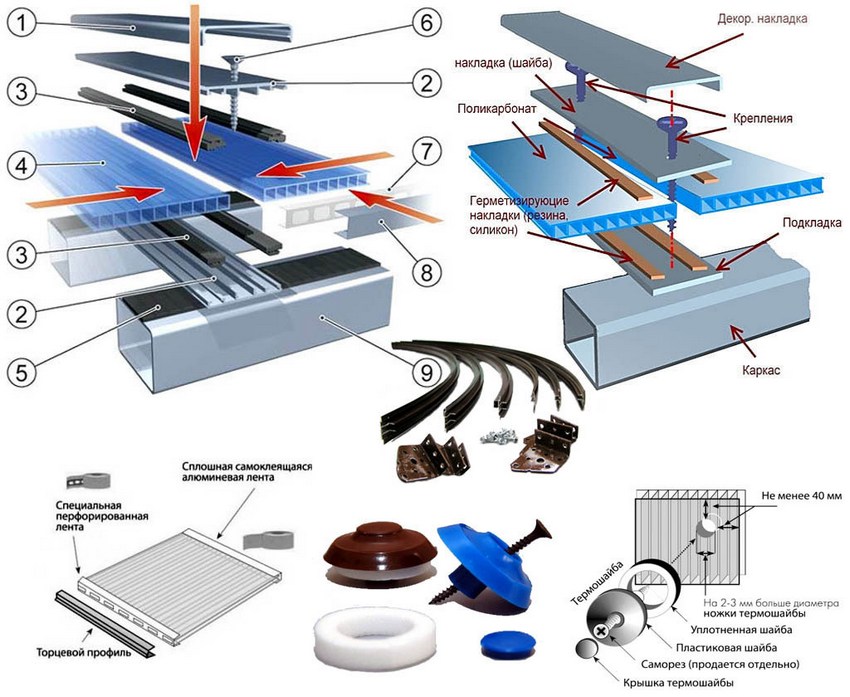
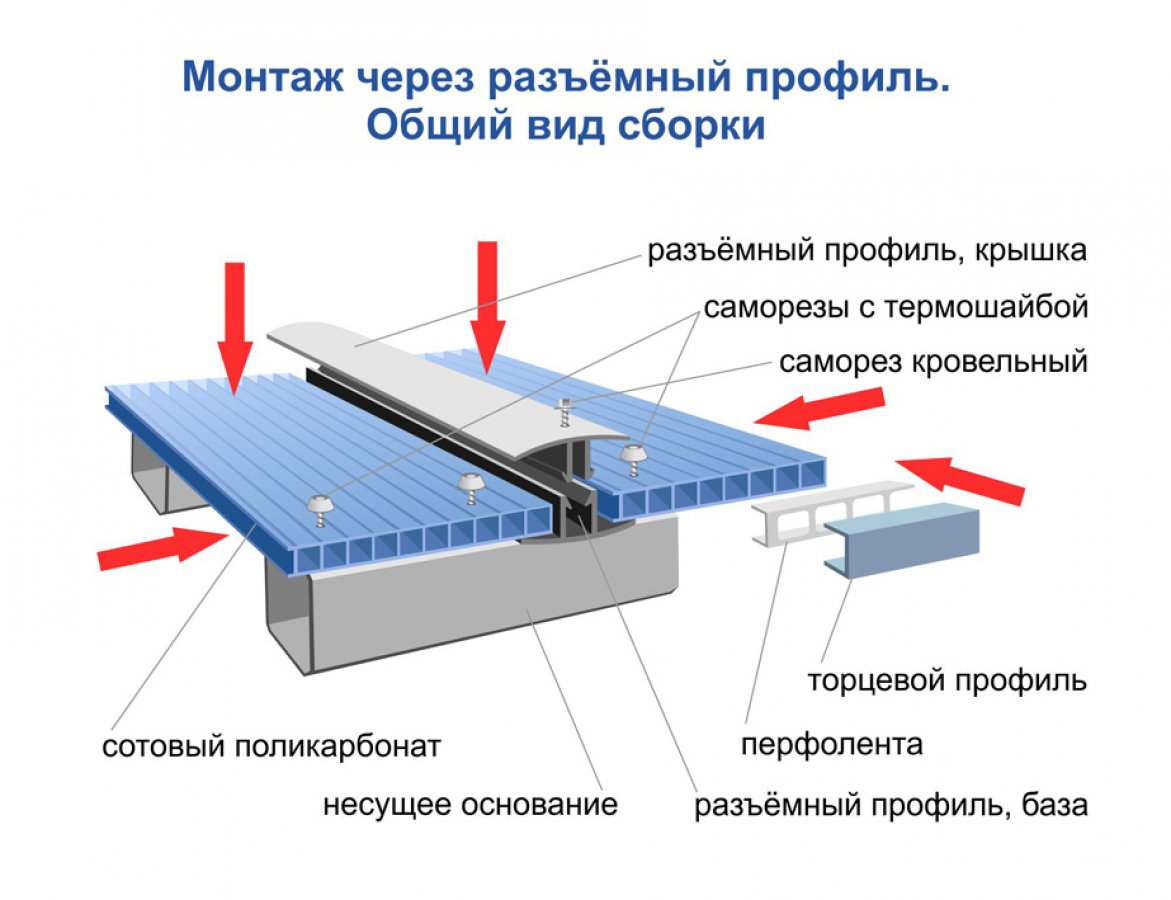
Polycarbonate mount
Polycarbonate is a relatively new material that has received wide recognition from summer residents.
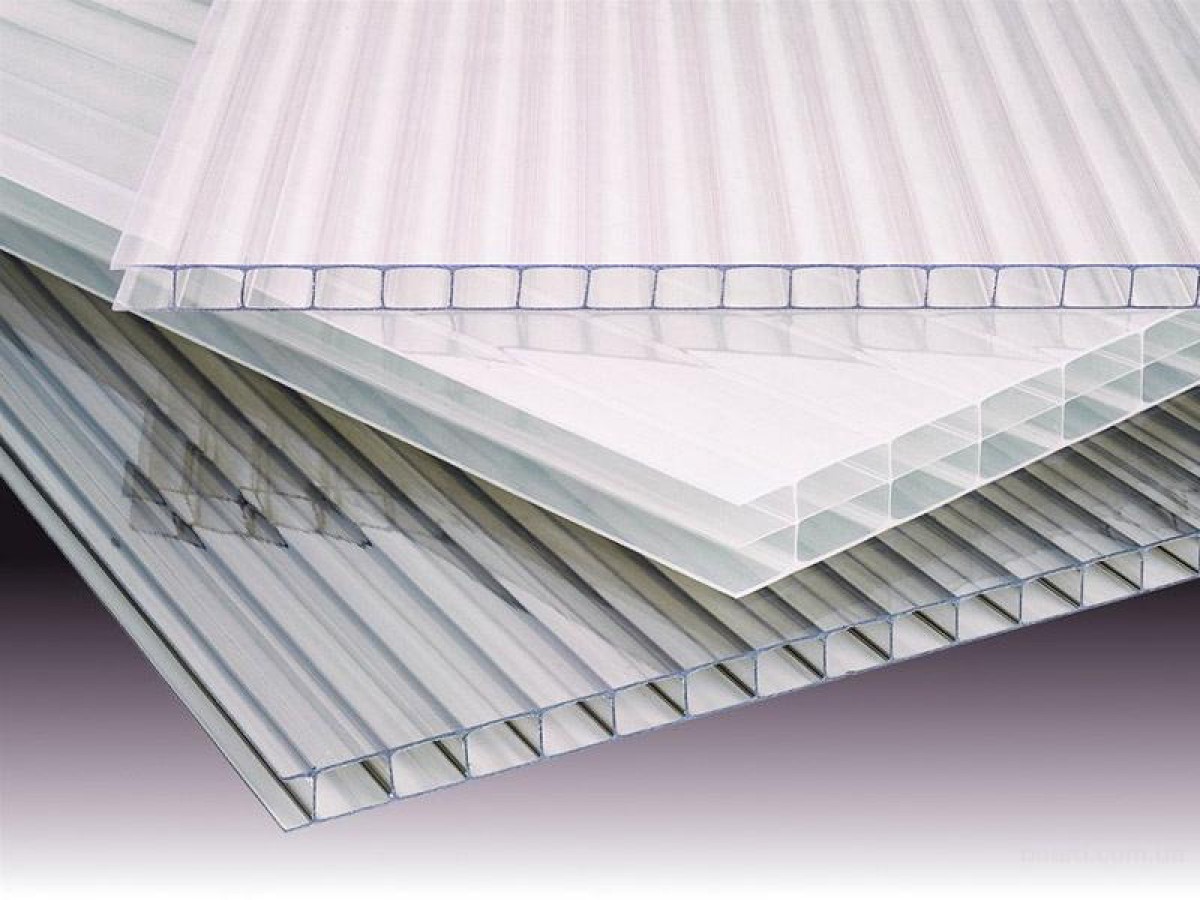
It has many advantages:
- good light transmission ability;
- double-layer honeycomb structure that retains heat well;
- sufficient mechanical strength;
- resistance to UV rays;
- simple and fast installation;
- service life of at least 5 years.
Disadvantages of polycarbonate:
- reflects Sun rays stronger than glass and film;
- resistant to scratches and point impacts, requires careful handling;
- with improper installation, moisture and dirt accumulate inside, from which the material fades.
To extend the service life, polycarbonate must be installed strictly according to the manufacturer's recommendations.
Three important factors to be observed:
- polycarbonate is fixed so that moisture can drain along the inner longitudinal stripes;
- one of the sides of the polycarbonate has a protective UV coating; during installation, the sheets must be placed with this side up;
- fastening is carried out on special self-tapping screws with a thermal washer along pre-drilled holes, otherwise the sheets will lead when heated.
Sequencing.
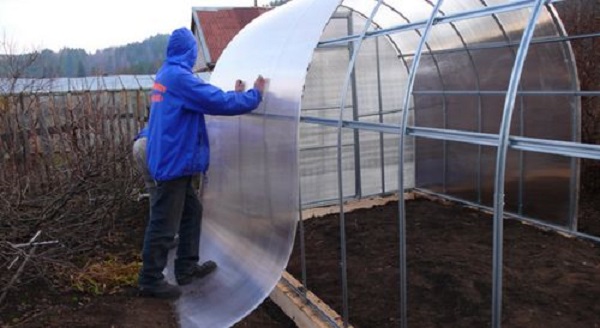
Step 1. Remove the protective film from the polycarbonate and mark the upper side with a marker (on it protective film usually colored or has a manufacturer's logo). It is better to make several marks on each sheet.
Step 2 Cut out polycarbonate for end walls. For this standard sheet cut into three pieces measuring 2x2 meters. One part is applied to the end of the greenhouse so that the cavities are directed vertically. The left side of the sheet is aligned along the left edge and the contours of the arc are outlined with a marker to the left post and down along it. Apply the right edge of the sheet to the right side of the end and do the same. As a result, the contours of two semi-arches are obtained on the sheet. They are cut out with a mounting knife or a jigsaw with a small allowance of 3-5 cm. The same is done with the second end.
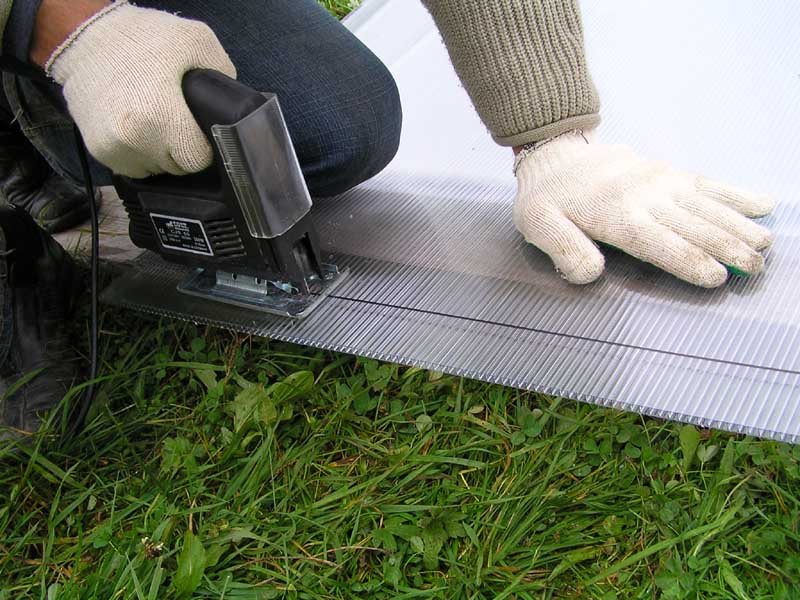
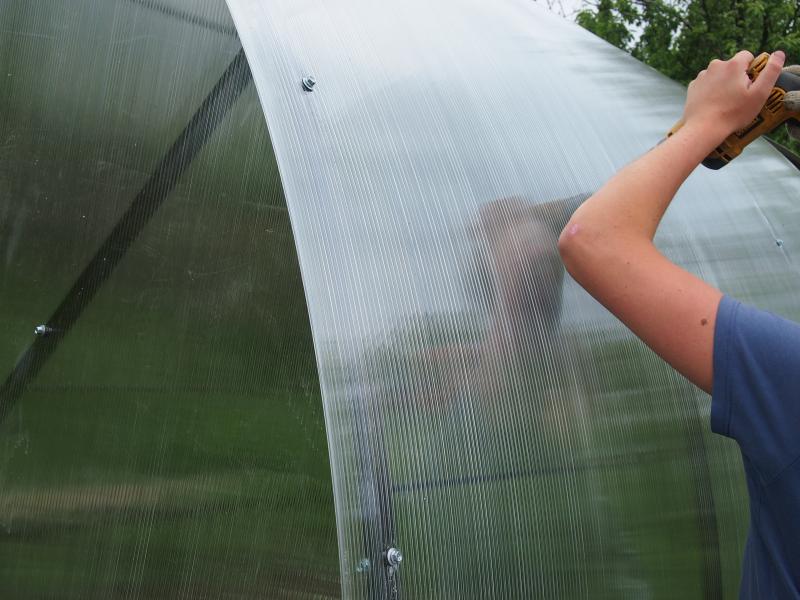
Step 3 The cut parts are fixed on self-tapping screws with thermal washers using a screwdriver. The fastening step is 30-50 cm. At the same time, they try not to pinch the polycarbonate. Trim excess polycarbonate with a knife.
Step 4 The third piece of the sheet is used for sheathing doors and vents. The sheet is applied to the doors, observing verticality. They circle the doors with a margin, cut out blanks and attach them to the doors and vents. From the remains of polycarbonate, an arch is cut out above the door, closed. Polycarbonate at the joints is best connected using special profiles.
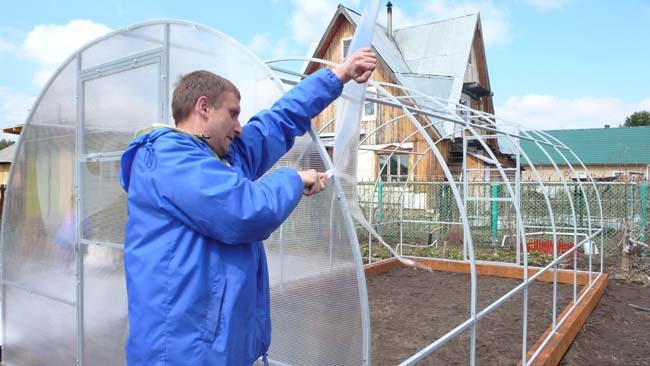
Step 5 Close the top of the greenhouse. To do this, a polycarbonate sheet is laid on top of the arcs, aligned along one of the lower edges, and the second is cut in place. The sheet should protrude slightly above the ends of the greenhouse. Fix the sheet at the corners.
Step 6 The second sheet is overlapped on the first one at the junction, cut. The corners of the sheet are fixed, after which they are fixed with screws along the bottom and all arcs in increments of 40-60 cm.
Video - Greenhouse made of PVC pipes and polycarbonate
Film mount
Using a film as a covering material has its pros and cons.
The advantages of this coverage include the following factors:
- low price;
- simple installation;
- good light transmission.
Flaws:
- low mechanical strength;
- susceptibility to UV radiation, due to which the film is destroyed in a year or two, even without mechanical stress;
- low thermal insulation.
Despite the shortcomings, the film is widely used to cover greenhouses and greenhouses. Film installation technology is quite simple. The film can be mounted both on self-tapping screws through strips, and on special pipe clamps.
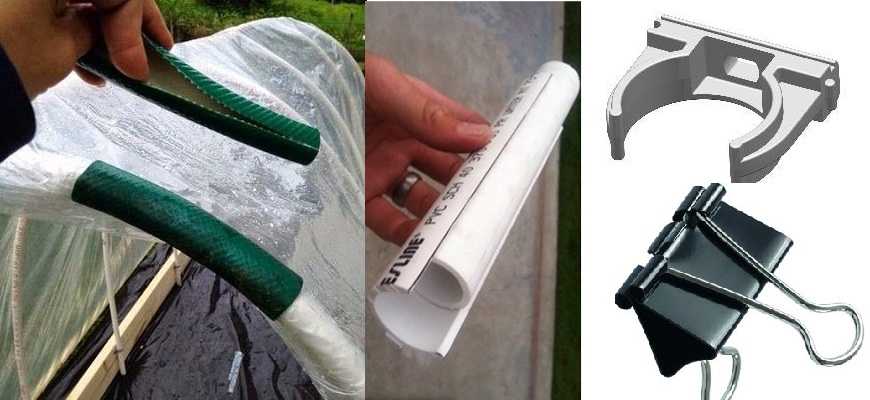
Note! When fixing the film on the screws, you can use an old PVC garden hose, cut in half lengthwise, as a strap. It neatly covers the pipe and does not tear the film.
Sequencing.
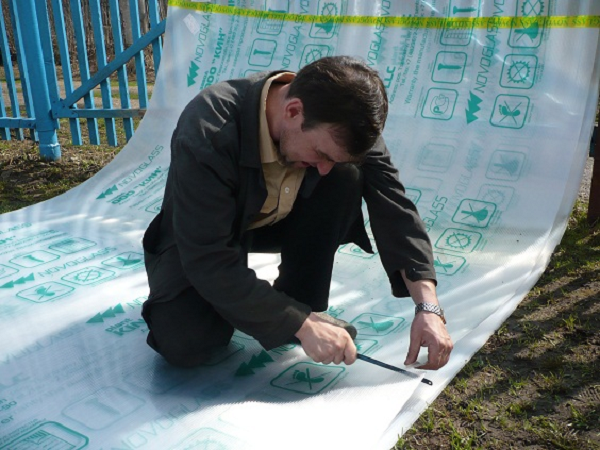
Step 1. The ends of the greenhouse are sewn up with a film. A piece of film is cut from the canvas of a suitable width according to the size of the end part with allowances of at least 20 cm on each side. The film is applied to the end wall, the allowances are brought to the wrong side and the film is fixed on the sides and at the top point with a temporary fastener. To do this, you can use adhesive tape - they grab a supply of film from the inside of the greenhouse. Align the film, eliminating creases and folds. Fix it around the entire circumference in increments of about 60 cm for temporary fastenings.

Step 2 Cover the greenhouse with a film with a margin of at least 30 cm from the bottom and at least 20 cm from the ends. Align the film, eliminate creases and folds. They are fixed along the extreme arches to a permanent fastening - clamps or self-tapping screws through the bar. Mounting step - no more than 30 cm.
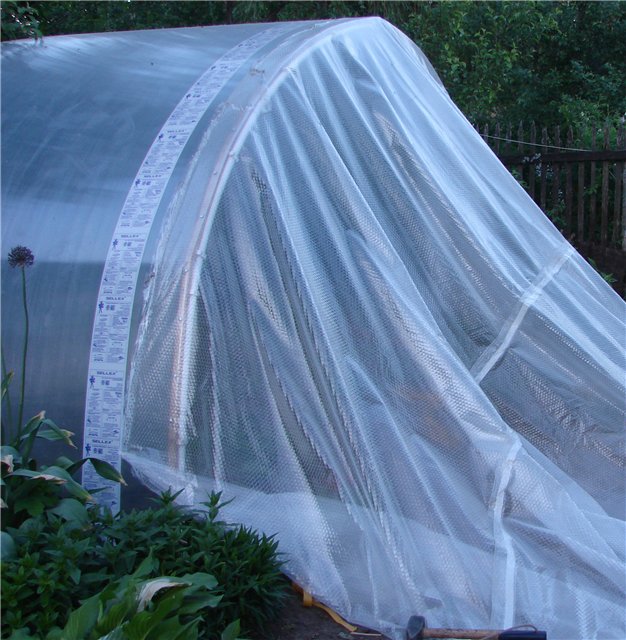
Step 3 From below, the film is attached to the lower screeds or sprinkled with earth. On intermediate arches, the film is attached to self-tapping screws through a bar, hose or rubber gaskets. The points of contact with the arcs can be reinforced with adhesive tape.
Step 4 Openings are cut out for the doors, leaving allowances of at least 20 cm. These allowances are folded inside the greenhouse around the doorway and fixed on the racks in the chosen way. Sheathe the doors and windows with foil.
Step 5 The free ends of the film are cut or glued to the adhesive tape. If you leave them hanging freely, in windy weather the film will begin to tear.
A home-made greenhouse is in no way inferior to industrial counterparts in the ability to create a microclimate favorable for plants. At the same time, its price is several times lower. Making such a greenhouse with your own hands is not at all difficult if you follow the instructions given and the advice of the masters.
Have we answered your question?