Raised beds are the savior of vegetable growers with poor soil, poor site drainage, and those who find it difficult to cultivate a large garden. The main idea of such structures is, instead of struggling with poor conditions, to create a structure above the ground, where all soil parameters can be controlled with minimal effort. Attractive raised beds in the photo have their pros, cons and difficulties. Armed with advice and having studied the instructions for different arrangement options, choosing the one that suits you is quite simple.
Purpose of raised beds
It’s easy to understand why the beds are made high - this design helps solve a variety of problems on the site, be it waterlogged, infertile soil, densely overgrown with weeds, or even cold climate.
Decorative vegetable garden
A correctly selected and placed high structure allows you to effectively grow plants in specific conditions, without making such significant efforts as in traditional vegetable growing.
Raised beds are horizontal boxes or containers for growing garden crops, herbs and flowers, located at least 15-20 cm above the soil level. Their width is from 40 to 150 cm.
This size is convenient for processing plantings without standing on the ground. The length depends on the size of the plot and the desire of the owner. These can be either simple ridges in the form of “hills” of nutrient soil mixtures, or structures with sides made of different materials.

Animal protection
Classification and features of species
Vegetable growers around the world have developed many types of raised beds. This makes it possible to choose a design that is most suitable for certain conditions and effectively grow plants in almost any climatic zone. Any of the modifications can be classified into one of the following categories:


Waist-high vegetable containers
Pros and cons of growing plants at altitude
As with every technology, the method of growing garden crops “at height” has its own advantages and difficulties that may arise when applied in practice. Therefore, before “rushing into battle” and starting construction, it is worth familiarizing yourself with the pros and cons of the method and testing it in specific conditions.

Design option
Advantages and possible difficulties
Bulk beds, whether large boxes, mounds without fencing or narrow containers, have a number of advantages over traditional vegetable gardens:
- In the spring, they warm up faster, allowing plants to be planted earlier and the first harvest to be obtained.
- The soil is not compacted by walking because the structures are made for easy access from the passages between them.
- An excellent option for those who, due to health or employment reasons, cannot work in a traditional garden. Raised beds require much less effort and time to get a good harvest.
- Thanks to the use of humus, systematic feeding of plants with fertilizers and regular watering, you can get significantly larger yields of vegetables from a smaller area.
- Using imported soil and humus, you can get an environmentally friendly harvest, even on contaminated and infertile (sandy, saline) soils.
- With fencing made of wood, wicker or stone, beautiful raised beds can serve as decorative element plot.

Wooden tall containers look very aesthetically pleasing
At the same time, some vegetable growers highlight disadvantages that sometimes cause difficulties in the practical implementation of this method:
- Equipping raised beds requires the acquisition of materials and minimal skills in the construction of simple wooden structures.
- In the absence of a compost heap, humus and fertile soil also need to be purchased.
- In hot weather, the soil dries out faster, which requires more frequent watering or a drip irrigation system.
- The need to replace the soil every few years or add compost annually and grow green manure before and after the main vegetables.
How to neutralize disadvantages and overcome difficulties
The listed difficulties can be overcome by taking used boards or slate as construction material, preparing in advance compost heap and arranging drip irrigation from plastic bottles.
As a test, you can make one small bed with your own hands and experiment on it for one year. Having determined what and how best to grow using this method in the conditions of a particular site, you can begin full-scale construction, taking into account the accumulated experience.

Strawberries grown in beds or containers are always clean and disease-free
Many gardeners begin their acquaintance with this method by growing strawberries in high beds. This plant can be grown with your own hands in any type of raised beds. When planning planting strawberries, it is worth considering the features of its cultivation:
- When building a container or box, you should take into account that strawberries are planted in sunny places, so in order to avoid overheating of the soil, their walls are made of wood, brick or stone, but not iron or slate. For the same purpose, the external walls of a tall structure should be whitewashed or covered with white facade paint.
- To avoid rapid drying out and overheating of the soil under the bushes, it must be constantly covered with a layer of mulch, film or agrotextile.
- In a low box, the earth will dry out and deplete faster. Frequent watering and mulch renewal will be required - at least twice a week. Therefore, it is necessary to have a compost heap and a barrel in which organic matter will be infused for irrigation.
Design and dimensions of raised landings
To make the right raised bed with your own hands, you must first determine the most advantageous location for it on the site. The place should be illuminated for 5-6 hours a day, preferably from sunrise. It should not be exposed to winds, especially northern winds, or drafts.
Most experts recommend placing containers in the direction from south to north - then all plants will receive an even amount of heat and light. If the site is located on a slope, it is better to place them regardless of the cardinal directions, but across the slope.

Device and layers
How to calculate the size of a structure
The appropriate height is then determined. Containers can be made slightly raised above the ground (25–30 cm) or high (70–80 cm). Both options have their advantages. There are even scientific research dedicated to selecting the height of containers using a certain formula for body proportions specific person. As for the device, beds at waist level require more time and effort, but they are warmer and easier to maintain.
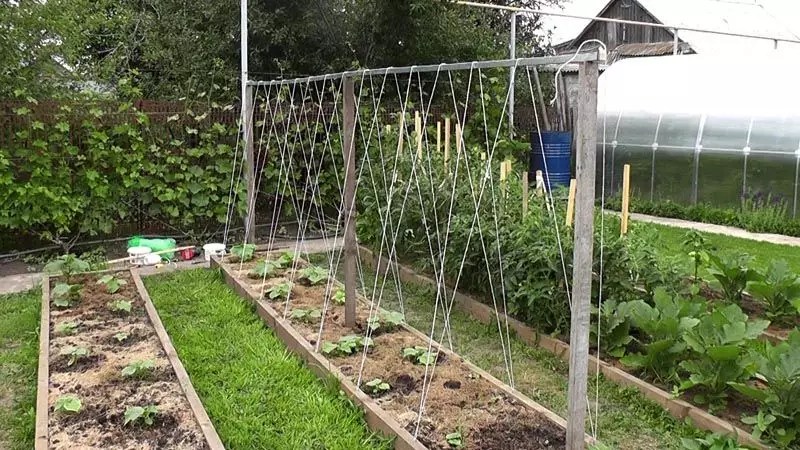
Optimal size a high bed should be wide enough to reach the middle without stepping on the soil (70-100 cm). If you plan to install two parallel containers, you can make a mini-greenhouse out of them. For this, the boxes are made 80 cm wide, and the passage between them is 60 cm. A frame of plastic pipes is created on top and covered with film.

One of the wooden frame options
Basics of design and basics of construction
Having decided on the dimensions, they mark out a place on the site, remove the fertile layer of soil using a shovel and secure a fence around the perimeter. The frame is knocked down on the sides, slightly recessed into the ground, or simply placed on the surface. Most often, the frame is covered with boards. The bottom is left free. Scheme of a high bed with a wooden frame and a small recess in the photo below.
The simplest design of raised beds is a wooden box without a bottom, consisting of two short, two long boards and four pointed beams. The width of the boards is selected depending on the required height of the structure, and the length of the beams should be 20-30 cm longer in order to drive them into the ground.
The support bars are attached to short boards, after which long boards. The finished structure is installed in a marked and prepared place.

Simple design from boards and beams
Making raised beds with your own hands
For those who have at least minimal construction or carpentry experience, it will not be difficult to figure out how to make raised beds with your own hands and bring the idea to life in a short time. The first (trial) design can be made from existing building materials or waste - old doors, slate, boards.
Wooden fencing and its features
The fence can be built from wood, concrete, brick, stone and almost any available materials. When choosing material for bulk beds, consider:
- price;
- difficulty of installation;
- durability;
- decorative properties.

Typical scheme
When the question arises: what to make raised beds from, most owners choose wood. At correct processing this material can last 5-7 years, and it looks beautiful.
Before construction, you need to treat the boards and beams with a special antiseptic impregnation, stain or waste oil. So that the impregnation does not subsequently penetrate into the soil, and the frame is exposed to moisture as little as possible, it is covered with a dense film from the inside.
Boards for high beds are taken from larch or acacia. Such wood species have the best balance of low cost, strength and durability. Suitable for work are slabs, beams, logs (halves), any boards, lining.
Raised beds made of wood will last longer if the boards are at least 2 cm thick. The sides are secured using metal corners or by installing 40x40 or 50x50 bars in the corners of the box and screwing the boards to them with self-tapping screws.
Not the cheapest, but very beautiful solution are beds made of timber. Their advantages are durability and practicality - it’s convenient to lean on, sit down on, and plant seedlings on the wide side. In addition, the timber will perfectly withstand even a large volume of soil in waist-high containers.

Boxes made of timber - reliable and beautiful
Other fencing materials
High fences made of concrete, brick, metal, and stone are more difficult to build with your own hands. They are stronger and more durable than wood, but also have their disadvantages.
Metal beds look very neat, are easy to install and last almost forever. They are usually made of galvanized steel, sometimes with polymer coating.
Stores sell ready-made fences, so their installation also takes a minimum of time. If you have the skills to work with metal, you can save money and make a fence from roofing iron and metal corners or a frame from wooden bars.

Galvanized metal fencing
Concrete beds are a little cheaper, but also require special skills to build. Such a structure can last at least 30 years. Borders can be installed using the monolithic strip method, the sliding formwork method, or you can make beds from concrete blocks by simply installing them in in the right place. The disadvantage of concrete fencing is its ability to increase soil acidity.

Concrete structures can also serve a decorative function.
Fences made from new bricks are beautiful and reliable. The disadvantage is that to make even and neat masonry, you need to have special skills or hire a specialist. How to lay out brick beds:
- pull the rope tightly on the pegs along the inner perimeter;
- dig a trench at least half the height of the brick;
- lay out the first row evenly;
- start laying the fence on the solution.

Remains of building materials in action
A stone fence is made in the same way. The stone will fit into any landscape design and practically eternal. Disadvantages: inability to move the structure to another location and high cost decorative stone.

Gabions as a fence
A fence for raised beds can be constructed from slate, plastic bottles, border tape, wicker, straw and other materials.

Blocks as a fence
Preparing the soil for successful vegetable growing
When the fencing is ready, begin filling the raised beds with nutritious soil. On wet soils and with a low fence height, it is best to dig a trench 10-15 cm deep. If there are rodents on the site, a fine-mesh construction mesh is laid at the bottom to protect the plants.
How to fill raised beds with your own hands - order of layers:
- If the structure is installed on the surface of the earth without removing the top layer of soil and backfilling the drainage, to avoid the germination of weeds, cover the bottom with geotextiles.
- If the area is wet or the fence is made of stone, concrete, brick, be sure to make a drainage layer from crushed stone and sand or from branches and twigs. The drainage from the branches is covered with coarse sand or expanded clay. A geo-textile is laid on the drainage layer, then another layer of crushed wood waste.
- Next, plant waste is laid: chopped branches, grass (excluding weeds), dry leaves, tops, vegetable peelings, straw. The layer of organic waste can be compacted with soil or the sod can be laid on top with the soil facing up. To speed up the decomposition of waste, you can pour it with Baikal solution or other similar means.
- The next layer, depending on availability, is manure, peat or immature compost. After complete decomposition, they will continue to nourish vegetables for a long time.
- Most top layer- This is soil for high beds, consisting of a mixture of fertile soil and humus or mature compost. It should be so thick that the roots do not grow into the lower decomposing layer. The composition of the soil for the top layer can be easily adjusted to suit the cultivation of certain crops. You can add mineral fertilizers, sand, half-rotted sawdust, turf soil, peat

Layer-by-layer filling of the finished box
Watering for raised beds
You need to water the beds and feed the plants more often than usual. open ground. The average frequency of watering is once or twice a week. Traditional watering from a hose or watering can has significant disadvantages - it compacts the soil, requires loosening afterwards, and strong water pressure destroys the structure of the top layer of soil. If you water with weak water pressure, a lot of time is wasted. Therefore, increasingly, gardeners prefer to organize automatic or semi-automatic watering.
The irrigation system for high beds can be made in different versions:
- Tapes for drip irrigation. It is necessary to lay one such tape under each row of plants. Next, polypropylene pipes are fixed to the fence, to which each tape is attached through valves.
- You can arrange drip irrigation in a similar way using polypropylene pipes with holes. The diagram of such a system is shown in the photo below.
- A semi-automatic waterer for garden beds can be created from old hoses. They are laid on the ground and small holes are made in places where water should escape.
- One of the most simple options semi-automatic watering, which you can do yourself - watering with a wick. To do this, buckets or large plastic bottles are dug into the ends of the frame. One end of a wick made of cloth or rolled fabric is immersed in a container of water, and the other is buried 10-15 cm into the soil.
- Butterfly watering of beds is the cheapest device. To do this, you need to bury under each plant plastic bottle with the bottom cut off and made small holes. It will be convenient to pour water from a hose through the bottom, and from the holes it will slowly flow out under the root of the plant.

Diagram of a drip irrigation system made from old hoses or pipes
Raised beds, with all their pros and cons, are a technique that allows you to grow substantial yields of vegetables even in small and unsuitable areas. There are many variations of their arrangement, filling and watering - from simple and economical to expensive and decorative. Among such diversity, it is easy to choose an option suitable for a specific site, material capabilities and even physical parameters of a person.
Why is it convenient to have high beds in the country?
First of all, high beds help accelerate the ripening of fruits, thereby increasing productivity and simplifying the process of caring for them.
High beds do not require constant digging, loosening is enough, and the aesthetic appearance of, for example, flowering cucumbers will resemble a flower bed - these are the main advantages of high beds.
In addition, such beds can protect your plantings from the invasion of moles and other rodents.
Is this not enough?
Raised beds at the dacha can have different configurations and structures; they can be on the surface of the ground or buried in the ground.
Creating a raised bed
To create a box for a high bed, prepare building materials (brick, slate) or lumber that will suit  wooden boards, 4-5 cm thick, beams, you can use logs sawn lengthwise. Don't skimp on materials. If you use wooden materials, then they must first be treated against rotting and pests. Place vertical posts along the outside walls to strengthen the structure (you can tie the frame with wire). Cover the inside of the walls with thick film or roofing felt for moisture insulation. Cover the bottom with wire or plastic mesh with small cells to protect plants from moles and mice. It’s convenient when the width of the high bed is 100-150 cm, you adjust the height yourself so as not to burden your back (75-90 cm), and adjust the length depending on the area of the plot.
To make a deep, high bed at the dacha:

Cucumbers, zucchini, cabbage, tomatoes, and eggplant grow well in high beds of this configuration. Radishes, lettuce and Chinese cabbage tend to accumulate nitrates, so growing these crops in the first few years is not recommended. There is no need to apply fertilizers for 2-3 years.
High garden bed without deepening
 The technology for making high beds without deepening is the same.
The structure is made from any available material.
The only difference is its filling: first, drainage is laid, then geotextiles, since it does not rot, mold does not appear, roots cannot “break through” it, and are not damaged by acids and alkalis.
The last main layer is soil with hydrogel (non-toxic material, absorbs and retains moisture, does not change properties for 5 years, regardless of temperature exposure).
Take into account the fact that when creating a high bed at the dacha, the crops require more thorough watering. After a few years, the raised beds will need to be topped with fertile soil.
High hilly ridge - earthen embankment
 Another type of raised bed at the dacha is an earthen mound, which will last you 5-6 years. You need to start creating it in the fall so that it can settle down by spring. The top of the central part of the bed rises above the ground surface by approximately 80 cm, the edges seem to slide towards the ground surface. The width of such a bed is usually up to 2 m, the length is optional and the area allowed.
It’s easy to make a high hilly ridge in the form of an earthen embankment:

Combs
 This type of high bed is suitable if the dacha has clay soil with spring standing water and a shallow fertile layer (up to 15 cm). Dig up the soil and use a shovel to cut ridges 60-70 cm wide with a slope of 45-50°. During drought, the edges will dry out, so on light soil the edges of the ridge should be flat, on heavy soil they should be steep. Slice better in autumn when you dig up the soil. In spring, snow melts off the ridges quickly, the ground warms up faster, and plant development occurs earlier. It is best to plant seedlings on the ridges.
A mounded bed has advantages: loose soil structure, more high temperature, which allows some early crops to be planted even earlier than usual.  The density of plantings here is not so bad due to less shading of the plants. There will be no stagnation of water in the mounded bed; the water will penetrate into the inner layers of the earth, which will make the roots immensely happy. Place early crops first, then zucchini, pumpkin, and cucumbers. In the second year, plant with cauliflower and tomatoes. Next year, plant carrots, eggplants and peppers. In the fourth year, safely plant salad crops, radishes, parsley, and spinach.
Disadvantages of a mound bed: in the first year you cannot plant leaf and head lettuce, cabbage, spinach, beets, radishes and chard, since all these crops tend to accumulate nitrates in the form of nitrogen, which in the first year will be released as much as possible during the decomposition of organic matter , it is best to leave them planted for about the 4th year.
In the 5th year, in the spring, the mound bed is fed with 2-3 cm thick compost. Planted with legumes. In the 6th year you create new bed in a new place.
Features of planning high ridges in the country and caring for them
 Before building raised beds, pay attention to:
- high ridges and rolling ridges are best suited for moist, undrained, clay soils with less than 1 meter of water depth;
- direction from north to south, for a slope - from south across the slope for uniform distribution of solar illumination;
- the main direction of the wind (hang a piece of cloth on a tree or stick and watch it for a while);
- if necessary, make a windproof structure in the form of flat, high beds planted with wild dwarf trees or tall plants(hemp, sunflower, Jerusalem artichoke), this is if the height of the beds is assumed to be more than 1.5 m;
- It is better not to place high ridges parallel to the slope, otherwise the top will absorb water, and the bottom may be left without water at all, so when placing hilly beds, also take into account the direction of the wastewater;
- if the soil is heavy and wet, then make an additional drainage by digging a ditch;
- if the soil is dry, sandy, then the water will be retained in the layers of the ridge on its own, which is undoubtedly good;
- when planting plants on high hilly ridges, consider the method of processing row spacing;
- When weeds appear, simply pull them out with their roots (best during the day in hot sunny weather) and leave them to “rest” in the aisles with their roots facing up. You can mulch with straw and hay, this way you will always keep the soil moist.
The disadvantages of high beds are the labor and financial costs of setting them up, and you may also need to buy nutritious soil. If you use wood or slate for the walls of the beds, the cost of the structure will be very small. But if you want to make brick or concrete frames, then the costs will be much higher. Also the arrangement of paths between the beds. You can simply cover them with fine stones, or you can line them with bricks, stones, or fill them with cement. Complex and expensive options immediately increase the cost of gardening in high beds.
Making raised beds with your own hands
Do-it-yourself production will not only allow you to save significantly compared to options from stores, but also make a bed of the required shape and size. By accurately determining the configuration, you can use the maximum area and use every suitable corner. But we must not forget that most crops require at least 5 hours of intense lighting.

Raised beds are very convenient to process
Materials for creating structures can be:
- Wood.
- Plastic.
- Slate.
- Brick.
- Concrete, etc.
Wood, plastic or slate will not only require less financial investment, but will also make the beds collapsible. It makes sense to install monolithic concrete frames, brick or stone walls only if you are sure that their dismantling will not be required. However, their appearance is so interesting that they can decorate any area on their own. And fruiting or flowering agricultural plants in such beds will add an indescribable charm to the garden.
Advice. There are many types of plastic, some of them are not suitable for use in the garden, because... capable of releasing toxins. You need to try to protect yourself from this, ideal option there would be a certificate from the manufacturer.
Preparing the site for placing raised beds is very simple; you just need to dig up the area, removing perennials, stones, and snags. The process of assembling the frame varies depending on the material. When installing the structure, you need to make sure that all corners are level and the walls are at the same level. It is better to install it in the fall, so that all layers of the soil mixture are well compacted and the natural processes of overheating begin. If you need to install in the spring, you need to do this at least a month before planting the vegetables. All this time, abundant watering is required to compact the layers of the substrate.
The efforts and funds spent on building bulk beds will very quickly pay off. This type of farming allows you to completely eliminate digging and make it easier to care for crops and harvest. And the quantity and quality of the fruits will pleasantly surprise you.
How to make raised beds in the garden: video
Raised beds: photo


Many summer residents still become despondent at the thought that the gardening season is beginning. For them, going to the site turns into daily weeding and watering with loosening. How could it be otherwise? Without this you won’t get a good harvest, they will say.

Thanks to raised beds, caring for vegetables becomes easier and takes less time. In addition, they serve as decoration for any area.
But more and more gardeners are building garden beds at their dachas with their own hands, so that caring for them becomes a pleasure and does not require hours of hunched over standing under the hot sun while weeding. Spring digging comes down to lightly loosening the soil with a pitchfork, and the weeds disappear somewhere in the beds, which look like decorative flower beds.
Features of the construction of easy-to-process beds, which are called raised or high, are determined by their design.
It makes it possible to receive good harvests with minimal tillage and in areas that are unsuitable for farming.
Installation of raised beds

Raised beds are containers filled with fertile soil. It is their structure that makes it possible to make any area suitable for growing vegetables, flowers, berry crops and a variety of table greens and herbs. The construction of a raised embankment bed is possible even on steep slopes that are unsuitable for the construction of conventional beds.
The height of the ridge can be different: from 15 cm in an area with fertile soil to 80-100 cm, if it is convenient for the owner or the area has a slope of up to 45 degrees. The width is usually made so that you can easily reach the middle, but when constructing bulk ridges on a slope, you must take into account the fact that it is convenient to process them only on one side, and limit the width of the ridges to 50-80 cm. The length is chosen arbitrarily.
The sides of the beds can be made from almost any material that can withstand the pressure of the soil poured into the box. For growing crops whose fruits are eaten, it is not recommended to build high beds made of materials containing harmful substances: tires, treated chemicals wood and the like. Untreated wood, stone, and brick are the safest materials for building a raised bed.
Return to contents
How to build raised beds
Before you begin building the box, you need to prepare the tools and materials necessary for the work:
- shovel;
- level, tape measure, cord;
- screwdriver and hammer;
- screws, nails;
- boards or other material;
- brick or tile;
- priming;
- mulch or film.

Structure of a high bed: 1- wooden frame; 2 - film, for covering the frame; 3 — wire metal mesh; 4 — wood waste(branches, twigs, brushwood); 5 - layer of newspapers, cardboard; 6 - small wood waste (sawdust, shavings); 7 - plant waste, turf; 8 - immature compost or peat; 9 - fertile garden soil.
Before making beds, it is necessary to remove the layer of turf on the site that is planned to be allocated for construction.
- Lay the block or boards to form a rectangle. Measure and compare the diagonals of the box; if the difference is more than 1 cm, align the walls. Using a building level, check the horizontalness of the upper edge of the building and correct any deviations.
- Connect the boards using nails or self-tapping screws so that the end of the nail that enters the end of the adjacent board is at least 8-10 cm.
- The next rows of boards or timber are installed so that their joint in each row overlaps the joint of the previous one. Lay the boards in this way until the desired bed height is reached.
- Around the high bed you need to make a blind area of tiles or bricks. To do this, remove the turf around it to the required width and apply a layer of masonry mortar to the bottom of the resulting trench. A row of bricks or tiles is placed on the mortar with a small gap between the elements. Lightly tapping with a hammer, you need to level the parts of the blind area and fill the gaps with a dry mixture of sand and cement. In this way, you can completely pave the path between adjacent beds.
- In order to prevent perennial weeds from growing inside the bed, geotextiles or a layer of cardboard are placed at the bottom. To prevent the penetration of rodents, the bottom is covered with a metal mesh with a mesh size of 1x1 cm.
The next layer is drainage - crushed stone, broken bricks, etc. Large wood waste remaining after uprooting bushes on the site, sunflower stems and other large debris that is difficult to rot can be used as drainage. The thickness of the drainage layer can be 15-40 cm, depending on the height of the bed.

Fertile soil is placed on top of the drainage. The thickness of this layer is dictated by the depth of penetration of the root system of the plants that are planned to be planted on the ridge. For greenery, a soil layer of 15-20 cm is sufficient, for most vegetable crops and potatoes it should reach 40-50 cm.
The surface of the soil is mulched with sawdust or covered with an opaque film, which helps retain moisture in the soil longer and prevents the germination of weeds, whose seeds may end up in the soil. When planting seedlings, make cross-shaped cuts in the film, tucking the corners under it. The plant is placed in the resulting hole. The layer of mulch can simply be raked down to the soil, and after planting and watering, leveled around the bush again.
If brick or stone is used to build the sides of a high bed, the masonry is done directly on the ground, without constructing a foundation. When forming such ridges, you can give them the most different shapes and make the vegetable garden part of the decorative decoration of the summer cottage.
Do you know what innovation is, how raised beds came to our country from Canada. The land there has been cultivated in this way for many years. Such planting options can be used not only for growing vegetable crops, but also for creating original ones. Let's find out how to make beautiful and practical raised garden beds with your own hands. Photo, description technological processes and the diagrams will help you with this.
Do-it-yourself raised beds at the dacha: photos of structures and main characteristics
The rate of gas exchange, soil moisture and the presence of beneficial microorganisms depend on the size and shape of the beds. All these parameters affect the quality of the soil.
With the help of raised beds you can grow a large harvest of berries, vegetables and fruits. In this case you can get good performance even from a piece of land that is not very fertile. The peculiarity of high beds is that they warm up faster than low structures.

There are several types of vertical beds. They differ not only in material, but also in functionality. Some options are made from building materials, while others are made from simple ones.
Here are the types of beds that exist:
- trapezoidal structures;

- multi-tiered beds;

- structures with a triangular cross-section.

When creating isolated beds, you can take into account factors such as lighting, soil composition, and its structure. At what height such beds will be placed depends on the volume of the root system, soil characteristics and your own preferences. The minimum height is 15 cm, but to provide better insulation, you can raise them by 30-40 cm. Warm raised plantings can be higher than 50 cm, since a layer is still laid on the bottom. Narrow beds can be up to half your height.

The length can be very varied. Most often it depends on the length of the garden. If the bed is too long, then its sides need to be further strengthened. When arranging any garden bed, remember your own comfort and convenience. The best width is when you can reach the middle of the structure. The optimal value is 90-120 cm.

Can be grown in raised beds different cultures. It is not recommended to use plants with tall stems, as they will be inconvenient to collect fruits from. Root crops, strawberries, peppers, herbs and cucumbers are often planted on bulk structures.
For your information! Raised bed filler is particularly useful. It is made from organic ingredients. At the same time root system located in the fertile layer, which promotes the development and growth of plants.
Related article:
Let's find out how to make original beds and what materials they can be built from. Interesting ideas Our review will help you create a variety of designs.
Features of raised beds: pros and cons
The main advantage of raised beds is that you can accommodate a variety of vegetables and plants in a small area. Raised beds are especially popular for strawberries, aromatic herbs and cucumbers. Such designs also have other advantages:
- bulk beds can be filled with specially prepared soil. In this case, the quality of the soil on the site is not of great importance;
- it is possible to regulate the thickness of the soil layer for any plants;
- raised gardens are easier to weed and dig up;
- raised beds can be laid out anywhere, even with difficult terrain;
- Seedlings can be planted on high embankments earlier, since the soil in them warms up faster;
- in raised gardens the soil is looser, which promotes better gas exchange;
- can be used for those that will hang over the edge of fences for high beds;
- Depending on the material, you can create not only practical, but also beautiful designs. Some options can become a design masterpiece for your garden;
- high beds with sides are practically not susceptible to attack by weeds, and are also well protected from mold and fungi;
- Installing beds is not a complicated procedure; they can also be easily dismantled. The planting location can be easily changed;
- inside such structures you can create a convenient one;
- the soil on raised beds is protected from freezing as much as possible. During early frosts, you can cover this planting with polyethylene;
- the construction of high plantings is protected from erosion during rainstorms.

Such designs also have certain disadvantages, but there are not many of them. First of all, you will need fertilizing mineral fertilizers. It is also important to monitor the mole cricket invasion.
For your information! Before you start work, treat the wood parts with an antiseptic and special impregnations. This will prevent rotting processes and protect materials from destruction.
Creating vertical beds with your own hands: photo options
You can also create warm raised beds or vertical structures. They are popular because appearance and saving usable space. In addition, this is an excellent solution for protecting crops from various pests. Vertical structures are great for growing flowers, strawberries and herbs. You can not only make such structures from available raw materials, but even purchase ready-made options. You can see how to make warm structures in the video:

Why you should buy a vertical bed for strawberries: prices
You can see different options design of vertical beds, but their most important advantage is their miniature dimensions. Such structures can be built from any materials, even from plastic bottles.
Vertical products do not require special care. They are on optimal height, in order to process them conveniently.

You can see how to make a raised structure for strawberries in the video:
How to make a pyramid bed for strawberries with your own hands: dimensions and other parameters
You can build beds with a pyramidal structure on your own. You will need tools and materials such as a tape measure and a board. To make the base you will need 4 support boards. They can be 2 meters long. In this case, the sections need to be connected under acute angle.

To increase the rigidity of the pyramidal bed, you need to install an additional post as a supporting element. In this case, the boards are mounted on a horizontal surface and attached to each other. A rail is installed in the base. The resulting side is fixed vertically, and then the second and third sides are attached to it. After installing the frame system, the length of the slats is measured. They are placed at intervals of 25-30 cm. To make the shelf raised, its ends should be cut at an angle of 30 degrees. After assembly, the structure is filled with soil, which is compacted.
Technology for arranging vertical beds for strawberries from plastic pipes
To grow strawberries, you can build a vertical bed from. In this case, you need to prepare plastic pipes, steel cable and a special knife for cutting. The volumetric section allows you to place the required amount of soil inside. The cut should be made along the structure. To fix the bed in a horizontal position, you need to make a hole in each half. Then a fishing line or cable is pulled through them. The parts are then placed one on top of the other. In this case, you can make different levels of beds from pvc pipes with your own hands.

For your information! If you plan to place the structures in a suspended state, then you need to take into account that they can sway. Therefore, it is better to install them in places that are well protected from the wind.
Constructing vertical beds with your own hands using a construction mesh
A compact structure can be built for crops such as strawberries, greens, flowers or potatoes. A good solution would be a vertical bed. To do this you need to prepare metal mesh, straw, special soil and necessary tool for processing the material.

To create a bed you need to bend the mesh into a pipe. In this case, the cross-section should be 0.9 meters. The edges are secured with wire. Straw is laid on the sides, and the free space is filled.
To plant potatoes, such beds should be placed at a height of 50 cm from the surface level. Gaps of 10 cm are left between plants. Then the first layer should be shed, then the soil should be laid and the seedlings should be planted.
Features of arranging a vertical bed for strawberries with your own hands: using pots
To grow strawberries, you can also use ordinary ones. Such designs allow you to create an attractive external design. You can use both plastic and clay pots. In this way, you can create a multi-level composition.
Pots must be selected so that their diameters become smaller towards the top of the structure. In this case, the difference between pairs of pots should differ little.

The largest pot is placed in the chosen location and filled with soil. After this, a smaller pot is placed in it, etc. When the structure is ready, plants are planted in the soil and watered. The largest pot is installed at the base of the structure. A rod of a smaller size than the diameter of the container is placed inside. The pot is filled with soil, and the remaining products are strung on rods one by one. After filling with soil, plants are planted. The pots are mounted on a pole or high stump.
The nuances of creating vertical beds for strawberries with your own hands from tires: photos of products
There are different ways growing cucumbers in open ground. In this case it is possible to build vertical beds. This option is also suitable for planting strawberries.
The tire structure is mounted according to the same principle as pot structures. Tires of different sections are suitable for this. But keep in mind that old products are not particularly environmentally friendly material.

Before mounting, tires should be cleaned, dried and, if necessary, painted. The largest tire is placed down, and a part is cut off from the side. The hole is filled with soil and planted with plants. In this way, other elements are also laid out. Tires can be beautifully decorated with patterns or even unusual cuts.
Article


