Gerona. This water device was known 2000 years ago. However, these days few people think about how it works. After all, there are now many home fountains on sale. different types. But the peculiarity of this fountain is that it works without any engine, and you can make it yourself.
No need to buy
DIY enthusiasts will be happy to know that this device can be made quickly and easily. How to make Heron's fountain? First you need to prepare the materials and understand the principle of its operation. It’s not difficult to make a simple Heron fountain with your own hands. And it consists of only two water containers, tubes and a bowl. All these objects are connected to each other and, thanks to the gravity existing on Earth, a stream of water is pushed out over the surface of the bowl. Heron's fountain also operates in full accordance with the laws of hydropneumatics.

Details
Each fountain container serves a specific purpose. The Fountain of Heron begins with a bowl. It is a bowl filled with water, from which a thin tube extends, directed into the lower container. This is where the water begins to move. This container is empty. Water accumulates in it, which, rising upward, creates air pressure rising through a thin tube and enters the upper container filled with water. From here, the air pushes water, which moves through the tube into a bowl of water and creates a jet that is visible above the surface of the liquid. Heron's fountain can work for a very long time, but the containers have to be swapped. Because the lower one gradually fills with water, and the upper one with air, which means the required pressure ceases to be created.
What's the secret
You may be surprised to read now about how you can make a fountain with your own hands. After all, this model uses plastic, and 200 years ago it had not yet been invented. It's simple. The Greek inventor used glass containers. First, he conducted an experiment. Poured water into glass bottle, then plugged it with a cork in which he made a hole. He inserted a tube into this hole that reached to the bottom of the bottle. Having placed this structure in the sun, Heron began to observe it. The sun began to heat the bottle, and the water rushed up the tube. Moreover, the hotter the sun, the more water flowed out. Then Heron took a magnifying glass and pointed it at the bottle to enhance the effect of the sun's rays. Heated water burst out of the bottle in a high stream through the tube. This gave Heron the idea that water could move in a circle, rising from the bottle and returning to it. Then he began to think about how to make the water return to the container on its own.

What's next
The inventor came up with the idea of placing two more inside one vessel. The third vessel was empty, and the second was filled with water. Water enters the third vessel, creating air pressure, from which it rises up the tube located in the middle of the third vessel. From the second vessel, water begins to move into the third, expanding when heated sun rays. As a result, viewers see a fountain jet flowing above the surface of the bowl. Heron placed his first fountain in the temple. At that time it was like a miracle, because no one could explain how this fountain worked, because there were no visible mechanical devices or pipes through which water could be pumped.
These days
Heron's invention is still interesting to our contemporaries. It especially surprises children who are not yet familiar with the laws of physics. Modern inventors are gradually improving Heron's project. They add something new to it, improve its properties and, of course, come up with something of their own. For example, you can increase the height of the jet if you connect several containers together, then the pressure is added up and pushes the stream of water over a long distance. They're still inventing various ways recharging the fountain. It would be nice to make sure that a person does not have to take part in this process.

Nowadays, even a schoolboy can make a Heronov - you read in our article. You can decorate this invention and install it in your dacha or apartment, surprising your guests.
To make a fountain at home, you can take a kerosene lamp (glass from, or rather) and choose a stopper that will close it narrow end. Next, you will need to make a hole through this plug (drill, awl, nail). The resulting hole should be such that the glass tube in the shape of a U fits tightly into it.
The glass tube can be bent over the flame of a candle or burner. Need to
The process itself is quite simple compared to preparation. You need to hold the tube (hole) with your finger and pour water into glass cylinder. That's it, now open the tube and the water will flow like a fountain until the water level is equal to the level of the end of the tube.
I am not very friendly with technology, so I can only offer a fountain model that will use excess atmospheric pressure and no electrics.
To do this, you need a larger plastic bottle, a flexible tube from Esmarch's mug, equipped with plastic tap, and some kind of cap that should be equipped with holes for a more beautiful fountain jet. Ideally, an old watering can would do, or rather its diffuser. The diffuser should be disguised with pebbles, decorations, and, if possible, imagination. Insert a flexible tube with a faucet from below, the other end of which is inserted into a container of water. The container should be on a hill behind the fountain and therefore it is better to drape it under rocks or a house. If it is a plastic jar, then it is better to fix it with the neck down so that it is convenient to insert the tube, but in principle the tube can be inserted through the top, as long as the tube reaches the bottom of the jar, pump the air out of the tube so that water flows and close the tap. Now when you open the tap, water will flow into the fountain.
The principle of such a fountain is shown in the picture:

I’m also not very strong in physics, but I remember how I managed to make a fountain myself for a school assignment. I found a similar method.
To complete a physics assignment and make a fountain yourself, I think this method is suitable. Let's make a fountain ourselves using the principle of communicating vessels from materials that are almost always on hand.
Let's take some container and make a hole closer to the bottom. We insert a cork into the hole (we also first make a hole in the cork), and insert a hose into the cork. Next, we place the container on a hill, and lower the second end of the hose lower and secure it with some kind of tripod. Fill the container with water...
And an important note:
THE LONGER THE HOSE LENGTH AND THE HIGHER THE WATER CAPACITY THE HIGHER THE FOUNTAIN WILL BE

This process how to make a fountain based on the principle of communicating vessels, perfectly shown in the video:
The simplest fountain operates on water pressure:

For it you need to have three vessels and a hose.
At a height of more than half a meter, install a vessel (in Fig. A) in the bottom of which a hose is installed (in Fig. B), transferring water to the center of the bottom of a smaller, but larger area vessel (in Fig. B) installed below. The trouble is that you will have to either drain the lower vessel or install a pump that transfers water to the upper vessel.
Modeling a fountain at home is not at all difficult. To do this, you need to go to a car dismantling shop and buy an electric motor for pennies - a windshield washer pump of absolutely any brand. As a nozzle for the future fountain, you can also use a nozzle from any glass washer, any car. A charging unit from an old one can be used as a power supply. mobile phone. 4 - 5 volts from such a charge is quite enough to get required power fountain jets. You need a couple of tubes - hoses can also be taken from a dismantling station and a container in which your structure will be located - a fountain. Water is sucked in through one tube and supplied to the nozzle through the other.
How to mount the entire complex depends on your imagination. For a short-term demonstration, you can take 2 - 3 batteries of 1.5 volts, or one flat battery of 4.5 volts.
There are so many interesting things around us.
At all times, people decorated their homes with flowers. And we have a lot of flowers in our house, which are placed on window sills, shelves and even on the floor. They require a lot of attention: watering, spraying. Some require a lot of water, others little. One day I noticed that the soil in the flowers dries out very quickly. Mom said that apparently the air in the house is quite dry. I wondered if it was possible to humidify the air in the house and thereby help the plants?
Ways to humidify the air in an apartment.
There are many methods and devices for air humidification. Household appliances that increase the humidity in the air in the house are beautiful and effective, but very expensive. Eat traditional methods humidification of indoor air. Most of them come down to the fact that water should evaporate naturally. These can be open containers of water or a damp cloth. However, for this method of moisturizing to bring noticeable results, you need to regularly wet the fabric and add water to the container. The amount of liquid evaporated will be small, which means it is necessary to hang more than one piece of fabric and place more than one container with water. Should you turn your room into an exhibition of water vessels and wet pieces of fabric? I suggest using a model of Heron's fountain to humidify the air.

Fountain of Heron.
Even the ancient Greeks drew attention to the miracle of nature - springs. They decorated the springs with greenery and flowers, and lined them with stones. The water flowed in a trickle, and it was convenient to fill the dishes with it. IN ancient Rome artificial springs began to be built. This is how the first fountains appeared.
The ancient Greek mechanic Heron of Alexandria created the most ingenious fountain in design. It consists of three vessels: an upper, open one A and two spherical ones B and C, hermetically sealed. The vessels are connected by three tubes.

When there is some water in A, ball B is filled with water, and ball C is filled with air, the fountain begins to operate: water flows through the tube from A to B, displacing air from there into ball B; under the pressure of the incoming air, water from B will rush up the tube and flow like a fountain above vessel A. When ball B is emptied, the fountain stops working.
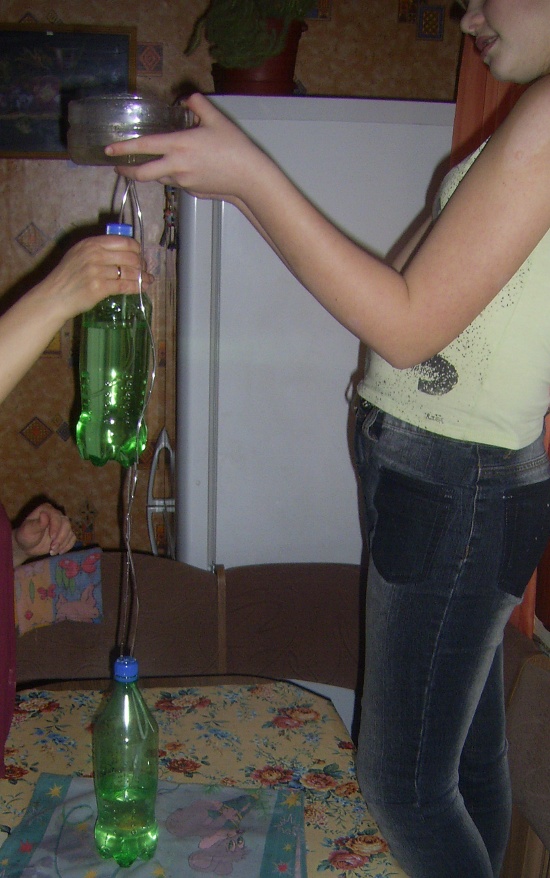
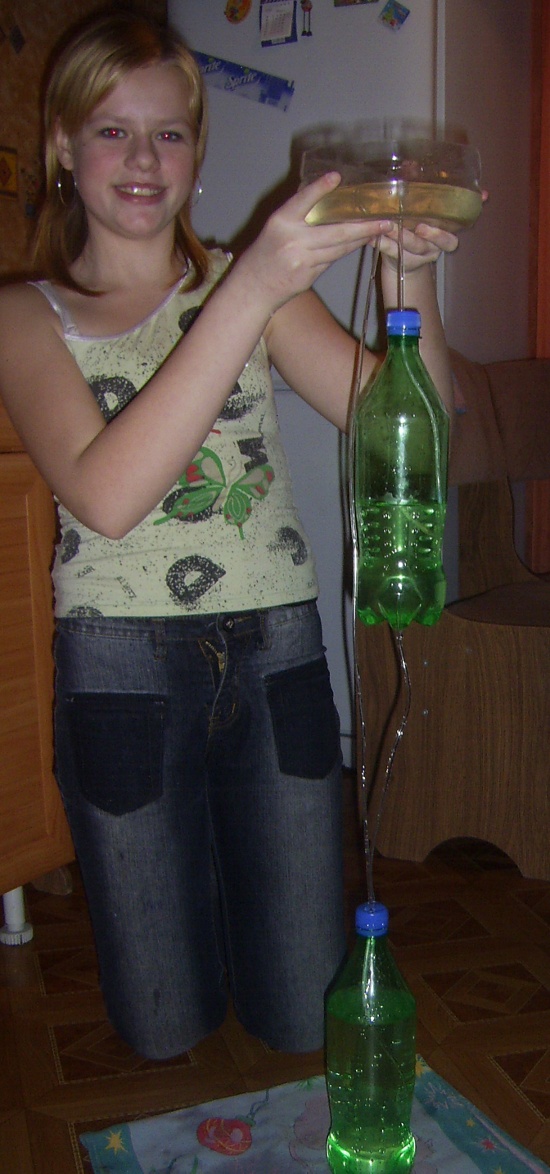
Assembly and testing of the Heron Fountain model.
I tried to create a simplified design of the Heron fountain at home. Instead of balls, I took two plastic bottles, vessels B and C, from sparkling water with a capacity of 1 liter, with two holes in the lid and bottom. A flat vessel was made from the lower part plastic bottle larger capacity. Instead of glass tubes, I took nylon ones from a medical solution transfusion system. Vessel A was connected to vessel B using a tube, and vessel B was also connected to vessel B using a tube. Vessel B was connected to vessel A, in which special device to get a jet. I placed all three vessels at different levels above each other. Vessel B is filled with air, water is poured into vessel B, and water is poured into vessel A to the level of the device for generating a jet. Water flows through the tube from A to B, displacing air from there into vessel B; under the pressure of the incoming air, water from B moves up the tube and a fountain jet is formed. When all the water from vessel B flows into vessel C, the fountain stops working.

My fountain will benefit house plants.
By placing the fountain structure next to the flowers, we significantly improve the microclimate, and the flowers respond abundant flowering. To increase the efficiency of the fountain, you can use bottles of larger capacity and increase the height of the jet. When vessel B is 35 cm lower than vessel B, the flow of water in vessel A decreases. We measured the stream with a ruler - it turned out to be 5 cm. We tried to place all three vessels at the same level, then water from vessel B stopped flowing into vessel A, and there was no stream.
And when vessel B is lowered 60 cm below vessel B, a good stream of water is formed.


Calculation of economic costs for constructing a fountain model.
This fountain design does not require any material costs.
To make my fountain, I used used plastic bottles and a system for pouring solutions:
1. bottles of carbonated drink with a capacity of 1 liter - 3 pieces;
2. medical system for transfusion of solutions – 1 set.
I did not take into account labor costs, since I was making the product not for sale, but as a gift for my mother. For my mother, I think my work will be priceless, and for me I am happy and proud that this layout will delight the eyes of our guests and bring benefits. I will be very proud when my mother tells me that I made this model of a working fountain.
Conclusions and self-assessment.
A fountain can be built at home using available materials.
In order for a fountain to flow, pressure is needed, and for it to appear there must be a difference in water levels.
The fountain model I made turned out great. But the work was not easy. It was difficult to design and manufacture the model itself: to make holes in the bottles and to achieve a good stream of water. It took me a lot of time to work on the project, but I am very pleased with my result. And I am sure that the knowledge, skills and abilities that I acquired will be useful to me in the future.
I believe that I coped with the task that I set for myself.
Although the task was difficult, luck came to me!
I answered questions, which means I read a lot.
It is with a calm soul that I send you my report.
References
1. Great Soviet Encyclopedia. – M., 1977. – vol. 27
2. Technique: Encyclopedia/ Design. Series by L. Yakovlev. – M.: OOO “ROSMEN-IZDAT”, 2000. – 399 pp. – (Children’s Encyclopedia).
3. Ya. And Perelman “ Entertaining physics” book 2, TRIAD-LITERA Moscow, 1994. – 117 p.
Chuprova Polina Petrovna,
7th grade student.
Supervisor:
Chuprova Natalia Alexandrovna,
physics teacher.
Municipal educational institution Vosyakhovskaya secondary school
With. Vosyahovo
If you have accumulated a large number of plastic soda bottles at your dacha or at home, do not rush to throw them in a landfill - they can still be useful in the household. For example, empty containers are suitable for making simple homemade fountains, with the help of which it is easy to organize an irrigation system for watering the lawn (in case there are no sprinklers and sprinklers for the garden at hand).
You can also usefully spend free time together with the children, making a fountain from a plastic bottle. This homemade product will be very interesting for young inventors and is quite easy to make.
A fountain that works itself from plastic bottles
The classic design of Heron's fountain is described in 7th grade physics textbooks and consists of 3 containers of water, located one above the other and connected by three tubes. For a home experiment, empty plastic bottles from mineral water or soda. The first tube comes out of the top bowl and goes down to the very bottom of the structure. The second, which is attached separately from the first, comes out of the lower container, enters the middle one and reaches almost to the very top. The third tube comes from the bottom of the middle bowl and enters the top bowl.
By default, all the liquid is in the middle container. In order for the fountain to start working, you need to add a little water to the upper bowl - then the liquid will automatically flow through the first tube into the lower container until it is completely filled. At this time, the air pressure will increase, which will be transmitted through the second tube to the middle tank. At the same time, pressure will also be applied to the water, as a result of which it will begin to rise through the third tube into the upper bowl and flow upward. By completing this standard physics assignment, you will be able to replicate the experience of the great Greek mathematician and inventor Heron of Alexandria.
Making your own Heron fountain
The site provides instructions on how to make a fountain from plastic bottles, which will help you complete the experiment without errors. For this experiment, you can use empty containers of any size. First, you will need to make a bowl for the future fountain - cut a “cone” from one bottle with a neck of the height you need. Connect all structural elements as shown in the figure below, having previously drilled holes for the tubes.

Activating the Heron fountain with your own hands from bottles is very simple: first fill it with an amount of water equal to the volume of a medium container, then wait until it completely drains into the lower part of the fountain, and then turn the structure upside down. The liquid will begin to flow into the middle container. This process is also called “charging the fountain” because it continues until all the water flows down. Starting the fountain is also easy - add a little water to the bowl to close the system and enjoy the amazing spectacle.
The DIY bottle fountain will run until the water in the middle reservoir is used up - then it will need to be recharged. Please note that the larger the plastic bottles, the longer the fountain will function. The height of the jet will directly depend on the actual difference in water level in the middle and lower containers. The main thing is not to get confused with the tubes.

Another important point One thing you definitely need to pay attention to is the tightness of the connections. For this reason, after completing assembly, fill the entry points of the tubes in the covers with hot glue or sealant. If you don't have sealant on hand, use alternative option You can use regular plasticine, but keep in mind that in this case leakage is possible.
Consumables
To make a homemade mini-fountain, scrap materials that can be found in any home are used:
- plastic soda or yogurt bottles;
- flexible hose, glass tubes or cocktail straws;
- hot melt adhesive or sealant;
- drill or nail (to make holes).
If you use a flexible hose instead of rigid tubes, then plastic lids(at the connection points) you can insert sections from a thick ballpoint pen or connectors from a dropper.
You might be interested in
This Fountain made from plastic bottles does not require any cash costs. After all, gravity, thanks to which it works, is still free.
The Fountain of Heron of Alexandria has been known for 2000 years. However, many are meeting him for the first time. The uniqueness of this fountain lies in the fact that its stream hits above the level of the source water, and this in the absence of an engine!
The Fountain of Heron of Alexandria is a mystery to the unenlightened person. It seems that the law of communicating vessels is being violated. It seems that the fountain can run forever, consuming its own water.
This fountain is convenient to use at home as an air humidifier for flowers.
Instructions for using the fountain:
1. Unscrew the bottom bottle and fill it with water.
2. Screw the water bottle back on.
3. Turn the fountain upside down and wait for the water to pour into the second bottle.
(If the water does not flow immediately, you should press the bottle a little to start the process)
4. Place the fountain with the bowl up. The fountain is ready to start.
5. To start the fountain, you need to pour a little water (30-50 ml) into the bowl.
6. After finishing gushing, turn the fountain upside down to recharge. (You no longer need to spin the fountain and add water to it)
7. You can repeat steps 3 - 6 ad infinitum!
We wish you a pleasant time enjoying our fountain!
MATERIALS:
Plastic bottle (2 l) and two bottles of drinking yoghurt.

Cocktail straws, gel pen refill, dropper tube, dropper connectors (you can use pieces from a gel pen instead), nail, glue cap.
EQUIPMENT:

Alcohol lamp, knife, pliers, scissors, marker, sandpaper, glue gun (or any other waterproof glue).
INSTRUCTIONS:
Step 1.

We clean the bottle caps with sandpaper and glue them together with a glue gun. Using a nail heated on an alcohol lamp, we make two holes in the glued corks. We insert the connectors from the dropper into the holes.
Step 2.

Glue a cork from a 2 liter bottle to the bottom of a yogurt bottle. We make two holes in it with a hot nail.
Step 3.

Insert the tube from the dropper (~40 cm) and a straw without the corrugated part into the holes. Extend the straw on the other side so that it reaches the neck of the bottle. We insert a piece of rod from a gel pen into the end of the tube from the dropper for rigidity and seal the cracks around both tubes with glue.
Step 4.

We insert the second end of the tube from the dropper to the central connector in the glued plugs. We attach a cocktail straw to the second connector. We cut the end of the tube so that it reaches the bottom of the bottle.
Step 5.

Cut off the top part of a 2 liter bottle and attach it to the glued cork.
Step 6.

We make a nozzle for our fountain from a piece of tube from a dropper and the connecting part of a gel rod (or a glue cap). We attach the nozzle to the yellow tube using the connector from the dropper and a piece of orange tube.

[In order for the tubes to fit into each other, one of them must first be expanded (with the end of a handle, for example).]
The main purpose of the nozzle is to produce a thin, high jet. You can also get by by cutting the tube from the dropper without a nozzle - then the water from the fountain will simply pour down like a waterfall.
Step 7

We attach a tube to the central connector to the second side of the double plug.

We cut the tube so that its end reaches the bottom of the bottle.
Step 8
Putting all the parts of the fountain together


Step 9
If necessary, we make a stand for the fountain to make it more stable.

Cut off the bottom of a 2 liter bottle.

Glue this stand to the bottom of the bottom bottle of the fountain.
Step 10

The fountain is ready. You can start testing.
Video instructions:
P. S. For lovers of clever formulations...
Heron's fountain is a single-stroke hydraulic piston gravity compressor.


