When planning to replace old windows with new ones, many wonder how difficult it is to install them yourself. The answer is a job of medium complexity. In terms of time, replacing a medium-sized window with dismantling the old one takes about 3.5-4.5 hours. This is for a person with no experience. Company employees who do this all the time spend less than an hour on it. But the installation of plastic windows by the owner of the premises cannot be compared with the hasty work of “professionals”. They simplify the process to the point of indecency, arguing that prices have not been raised for 6 years and they have no time to waste time on trifles. If you are lucky to find truly masters, then you can entrust the installation to them. If not, take a weekend and install it yourself.
Construction of plastic windows
To properly understand the installation process, you need to have an understanding of window design. Let's start with materials and names. Plastic windows are made from polyvinyl chloride, which is abbreviated as PVC. Hence the second name - PVC windows.
The main element of any window is the frame. For plastic windows, the frame is made from a special multi-chamber profile. It is divided by partitions into a number of cells - chambers. The more of these cells, the warmer the window will be. When they talk about how many cameras there will be in a plastic window, they have the number of cells in the profile.
In the middle of the structure, in the largest chamber, an insert is visible blue. This is a reinforcing element of increased rigidity. It gives the profile the required strength. In plastic windows this insert is made of plastic, in metal-plastic windows it is made of metal (usually aluminum). That's the whole difference between them.

There is also a division of profiles into classes: economy, standard and premium. Optimal choice, if you need normal windows, use the standard class. In economy class, the partitions are too thin and they begin to freeze almost from the moment they are installed. Premium has a high price due to options that, in fact, are not needed.
If you want to have the best profile for plastic windows, take the standard class of any factory. There is no particular difference between products from different companies. They have long been standardized and all managers’ stories about the advantages are fairy tales. If they are made on factory equipment, there is no difference between them: all factory profiles have long been standardized.
Window profiles as standard have white, but they can also be brown - to match the color of any tree, and even pink - to order. Windows made from colored profiles are more expensive than similar white ones.
Window structure
To understand what is being discussed in the description of the installation process, you need to know the name of each component of the structure.

It consists of:
- Frames. This is the base of the window.
- If the window consists of several parts, the frame is divided into parts by an impost - a vertical component. If the window is made of two parts, there is one impost; If there are three parts, there are two, etc.
- The opening part of the window is called the sash, the stationary part is called the capercaillie. A double-glazed window is inserted into them - two, three or more glasses, hermetically sealed together. A foil tape is laid between the glasses to ensure tightness. There are double-glazed windows with special properties: with reinforced glass, tinted and energy efficient, which, according to manufacturers, reduces heat loss through the windows. There are also double-glazed windows with inert gas pumped between the glass panes. It also reduces heat loss.
- Double-glazed windows are pressed to the frame with a cap - a thin plastic strip. The tightness of the connection is ensured by a rubber seal (it is usually black).
- Locking fittings are installed on the sashes. This is a specific set of mechanisms that provide opening and locking. They can be different, as they provide different functionality: opening, opening with ventilation, opening + ventilation + micro-ventilation.
- To ensure tightness, rubber seals are installed on all parts - frame, impost and sashes.
At the bottom of the outer side of the frame (the one facing the street) there are drainage holes that are closed with special caps. Through them, condensation that forms inside due to the difference in temperature outside and indoors is discharged to the street.

The window also has a sill - a board on the outside that removes precipitation and a window sill on the inside. Side and top parts from the street and indoors. They can also be made of plastic or made using a different technology.
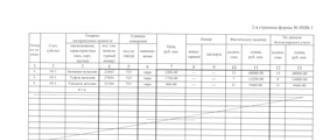
How to measure a plastic window
When ordering windows, you will be asked for six sizes: the height and width of the window, the length and width of the window sill and slope. To measure everything correctly, you need to determine whether your window opening is made with a quarter or without.

Inspect the opening. If the outer part of the window is narrower, the opening is a quarter. In this case, measurements are taken at the narrowest point: openings rarely have ideal geometry, so you will have to measure at several points. Find the most small value, add 3 cm to it. Transmit the height as it is.
If the opening is smooth, the calculation proceeds differently. Measure the width and height. Subtract 3 cm from the measured width and 5 cm from the height. This will be the height and width of your window. We remove 3 cm in width, since a gap of at least 1.5 cm is required on both sides under the mounting foam. We subtract 5 cm in height, since the same 1.5 cm is needed on top, and 3.5 cm on the bottom will be used to install the window sill.
The length of the window sill and ebb is taken with a margin - 5-10 cm more than the width of the window opening. During installation, both the ebb and the window sill are “recessed” a little into the adjacent walls, and the excess will go there. The width of the tides is standard, so the nearest larger one is chosen. On window sills the situation is different. Its width is chosen arbitrarily - at the request of the owner. Some people like them wide so they can put something, others prefer them flush with the wall. So there are no rules here.
When ordering, you will need to indicate how many and what parts will be in your window: whether there is a capercaillie or not, where it is located, how many sashes, which side they are on, how they should open. You will need to indicate the type of fittings (ventilation, micro-ventilation).
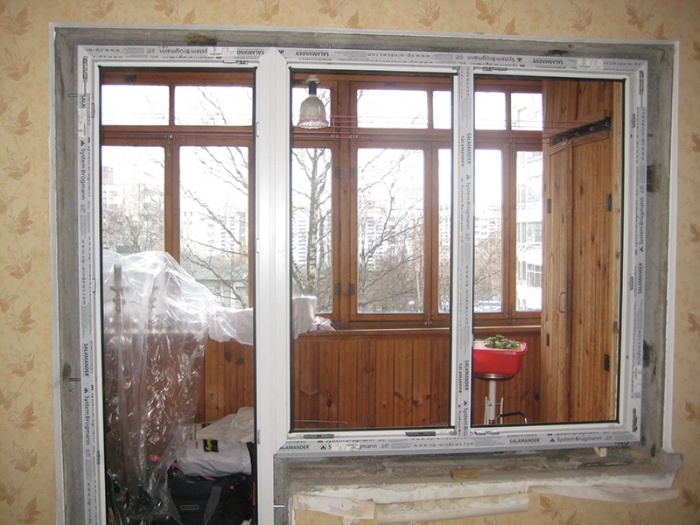
Preparation
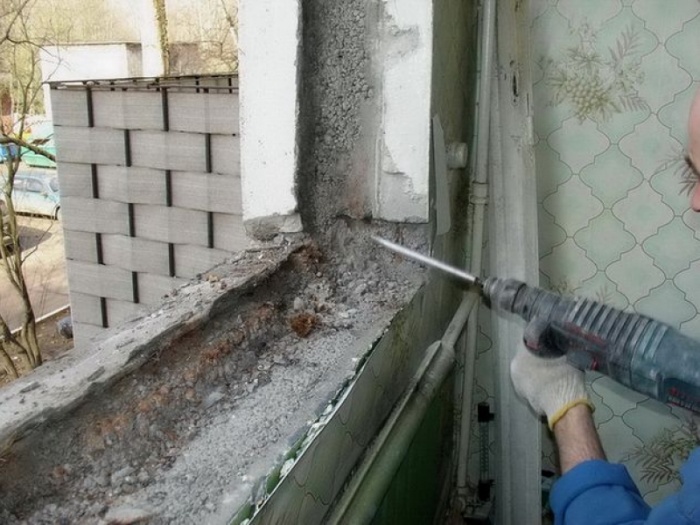
If you are replacing windows, installing plastic windows yourself begins with dismantling the old one. Problems usually do not arise: breaking does not build. After dismantling, it is necessary to inspect the opening: remove everything that can fall off. If there are any protruding parts, they must be removed - using a hammer, chisel or power tool. When the plane is leveled, all construction debris must be removed. Ideally, sweep everything away, even the dust, otherwise during installation the foam will not “grab” well on the wall.

If there are too large potholes or cavities, it is better to cover them with cement mortar. The smoother the opening, the it will be easier installation. If the wall material is loose, they can be treated with binding compounds: penetrating adhesive primers.
How to install correctly: choosing an installation method
There are two different methods: with and without unpacking (disassembling) the window. When unpacking, holes are drilled through the frame and anchors are driven through them into the wall. This method is more complicated, but the fastening is more reliable.

This is an anchor bolt installation. They are placed three on each side.
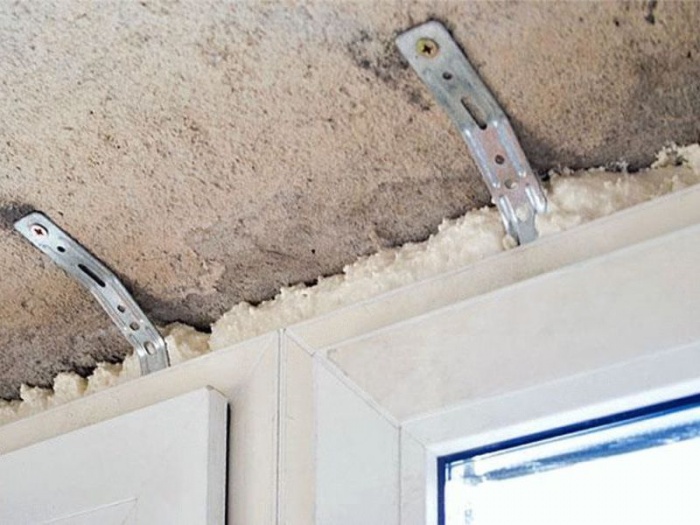
When installing without unpacking, metal plates are attached to the outside of the frame, and then they are attached to the walls. This is naturally faster, but the fastening is very unreliable: under significant wind loads the frame will warp or it will sag.

If you really don’t want to disassemble the window, you can mount it on a plate, but use not narrow and thin ones, but thick and wide ones, which are often used when installing a rafter system.
In principle, small windows installed on mounting plates, provided there are no significant wind loads, can stand normally. If you live in an area with strong winds, and they blow mainly through your windows, if the apartment is located in a high-rise building - in these cases, installation with unpacking is necessary.
Below, watch an emotional and intelligible video that explains why it is better to use anchors.
Do-it-yourself installation of plastic windows: step-by-step instructions
Let's describe both methods: suddenly you need a method with mounting on plates. It is used in buildings made of foam blocks, the load-bearing capacity of which is low and the load from the windows has to be distributed over a large surface. This method of installing plastic windows is also necessary if the building is built using “layered” technology. For example, there is concrete in front and behind, and a layer of insulation between them. If the window must stand in the soft layer, then it will need to be secured with plates. Installation of PVC windows in brick, cinder block, panel, etc. the house is desirable on the anchor.
Installation and unpacking
Do-it-yourself installation of plastic windows begins with measurements. Measure the frame and window opening to make sure they are compatible. Afterwards you can start working. The process begins with disassembling (unpacking) the PVC window. Here are the steps:
- Removing the window sash:
- Close the window (the handle is turned down).
- Remove the plastic covers on both hinges. They are pryed off with a screwdriver.
- There is a pin on the top hinge that provides a movable connection. It is located in the center and protrudes slightly. They press on it until it sinks (you can take a metal plate, rest it against the pin and lightly tap the plate). The pin will slide out from below. Now you can grab it with side cutters or pliers and pull it down and pull it out.
- Hold the door up and open the lock. To do this, place the handle in a horizontal position. Having tilted the upper part towards you slightly, lift the sash, removing it from the lower pin.
The entire sash has been removed. To make it clearer, watch the video. It describes in detail how to remove and install the sash on a plastic window.
- On the wood grouse, remove the glass unit. It is held in place by glazing beads. They need to be removed, then the glass unit itself will be removed without any problems. Remove the glazing beads like this:
- Something narrow and strong is inserted into the gap between the bead and the frame. If you don't have a special tool, it's best to use a small spatula. Disassembly begins from one of the long sides.
- The spatula is carefully pushed into the crack with a corner and the glazing bead is gradually moved away from the frame.
- Without removing the tool, move along a little, again pushing the glazing bead to the side.
- This goes along the entire length. As a result, the glazing bead is almost separated; it is simply removed.
- With the short side, everything is simpler: you pry up the free edge and, by turning the spatula, remove it from the groove. Grab the free edge with your hand and pull up.
Now you can try to remove the glass unit. Just be careful: it's heavy. If that doesn't work, remove another one of the beads. Just make sure that the window is tilted and the glass unit does not fall out. Now, if necessary, you can replace the double-glazed window yourself. Watch a video on how to remove glazing beads from PVC windows.
- Removing the window sash:
- The freed frame is covered with a special self-adhesive tape along the outer perimeter. Its installation is recommended by GOST. With it the window doesn't get so cold.

- Remove the protective tape with the campaign logo. If you leave it, it will fuse too much with the frame under the influence of the sun and it will be problematic to remove it.
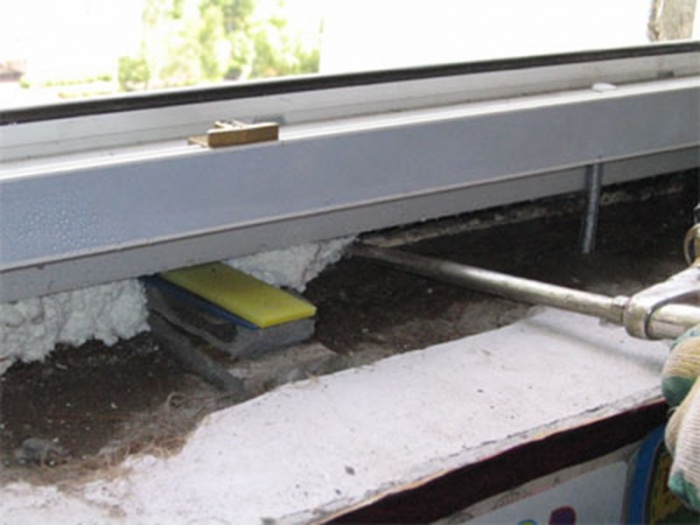
- The prepared frame is inserted into the window opening. Mounting wedges are used to align it. They must be installed in the corners and under the impost. The rest are arranged as needed. By placing them, the window is set strictly level in three planes. The position of the window is pre-fixed. This is what you can use mounting plates for.

- Take a drill and a drill bit that matches the diameter of the anchors. Make holes for fasteners. 150-180 mm retreat from the top edge. This is the first hole. The bottom one is approximately the same distance from the bottom corner. Another anchor is installed between them in a standard window: the maximum distance between two fasteners should not be more than 700 mm.
- Having made a hole, check whether the frame has moved (level in all three planes), then hammer in the anchor and tighten it. You cannot overtighten: the profile should not sag. Repeat this operation the required number of times.

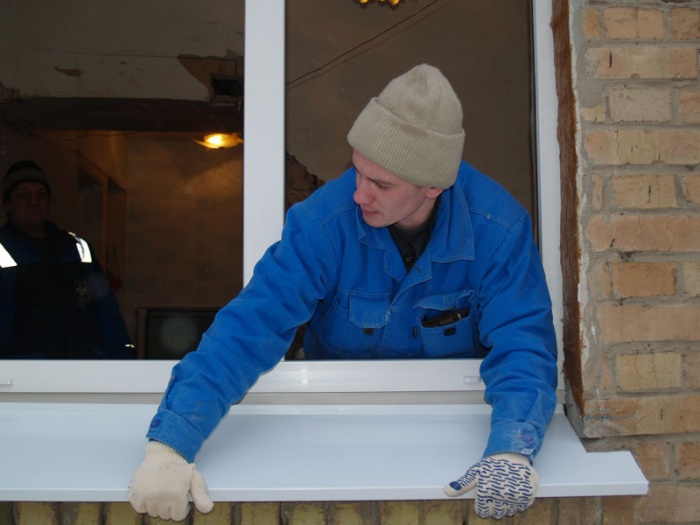
- Install ebb tides outside. To do this, first a vapor-permeable waterproofing is glued to the outer part of the frame (it is self-adhesive). Small grooves are made on the sides of the window opening, into which the edges of the tides are then inserted.

- A layer of foam is applied to the part of the window opening from the outside, where the ebb will rest on the wall. Sometimes, if the height difference is large, a lining profile is installed here. and then an olive is attached to it. The ebb, cut to size, is inserted under the frame lip and secured there to the frame with self-tapping screws.

- Along the lower edge the ebb also foams.

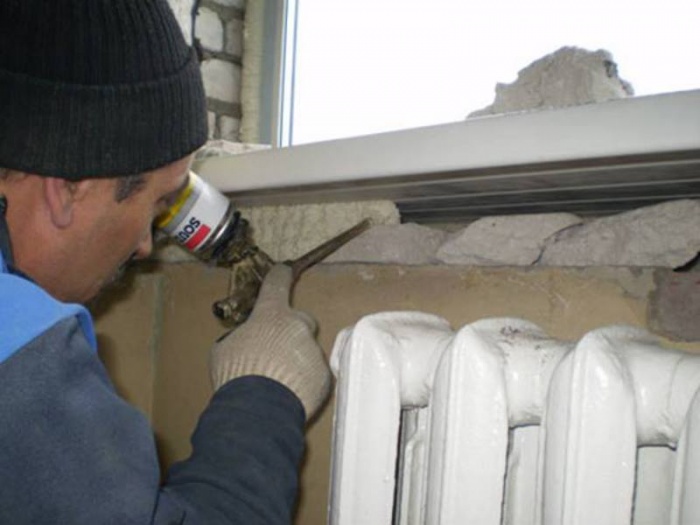
- Next, foam the opening. When installing plastic windows in the summer, the gap between the frame and the window opening is sprayed with water from a spray bottle. This is necessary for better polymerization of the foam.
- A vapor-permeable heat-insulating strip is glued along the contour of the frame - it is also recommended by GOST.
- Take a balloon with foam and fill the existing gaps to 2/3 of the volume. If the gap is large - more than 2-3 cm - foam is applied in several stages. A time interval of 10-15 minutes is required between two layers. When the first layer is partially dry, it is also sprinkled with water and the second is applied. This is repeated until the volume is 2/3 filled.

When installing PVC windows with your own hands, foaming can be done in several stages - depending on the size of the gap
- Without waiting for complete polymerization, the free edge of the heat-insulating tape is glued to the window opening. Just note that when using tape, the slopes will need to be made of plastic: the plaster and mortar will not “stick” to it.
- Assemble all parts of the window. There are only finishing work, and they are not a hindrance.
- A vapor barrier tape is also installed under the window sill in the lower part (also GOST recommendations). The window sill rests on support blocks made of hard wood treated with impregnation. The distance between them is 40-50 cm. They are made in such a way that the window sill is slightly inclined towards the room (about 5°).

How to correctly position a window sill during installation plastic window watch the video. There are many secrets.
The last to be installed or sealed are the slopes. One more video on this matter.
Installation without unpacking
The main details are described above, so this chapter is short. Installation for this option begins with the installation of mounting plates. They are of two types: U-shaped and linear. It is important to choose the most reliable thick metal ones.

They are installed at the same distance as the anchors: 150-250 mm from the edge and no more than 700 mm between the middle ones. They are simply screwed to the profile with self-tapping screws.

Then installing plastic windows with your own hands with mounting plates is identical to that described above, starting from the moment the window is leveled in the opening. Only they attach not the frame, but the plates, and not to anchors, but to dowel-nails. Drill a hole, bend the plate, insert a dowel, put the plate in place and tighten the dowel. Further all actions are identical.
Now it’s clear why installers prefer them: a decent amount of work is spent on disassembly, anchoring, etc.: screws are much easier to tighten. True, if you take powerful plates, they will hold tightly. No worse than an anchor. For example, like in the video.
Most homeowners choose to install plastic windows not only because of their excellent performance, but also because of the ease of installation. This process is simple due to the fact that the design provides very easy-to-install fasteners and additional parts that are included in the window package. Many people are interested in how exactly professional installers install windows. With minimal skills in using tools, any homeowner can install such windows.
Of course, as with the installation of any structural element, when installing PVC windows, you will need to observe a number of features and certain actions. It is advisable to carry out this kind of work with an assistant, even one who does not have any construction skills; when leveling the window, some difficulties may arise if you do this work alone. Proper execution of all installation nuances will help you complete the job accurately and save on the labor of hired workers.
Carrying out measurements and calculations

Before purchasing windows, you should take measurements of the openings - based on this data, you will place an order to the workshop. When taking measurements, you need to take into account whether they are a quarter or not. Foam concrete buildings are characterized by quarter openings, which greatly reduces heat loss. For an opening without a quarter, when ordering fiberglass windows, the length will be 5 cm less than the same parameter for the opening. 3 cm is subtracted from the value defined as the width of the opening. Gaps of 1.5 cm should be provided along the contour - they are necessary in order to carry out foaming. An additional 3.5 cm should be left at the bottom for installing the window sill. According to GOST, 2 cm should be left around the perimeter.
To take correct measurements for a quarter opening, measurements must be taken at the narrowest point. When ordering windows, add 3 cm to the measured width; the length does not change the value.

More often, PVC window structures are not installed in the middle of the opening, but at a depth of approximately 1/3 from the outer plane. But if you are going to install the structure yourself, you can move the window a little at your discretion. To order sills and window sills, you should definitely take these parameters into account. Add 5 cm to the widths calculated for the intended location of the windows.
When determining the width of the future window sill, it is necessary to take into account the battery - it should be covered by the window sill by about half. Add another 2 cm - the window sill will need to be placed under the base of the window frame. You need to leave a margin in length - at least 8 cm. But it will be much better if you add 15 cm - this allows you to cut the window sill more beautifully.
Plastic side plugs are usually included with ebb and window sills. You shouldn’t refuse them, although some masters do just that.
Return to contents
Window frame installation methods

The technology for installing polyvinyl chloride windows does not depend on how many internal chambers are in the metal-plastic profile, nor on the number of chambers in double-glazed windows. It will be necessary to take into account when developing the installation plan following points: the material from which the walls of the housing are made, and the dimensions of the plastic window structure. Depending on this, the method of fastening and the devices that will be used are determined.
Plastic window frames can be fixed in the opening using the following elements:
- using dowels, mounting anchors, which must be inserted into the walls through special through holes, which are performed in the profile in advance;
- Another option is special toothed plates pressed into the profile, which are not embedded in the wall, but are placed “off-the-cuff” and fixed with screws.
Option 1 is considered the more reliable of them. It is more often used in cases where it is necessary to install window systems of considerable size and weight. Window frames with through fastening quite well resist various shock loads that can arise, for example, when using PVC systems with sashes that open in different positions. Anchors passing through the plastic frames allow more precise adjustment of the structure during installation both vertically and horizontally.

Those wishing to find out the method of correct installation of PVC windows with Not large sizes, with fixed double-glazed windows, you may be interested in fixing the structure using anchor plates. Fastening elements will not spoil the appearance of the window - they are covered by slopes.
To install anchor plates in wall openings made of brick or concrete, you will need to make recesses. If you do not do them, you will need to apply an extra leveling layer before installing the internal slopes.
Sometimes installers try to combine these 2 methods. The anchors are inserted into the walls through the bottom profile, that is, the base of the window structure and the sides of the frame, and the upper part is fixed using plates. If PVC windows are installed in a bathhouse built of wood, anchor plates should not be installed - they become loose during operation. In some cases, galvanized screws are used instead of anchors.
Return to contents
The nuances of installing plastic windows in wooden buildings

The installation process will be significantly influenced by the type of material from which the housing is built. For example, for walls made of hollow or solid bricks or foam concrete, the differences will only be in the depth to which the anchors are installed. But openings in walls made of logs or beams will require a special approach. Here you will need to take into account the installation method and choose the right time for this.
Plastic windows can be installed in walls made of wooden building materials only a year after the construction of the house. It’s even better to wait 2 years - during this time the shrinkage process will enter the stage in which subsequent operation will be longer and more reliable. For buildings made of laminated veneer lumber, the shrinkage period lasts the fastest.
Window installation should not be carried out immediately in the opening, as is sometimes done in villages.
A plastic window should only be inserted into wooden box, which will protect the window structure from distortion. Myself window unit must be free from any damage, the presence of defects and rot is unacceptable. Before starting work, it should be treated with an antiseptic composition.

After the PVC windows are installed in place, the shrinkage of the log house does not end. True, it will not continue as intensely. To prevent it from causing crushing damage to plastic structures, it is recommended to leave between top edge frame and window frame there is a gap of 3-7 cm. After the window is put in place, the gap is filled with jute insulation and closed on both sides with platbands.
The building codes do not contain precise recommendations on what materials should be used to install ebbs and window sills in wooden houses. As a rule, standard sills are installed, which are ordered in one set with the window design. Window sills can be made of wood or polymers. The bottom profile can be supported on a wooden window sill, that is, it can be installed before installing the window.
For those who are planning to install windows themselves, but do not have much experience in this matter, the following information may be useful. Since wood allows moisture vapor to pass through well, the technical qualities of the polyurethane foam used to install the window are seriously reduced. To ensure that the foam blown around the perimeter of the structure is not exposed to moisture and does not get wet, a foil polyethylene tape should be applied to the window block along the line on which it is applied. This nuance is not specified in the regulations, but experienced installers highly recommend not neglecting such equipment when installing a window.
Return to contents
Standard methods for installing plastic windows

The technology for installing plastic window structures includes the use of polyurethane foam. In addition to providing insulation, it will add additional rigidity to the connection between the opening and the frame. Thus, a layer of polyurethane foam, obtained as a result of its polymerization, simultaneously protects the opening and fixes the structure. So that under the influence of unfavorable external influences the foam layer does not lose its technical properties, it is better to surround it with additional insulation.
As to when exactly to install PVC windows, the decision is made by homeowners. You can also come across the opinion that it is better to do the installation not in summer, but in winter - in this case, all installation flaws will appear immediately and can be corrected very quickly. When choosing polyurethane foam for work, pay attention to the information on the composition - it should indicate at what temperature this product can be used. The foam will only cure at the temperature specified in its performance characteristics, so you should not use foam intended for use in extreme cold conditions for summer work, and vice versa.
You can read about how to carry out foaming in the instructions that the manufacturer provides with a specific product. Usually foam starts from the bottom, gradually moving upward. Movements should be rotary and circular. In order to use less expensive material, it is better to blow out the foam in several stages, calculating segments of approximately 25-30 cm.
To shift the dew point, it is better to perform foaming with different densities. In practice it looks like this: outer layer They try to compact the foam less than the layer facing inward. The foam must be poured around the perimeter of the window frame as evenly as possible, without gaps or voids.
Return to contents
How to prepare a window opening for work?

To install PVC windows, you will need to carry out preparatory work. Before installation, any contamination should be completely removed from the window opening: dust, construction debris, particles old paint. When carrying out work independently, craftsmen should know that when installing a new plastic structure in a used wooden window frame, top layer It's better to plan it completely. It is not reliable enough; it is better to remove it completely so as not to disturb the adhesion of the foam to the surface.
If the gap between the opening and the window frame does not exceed 4 cm, they are filled only with foam. If the gaps are wider, it is better to partially fill them with other, cheaper materials. These can be pieces of timber, drywall, polystyrene foam, brick fragments and other construction waste.
Useful information
When the installation of a plastic window is carried out by specialists, it seems that there are no difficulties, everything happens quickly and accurately. The assemblers work like a finely tuned watch mechanism, where every part fits exactly into place. right place. However, not everything is so simple and you need to know exactly what and how to fix it so that the window does not cause problems. It is important to select fasteners for proper installation, as well as the actual installation of a specific structure.
Basic mounting elements
The variety of fastener elements can become a stumbling point for an ignorant person, but installers know exactly what parts may be needed during installation. The TBM-Market store offers a wide selection of fasteners for windows, because installation fasteners, if installed correctly, will significantly increase the service life of the structure.
Types of fastening elements:
- dowels or screws for concrete;
- frame anchors different types(anchor bolts);
- dowels and anchor plates;
- self-tapping screws of different diameters, including nipples for them;
- various screws and so on.
The installers install the window and select the necessary fastening that suits the type of walls in your apartment. A good quality fastener, not intended for a specific structural material, will give a poor result, and the period of reliable operation will be shorter.
- Through installation of plastic windows:
- Mounts for concrete walls(pins)
- Frame anchors
Most installers prefer to use concrete dowels or screws (turbo screws), since the dowel is installed quickly, holds the weight of the glass unit reliably, and is firmly fixed in the material. When working, a hole is pre-drilled into which a screw with a threaded notch is screwed in without a dowel, which ensures the strength of the fastener.
Pins have standard sizes for window openings - 7.5 by 152 (132), if it is necessary to replace the glass with light-protective, fire-resistant, etc., the structure can be easily dismantled.
Disadvantage of fastening: dowels cannot be used when installing plastic windows in non-uniform walls that have a layer of insulation.
Standardly, the anchor has three components: a screw, a bushing and a cone nut; it requires drilling a hole for installation in the profile and in the wall. The bushing is at the same time a helping element for screwing in the screw, an additional locking link that ensures the screw is secured in the hole. The countersunk head of the anchor (dowel) can be recessed into the hole or covered with a special cover.
Standard anchors for concrete (solid brick) have a length of at least 60 mm, for porous blocks or slotted bricks - at least 80 mm.
Dismantling a plastic window with anchors is more problematic than with screws, so you need to be especially careful during installation. The disadvantage of anchor dowels is that they cannot be used for multi-layer walls, especially when there is an insulating layer.
This type of fastening assumes that the integrity of the frame structure will not be compromised (holes are not drilled). For panel-type houses with walls multilayer structure, for glazing loggias, anchor plates are used, attached to window opening, and polyurethane foam. The plate is attached at the end to the frame using self-tapping screws, and it is secured to the wall with dowels (length no more than 40mm).
9134 0 0
How to fix a window: overview of fastening hardware and photo report of the installation completed
Hello. In this article I will talk about how to fix plastic windows in a residential building with your own hands using available tools. I hope that this topic will be of interest to you, since installation skills can save money.
Despite the fact that for many manufacturers the price of windows includes the cost of installation, there are many companies where they will sell you a double-glazed window cheaper due to self-installation. The money savings are obvious!
Basic information about window installation

The installation of glazing in the opening differs depending on the type of profile used and depending on the type of walls. For example, installation in a stone, concrete or brick wall is carried out directly without any structures compensating for mechanical loads on the window.
At the same time, installation in wooden house is carried out with the obligatory installation of a casing box, which compensates for the loads due to shrinkage processes.
There are two main requirements for the installation of plastic double-glazed windows:
- Strength and reliability of the installed glazing;
- Correct location in level relative to the vertical and horizontal planes;
- Properly sealed gaps around the perimeter of the opening to ensure optimal energy efficiency of the glazing.
Fastening elements for installing double-glazed windows in PVC profiles

Commonly used fasteners for plastic windows: a - frame dowel with a metal seal; b - frame dowel with plastic seal; c – universal plastic dowel; g – screw (self-tapping screw); d - anchor plate
Before moving on to the description of the installation, I suggest you find out what fasteners for PVC windows can be purchased at construction stores. There are many fastenings and such a variety is not accidental, since each type is intended for one or another type of wall.
Window fasteners according to the type of walls are divided into the following categories:
- for concrete walls;
- for installation of brick walls;
- for installation in aerated concrete walls;
- for fastening to wood.
By the way, using the listed fasteners, a protective grill can be installed.
Fasteners for installation in concrete openings
Plastic double-glazed windows are installed in concrete openings using anchors or, as they are also called, frame dowels.
To securely fix a heavy window in a concrete opening, it is customary to use anchors with a diameter of 8 or 10 mm and a length of 72 to 202 mm. The length and diameter of the hardware are selected taking into account the density of the wall - the more porous the concrete, the longer and thicker the anchor.
No matter how long or thick the anchors are, the strength of the finished result will depend on how carefully the hole is drilled. If the walls of the hole are broken as a result of unprofessional drilling, even the most reliable fastening hardware will not provide required strength installation

Installation using anchors is carried out in two ways:
- A hole is drilled in the profile and the anchor enters the concrete directly through the profile;
- An anchor plate is attached to the profile and through the plate the window structure is fastened to the opening.
The first method is relevant if the technological gap between the profile and the gap is small. If the distance between the profile and the opening is more than 1 cm, you can use an anchor plate, since the fasteners can be covered when finishing, if plastic slopes are used.

Anchor plates are simple or complex configuration. Simple plates are ordinary strips with perforations. Along with such devices, there are “crabs” - plates that cut into the profile, thereby simplifying the finishing of slopes.
Fasteners for installation in brick walls

Fastening plastic windows in a brick opening is carried out in approximately the same way as in. But there is one problem: if for installation in concrete, the holes for the anchor in the profile can be drilled in advance, then in the case of brick walls, the holes are drilled locally, since you need to get into the center of the brick, and not into the masonry seam.
For installation in brick, the same frame dowel is used as for concrete walls, but with a length of at least 10 cm. A length of 10 cm is the minimum penetration into the brick at which you can be sure that the fastening will not become loose or weaken when operation.
If you are sure that the brick is not hollow, and today this is used extremely rarely, you can use dowels 6-8 cm long.
Fasteners for installation in wooden openings

The best option for installing windows in a wooden opening without casing is self-tapping screws in combination with anchor plates. This type of fastening is equally good for log, timber and frame buildings.
If a casing box is installed in the opening, installation can be done with screws directly through the profile. To install glazing in a wooden opening, I recommend using self-tapping screws at least 10 cm long with a diameter of 8 mm. We screw in the screws in increments of 30 cm.
Fasteners for installation in aerated concrete openings
Aerated concrete blocks are characterized by low density, and therefore for installation we select special dowels and install them with a small pitch between the screws.
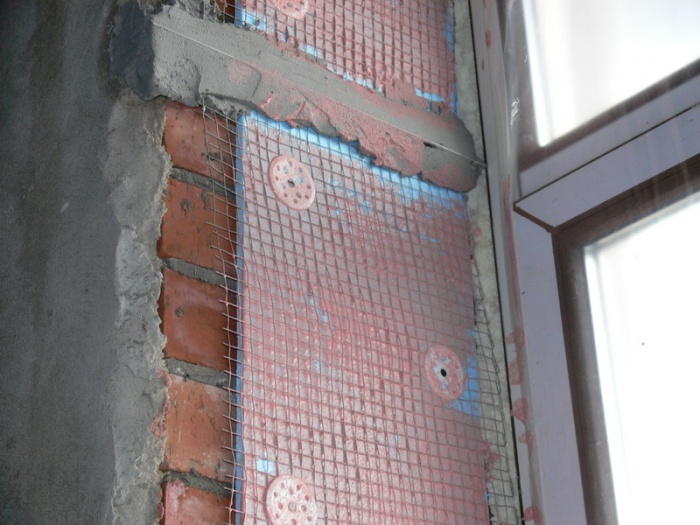
Installation of glazing in aerated concrete walls requires detailed consideration, since everything more houses are built using such blocks. That is why, to familiarize yourself with the installation technology, I offer a short photo report of the work done. installation work Oh.
Installation of a plastic window in walls made of aerated concrete blocks

To perform installation work you will need:
- Perforated anchor plates (160×40 mm and 2 mm thick);
- Plastic dowels (50×10 mm) for fastening into aerated concrete;
- Universal metal self-tapping screws (60×6 mm);
- Electric drill and drills in accordance with the diameter of the dowel;
- Screwdriver with a set of bits;
- Water level;
- Tape measure and pencil.
The installation instructions are as follows:

- If the perforation in the anchor plates does not correspond to the diameter of the dowels, we drill out the holes; if the diameter initially matches, we skip this stage and move on to the next one;

- We screw anchor plates along the perimeter of the profile onto self-tapping screws so that the holes drilled for the dowels are located on the outside;
In order for the frame to be securely fastened in the opening, we mount the anchor plates on 2 self-tapping screws, which will prevent them from turning. In addition, the installation step should not exceed 30-40 cm.
- We install the frame in the opening on plastic inserts and position it level in the horizontal and vertical plane;

- After the structure is aligned in the opening, we drill holes in aerated concrete blocks in accordance with the perforation in the anchor plates;
To drill aerated concrete blocks, it is not necessary to use a drill with pobedit surfacing. Since aerated concrete is soft, it is quite possible to use the drill that was previously used to drill out the anchor plates. By the way, when drilling, we try not to jerk the drill from side to side, since breaking a hole in aerated concrete is as easy as shelling pears, and as a result, the dowel will not stay in the wall.

- We screw dowels into the drilled holes;

- We screw self-tapping screws into the screwed dowels;
After completing the installation work, we do not remove the liners from under the window, as they will provide additional stability to the structure.

- Using a spray bottle, generously moisten the technological gap between the opening and the profile;
- Filling the technological gap around the entire perimeter polyurethane foam, so that the excess applied foam comes out from the outside and the gap is completely filled;
- After the foam has dried, the excess is trimmed with a mounting knife on both sides of the profile.
By the way, how can you attach a thermometer to a window without needlessly making holes in the profile?

It turns out that there is nothing complicated, just buy a special thermometer with Velcro on the glass. Thermometers with ears and mounting holes should be mounted not on plastic, but on wooden frames. But, if you have a thermometer with holes for screws, fasten this device to the profile with short screws - this will not harm the profile.
In conclusion, I note that if you don’t know how to secure the handle to the profile, you can also use small self-tapping screws that will go through the PVC and be held in the metal.
Conclusion
Now you know how to install a PVC window block into an opening of walls of different composition. I hope that the instructions provided were helpful to you. If you have any questions, as usual, ask them in the comments to the text. Also, don't forget to watch the video in this article.
Plastic windows are increasingly being installed by owners country houses, since they have many advantages compared to wooden products. They are also reasonably priced. But before installation, you need to carefully prepare for such work. To do everything yourself, you need to know the specifics of performing all operations.
All plastic products are supplied with installation parts, so with proper preparation, you can install the window without outside help. It is necessary to perform all actions very carefully so as not to damage the structure. In order to secure the windows in the opening more carefully, it is worth working with an assistant. In some cases, before carrying out work, it is necessary to strengthen the opening.

Materials required for work
Before you begin installation, you need to prepare the following materials:
- wedges inserted for the correct positioning of windows;
- polyurethane foam;
- sealant;
- water vapor barrier material necessary to protect joints from moisture;
- anchor bolts.
Wedges are used during the installation process to more accurately install the plastic profile. Without these materials, it is much more difficult to monitor. Polyurethane foam is an insulating material that fills the space between the wall and the frame. When choosing foam, it must be taken into account that it must correspond to the temperature at which the work will be carried out. If you purchase a material intended for use in the summer, its use in winter may lead to the creation of a poor-quality insulating layer.
You will also need self-expanding sealing tape during work. This material is glued around the perimeter of the window from the outside, after which it expands. Sealant is used to fill the space between the slopes and the window sill.
How to determine the correct position of a plastic window
Before carrying out installation work, it is important to correctly determine the position of the frame relative to the thickness of the wall. The plastic window should extend about a third inside from the street side. This rule is not mandatory, but when moving the window in any direction relative to the specified distance, it is worth considering that the length of the sills and window sills must correspond to the project.
It is important to consider the size of the radiator and its position. The window sill should not overlap it by more than ½ of the width. If you completely turn off the radiator, this can negatively affect the temperature in the room in winter, as well as the condition of the window. If installed incorrectly, plastic windows usually begin to fog up.
The length of the window sill should be approximately 15 cm longer than the window opening. Thanks to this, you can process the edges of the window sill while finishing the slopes. The window sill comes with side plugs, which should also be secured after installing the window.
Methods for fixing plastic windows
The choice of a specific fastening method depends on parameters such as the size of the window opening and the wall material. This should also be taken into account when choosing fasteners for a plastic structure.
Plastic windows can be fixed in several ways:
- Using dowels or anchor bolts. They are fixed in pre-created holes in the wall.
- Plates with teeth that are located on the outside of the window profile. They are installed on a spacer and secured with self-tapping screws.
The first method described is considered more reliable. That is why large plastic structures are secured with dowels. The fastening that passes through the window block is more reliable and can withstand impacts.
If you decide to install small plastic windows, they can be secured using anchor plates. These fasteners can be hidden by slopes and finishing materials. But before carrying out work, small recesses should be prepared for them. This will avoid problems with plane alignment.
It is worth noting that when installing plastic windows, professionals combine the above methods. In this case, anchor bolts are used to secure the base of the profile and its vertical parts. The upper part is secured with plates.
Basic rules for installing plastic windows
To install windows correctly, you should follow several basic rules:
- Installation of plastic double-glazed windows should be done using polyurethane foam. This material allows you to give the structure additional rigidity. It also acts as a fixative and heat insulator.
- To protect the space between the window and the wall, it is necessary to secure a waterproofing material on the outside and a vapor barrier on the inside.
- Windows can be installed at any time of the year. Many professionals recommend carrying out work in winter, as this will allow you to immediately see whether mistakes have been made.
- Before purchasing foam, you must carefully study the features of the composition. Such materials differ in several respects. One of them is the solidification temperature. The instructions on the cylinder indicate the most favorable conditions for using foam. If they are ignored, the material may begin to deteriorate during the operation of the structure.
- When foaming the gaps between plastic windows and walls, it is necessary to fill in small portions. This allows you to use less foam.
- If the opening crumbles, it is necessary to clean the surface of old materials and strengthen it.
Following the described rules, you can install windows with my own hands without making mistakes that people who have no experience in such work make. Technology for installing plastic windows in brick house is quite simple, but it is important to carefully perform each action so as not to make a mistake.
How the opening is prepared
Before performing window installation work, it is necessary to thoroughly clean the opening from dirt and dust. It is important to remove all remaining paint and building materials. Before installation, it is also important to compare the dimensions of the opening and the plastic frame. If the gap is more than 4 cm, it is necessary to use not only foam. This is due to the fact that when using it, it will not be possible to create an even and high-quality seam. In addition, quite a lot of foam will be lost.
Before installation, the sashes must be removed from the frame. To do this, simply pull the pin out of the hinges. If it is necessary to remove a glass unit from the frame, remove the glazing beads holding the glass. These steps must be performed very carefully so as not to scratch the glass.
After removal, the sashes and double-glazed windows should be placed on a soft mat and leaned against the wall so that they are in a stable position. Double-glazed windows should not be laid flat, as this may lead to scratches on the surface of the glass.
After this the deletion occurs protective film and marking the places where the fastenings will be located. The distance between them should be about 40 cm. It is important to take into account that the distances from the corners should be more than 15 cm.
Installation process
After carrying out the described actions, you should insert it into the window opening in brick wall spacers to create the required clearance. The frame must be leveled using a building level. It is also important to control side clearances.
In the openings of brick houses, it is necessary to mark the installation locations of anchors. After this, holes are created in the walls. If fastening is done using anchor plates, it is necessary to bend them so that they fit well on the wall.
The next step is to install the frame. It is important to check the horizontal and vertical structure of the structure before. How will it be finally fixed? After this, the bolts are finally tightened until the head protrudes above the surface by no more than 1 mm.
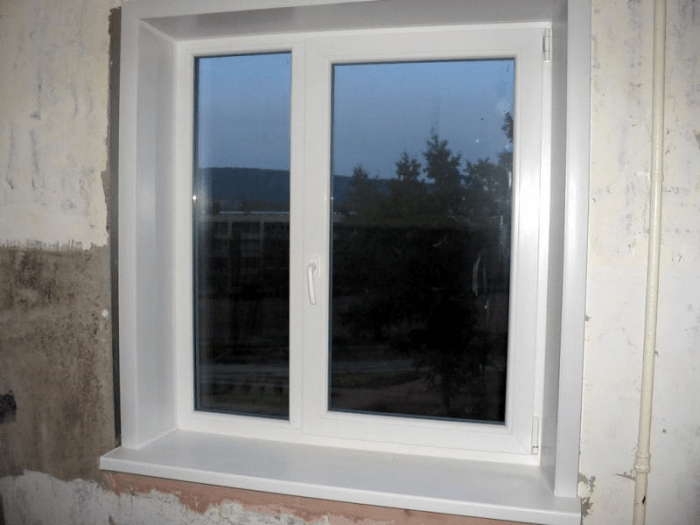
After all the described work, the sashes and double-glazed windows are installed, as well as the functionality of the entire structure is checked. If you installed the products with your own hands for the first time, you should carefully inspect the opening and make sure that no mistakes were made during the work.
Installation of slopes
Before installing external slopes, it is necessary to measure the width and length of the opening. Cutting plastic slopes is done using a circular saw.
Important! Slopes should only be secured to clean and level surfaces.
At the first stage, the upper horizontal part is secured. It needs to be recessed as deep as possible, and the space should be filled with polyurethane foam. Worth remembering. That it should not be released too much, since when hardening the material can change the shape of plastic products.

After this, the installation of vertical slopes occurs. During this work, it is important to check the verticality of the elements. The installation of the lower slope occurs in the same way. It is important to ensure that all elements are correctly joined and there are no gaps between them. Corners between plastic slopes are closed with a special part.
Installation of internal slopes should be done only after careful preparation of the surface. If the opening crumbles, it is better to clean it up to the main wall and only then carry out further work. After this, the opening is leveled and filled with insulation. If necessary, the window opening is strengthened.