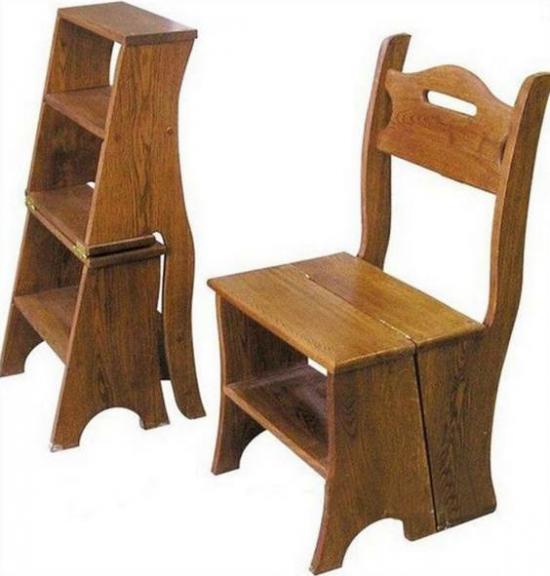
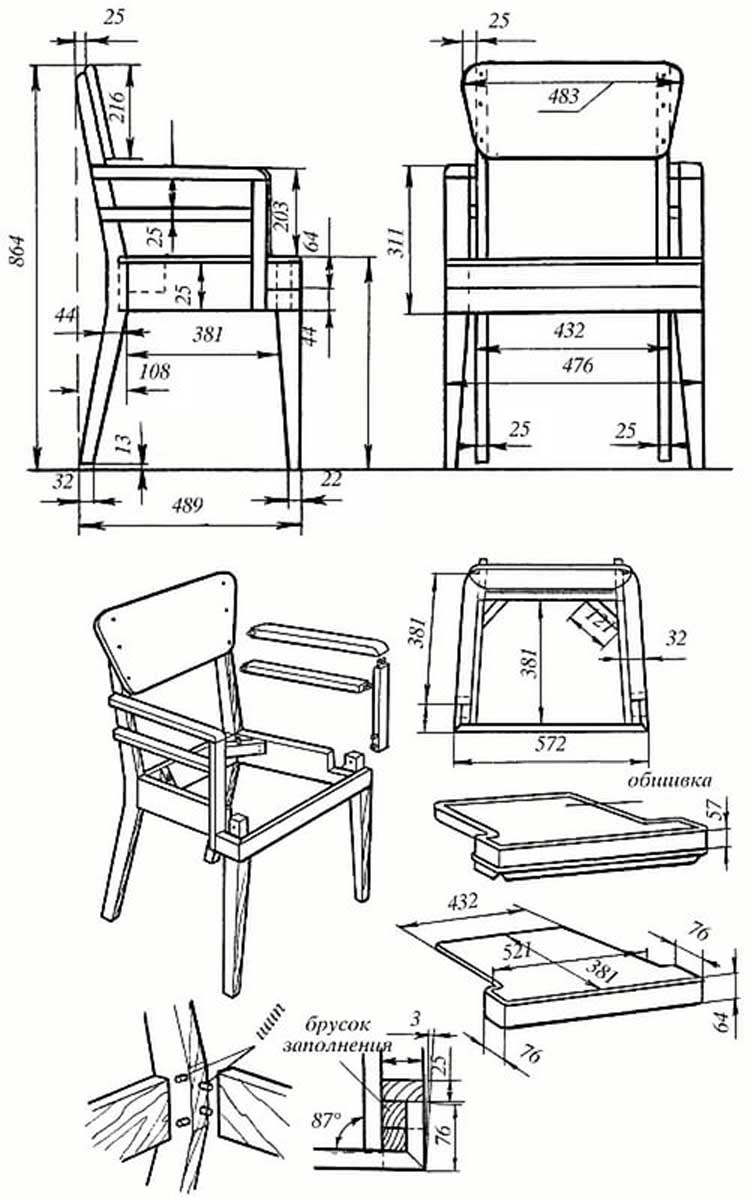
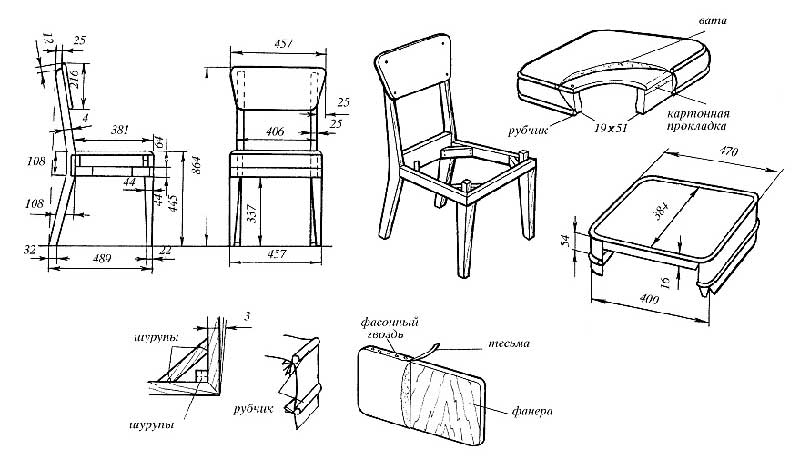
These chairs have a very simple and sturdy construction. The back legs and backrests are made from one piece of wood, 25 mm thick. Your best bet is to make a chair leg template and cut it out with a band saw.
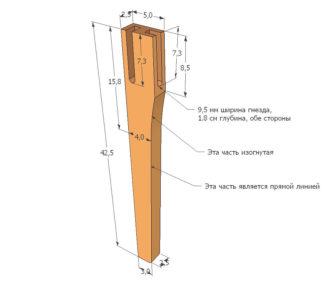

The next task is to make the edges semicircular. Using a milling machine and a suitable router bit, make a semicircle on the legs of the chair.


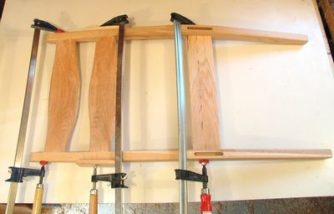
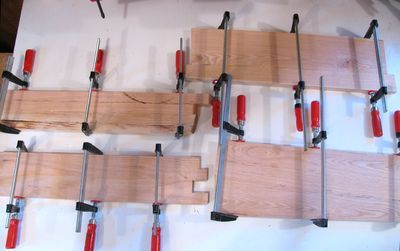
The back of the chair is a little more difficult to assemble, so align immediately during the clamping process, keep it straight.
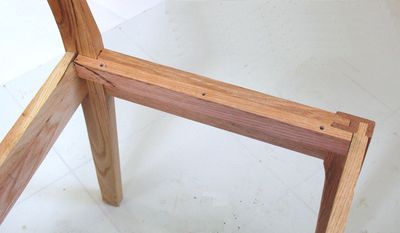
The front legs and lintels are a little easier to glue and assemble. Pay attention to the two small clips at the corners, this is done so that there is full contact when gluing.
The next step is to connect the front and back parts. Be sure to place the chair on a flat surface during this step. If the chair is a little uneven, or rather wobbles, then you can set the clamp diagonally to compensate in the opposite direction.

After everything is glued and the glue is completely dry, remove the excess glue with a chisel. It's best to leave the glue on until it's completely dry so you don't risk spreading it over a wider area by wiping it off.
The next important point is the place to sit.
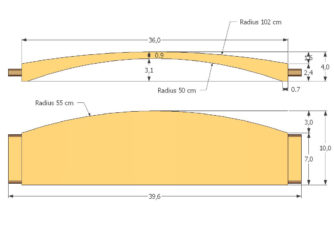
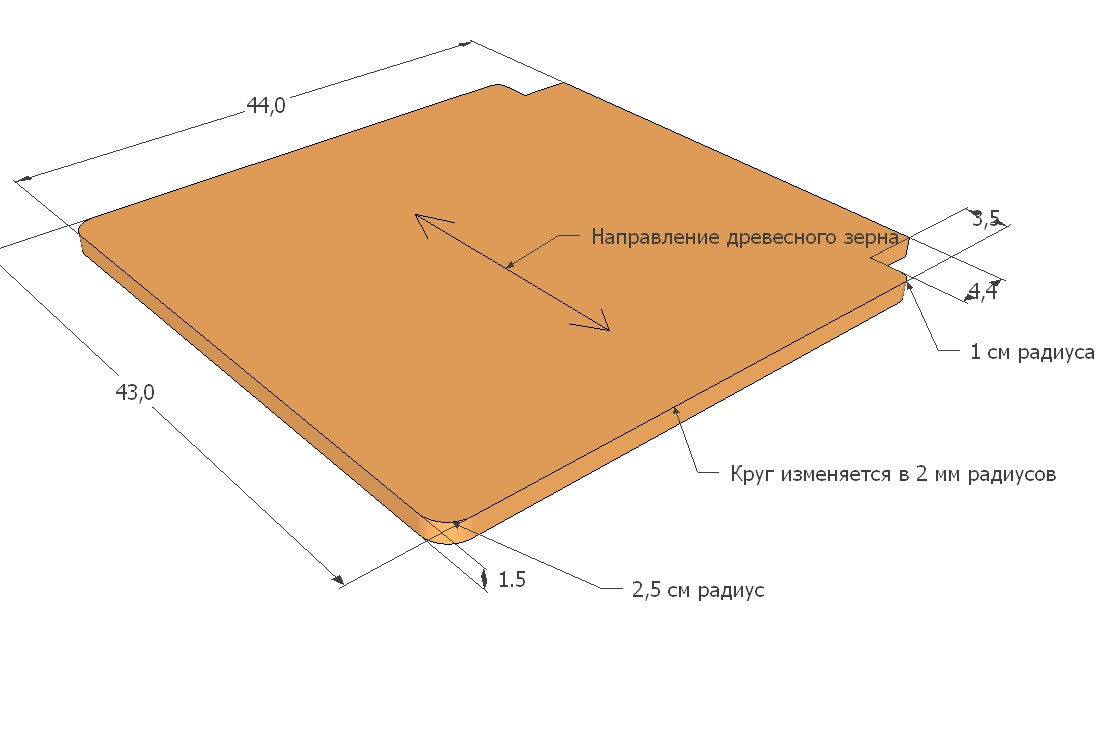
The seat is actually a simple square piece of wood, 42.5 cm along the fibers 42 cm across the fibers 16 mm thick, and the rear corners are cut.
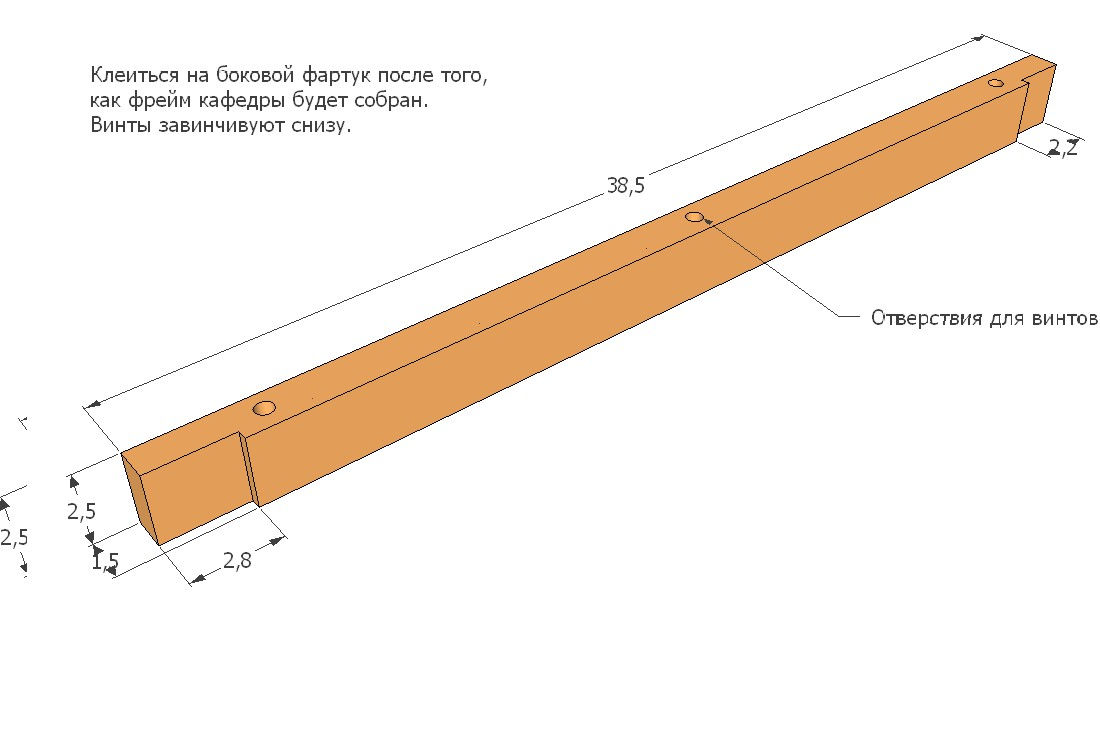
To install the seat, glue the attachment onto the apron, in which the holes for the seat attachment must be drilled. The holes are also made so that when the humidity changes, it does not crack at the clamping points with self-tapping screws.
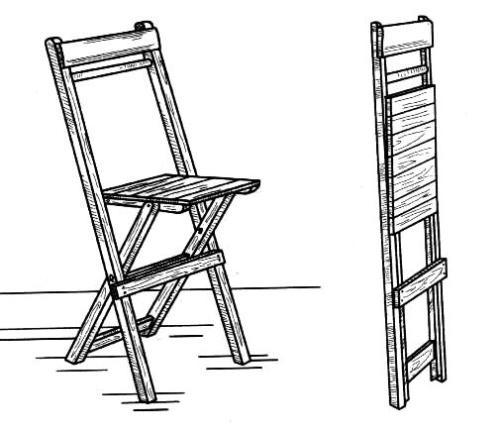
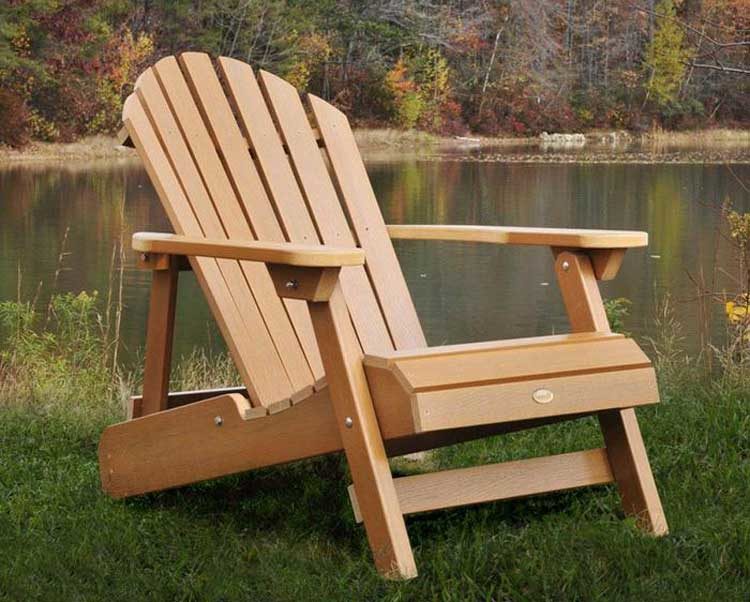
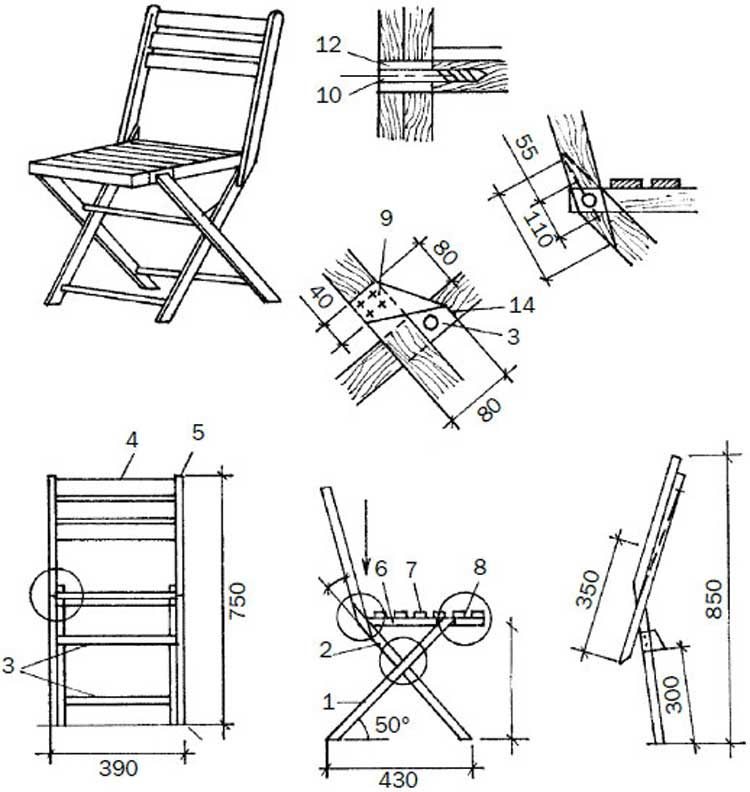
A wooden folding chair with a back will be an excellent piece of furniture for giving or small apartment, since it practically does not take up space when assembled. It can be put under the table or, for example, behind, and taken out only when you need it.
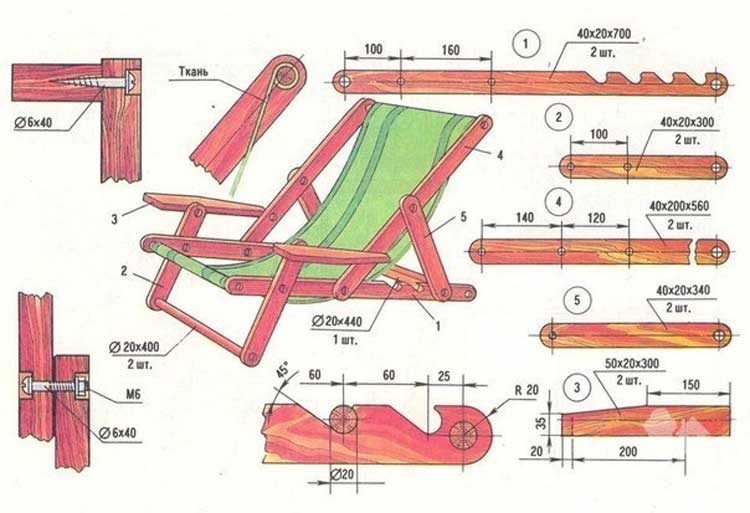
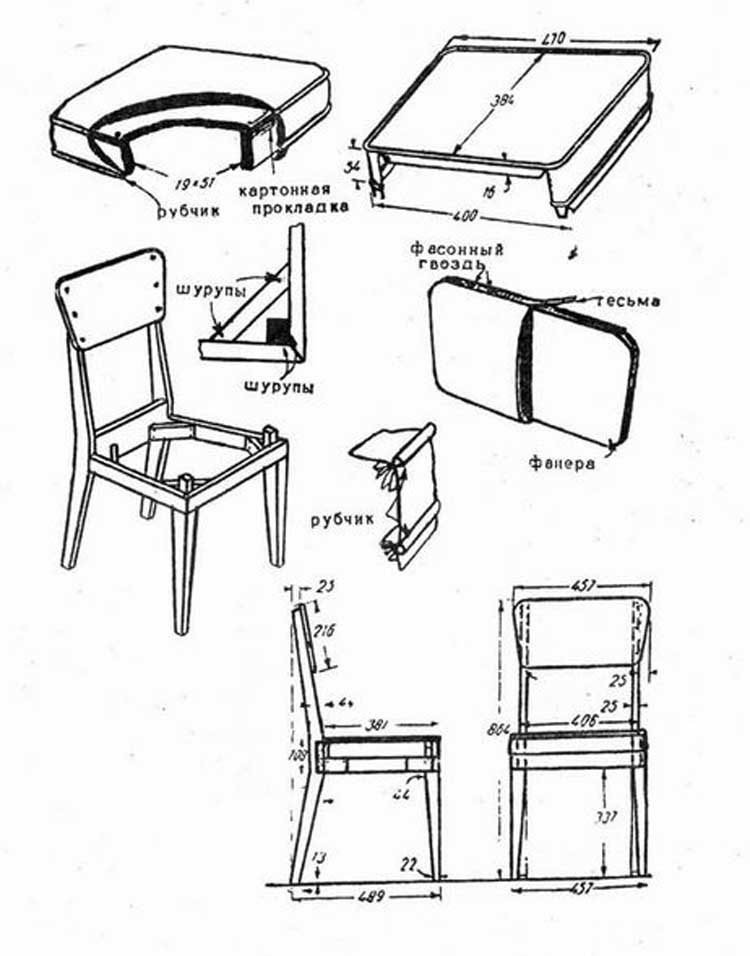
To make a folding chair, you need a pine furniture board, having a thickness of 18mm, and pine blocks. Also, you will need PVA glue, screws, wooden dowels 50mm long and 8mm in diameter, four cap nuts with a diameter of 5mm, four washers with a diameter of 5.3mm and four with a diameter of 5mm, four bolts 7cm long and 5mm in diameter, as well as a steel bar 1cm in diameter and long 33.8cm.
Also, you will need to collect the following details:
- Two legs with a length of 91cm;
- Two legs with a cross-section of 3x3cm and a length of 55.7cm;
- Two support bars 31.5 cm long for the seat;
- Six slats of various sizes for the seat (30x4cm - 1 piece, 31x4cm - 1 piece, 36.5x4cm - 2 pieces, 39x4cm - 1 piece and 40x7cm - 1 piece);
- The backrest measures 40.2x7cm;
- Transverse ligaments (25.4x5cm - 2 pieces, 2.8cm in diameter and 31.8cm long - 1 piece, 39x5cm - 1 piece).
First, you need to drill shallow holes on the outside of the legs for the bolt heads, and then drill holes with a diameter of 5 mm in them. Using a circular saw, you need to make longitudinal grooves on inside legs. The depth and width of the grooves should be 11mm. These grooves are designed to move the steel bar in them when the chair is unfolded.
Now you need to connect the long legs with a transverse bundle having a diameter of 2.8 cm, for which you will need to drill holes for the dowels at the ends of the bar. After greasing the dowels with glue, the bar is inserted on Right place... A bevel is made above the transverse ligament in the upper part of the legs in order to make the position of the back more comfortable. The back must be fastened with screws, recessed their heads.

With the help of dowels, short legs are connected with transverse ligaments (25.4x5cm). In order to make a seat, you need to attach the support bars to a board, while maintaining the required distance and then connect the seat rails to them using screws. It is imperative to insert spacers between the slats. After that, the seat needs to be cut, corners rounded and sanded well. A steel bar is inserted into the seat between the fifth and sixth rails, having drilled holes in the support bars in advance.
Now you need to connect all the parts of the chair. When the chair is ready, the bar will move up and down, and the bolts will act as hinges.
Making or repairing a chair on your own is not very difficult, as it seems to many at first. Homemade furniture will become an original decoration for your interior, because in creating special design solutions human fantasy knows no boundaries. At the same time, keep in mind that the furniture you create will be distinguished by reliability, quality and low cost, because you can use the remains of wood building materials in business.
Putting together a chair for the kitchen
It should be noted that there is always an opportunity to make chairs not only for the kitchen, but also for fishing or for a picnic. You just need to know how to make do-it-yourself folding chairs from wood, the drawings of which are presented below.
To begin with, measurements are taken, according to which a drawing of the product is drawn up.
Various types of wood can be selected for work:
- beech;
- pine;
- oak.
The main thing is that the material does not have knots and cracked areas.
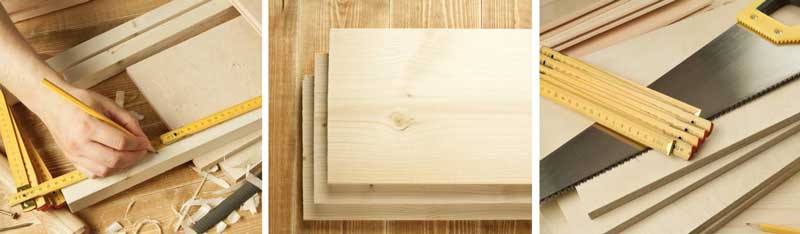
The preparatory process is simple - the timber should be cut off and sanded with coarse sandpaper, and then fine grain. This will give the wood a smooth appearance.
To work, you need the following tools:
- stapler;
- hacksaw;
- mallet;
- plane;
- electric jigsaw.
Work on assembling a new chair or repairing an old one takes place in the same order. But in the second case, first, a complete disassembly of the furniture is performed, the replacement of worn-out parts with new ones. The chair is then assembled.
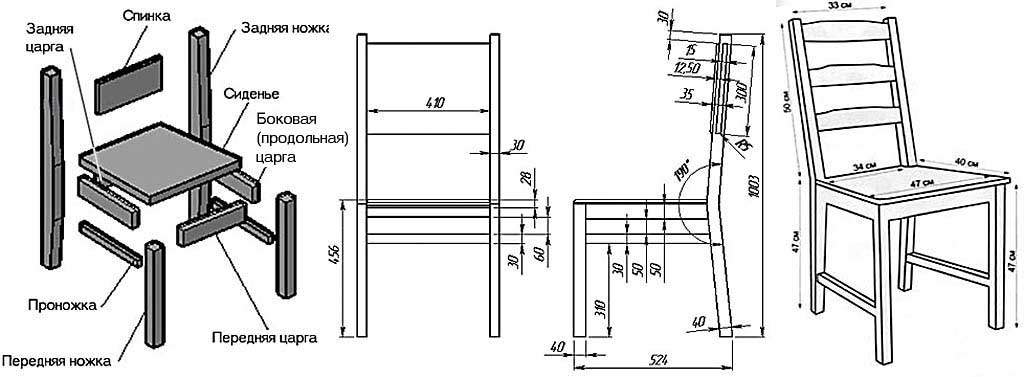
Before making the chair, we prepare two eighty-centimeter bars with a cross section of 4 by 6 cm for the rear legs, and a pair for the front ones, the cross section of which is 4 by 4 cm, and the length is 44. We arrange holes for the longitudinal and transverse bases and projections in them. We apply all the elements to each other so that the end places coincide.
Notches are made with a chisel, the rear legs are cleaned, the edges are removed with a plane to get a smooth transition from 60 to 40 mm.
The backrest for the future chair is prepared from the edged board.
The assembled base is covered with varnish and left to dry. At this time, the seat and back can be covered with material, insert a soft foam pad.
Having prepared everything, you can perform a complete assembly, fix the elements with screws, masking their caps. Chairs of such designs can also be used in the country.
Garden chair
Such a chair is easily made from trimming logs.
It will be a great decoration suburban area... The easiest option is to cut the log into blocks of the same size, the height of which is 0.6 meters each, and dig it into the ground. On top you can arrange a seat made of soft material.
Folding bar stool
Such pieces of furniture can be made in two versions - with and without a back.
For a chair without a backrest, prepare four legs (47 x 4 x 2 cm), the same number of slats for the seat and a pair of projections (32 x 4 x 2 cm), two bars under the seat measuring 35 x 9 x 2 and 35 x 6 x 2 cm.
We connect the strips that are fixed at the ends of the crossbar, we fasten the projections. We do not connect the middle bars so that the chair can be folded.
One more summer cottage option- a chair with a back. For it, you need to prepare two legs (0.9 and 0.55 m each), two transverse strips of three sizes (40 x 5; 34 x 5; 28 x 5 cm), a back (40 by 7 cm), a pair support strips under the seat, each length - 29 cm; boards - 6 pieces (34 x 4 cm).
Having prepared everything, you can start assembling. The final chair will look like this:
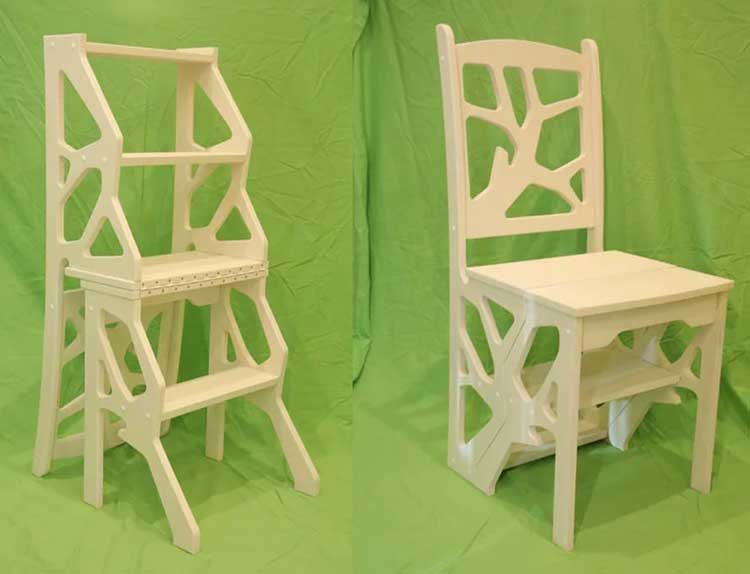
Foldable stepladder chair
Such a thing is considered an indispensable element for every owner. But the ladder takes up free storage space. Therefore, it is advisable to replace it with a chair made of plywood.
For the legs it is necessary to use pine wood, the rest of the elements are made of plywood. To make the product comfortable, it is recommended to adhere to certain sizes:
Having assembled a stepladder chair, it is varnished.
Folding furniture is considered a good solution for organizing picnics, resting at a summer cottage or in the courtyard of a private house. Convenience also lies in the fact that the assembled furniture is stored compactly, does not take up a lot of free space.
Furniture in the house is the main element of comfort, and more comfortable furniture than wooden, it's hard to find. Today in stores you can buy all kinds of chairs, tables, cabinets, and so on. But even the simplest chair can come in a variety of shapes and qualities.
Self assembly
The advantage of a wooden chair, in comparison with others, is precisely that it can be assembled on your own. To do this, it is enough to have straight arms, skills in working with woodworking tools, as well as several available types of materials.
Is it possible to assemble a wooden chair with your own hands so that it cannot be distinguished from a purchased one? Is it possible to make a simple and useful thing out of wood with your own hands that will be no different from similar ones? The answer, of course, is yes. You can create not regular chair bchik, but a beautiful element of the interior, which, moreover, will cost 2 or even 3 times cheaper than buying in a store or to order.
How to make a chair out of wood yourself? There are several simple and obvious steps for assembling a chair with your own hands, the scheme of which is approximately the same:
- The choice of material.
- Making a drawing.
- Preparation of tools.
- Direct assembly.
The first 3 points are linked and can be carried out in parallel. So in just 4 steps, in a few hours you can assemble an excellent chair for the living room or kitchen. If the work with the tool is carried out by a beginner, then there is nothing to worry about. The creation of the first chair may take a little longer, but then, with a full hand, everyone can finish the job faster and better.
Material selection
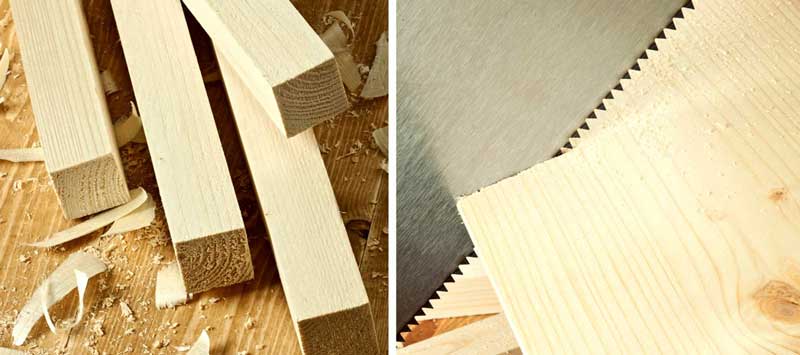
There are a lot of material options for assembling a chair, and it's not just about choosing a wood species. The main thing is to decide what kind of lumber and what degree of processing will be used in the work.
When it comes to the type of wood that is used to assemble your home stool, it is best to look for hard woods. For example, if it is a massive tree, then it is better to stock up on oak materials. Mahogany is also often used, because it has a beautiful shade, especially after varnishing, and is also often used in interiors when decorating premises. Oak and mahogany are quite practical materials because they are distinguished by their durability. Sometimes for assembly home furniture they use pine lumber and beech with their own hands. The main thing when preparing wood is to use a sufficient amount of it.
In order to create an ordinary chair, you will need to stock up on boards, beams. There are also options for processing solid wood or logs, if the design of the chair is very original and requires a special approach.
Each of these materials in the design of the chair performs specific functions. The legs of the chair, including the back ones as supports for the backrest, are best made of beams. The jumpers between the legs can also be made of boards. Special attention should be paid to the seat. Depending on its shape, you can use a single piece of wood or several planks. In the case of working with an array, the seat is made solid, but this makes the chair heavier. It is easier to use plywood or other ready-made tile wood materials as a seat.
Choosing material, craftsmen proceed from design features chairs, which are indicated in the drawing, which will be discussed below.
The material requirements are as follows:
- they must be dry enough at 22-23% moisture;
- edged, if possible, sanded, without cracks;
- beams with large cracks or third-party holes of more than 4 millimeters are not allowed;
- rotten or too knotty materials should also be discarded;
- the stronger the wood, the thinner the beams are chosen, while the optimal thickness of the bar is about 40 millimeters, and the boards should be thinner.
Blueprints
Before downloading ready-made drawings and photos of furniture from the network or drawing them yourself, it is worth evaluating the future parameters of the chair, since it must first of all be comfortable in everyday life.
Craftsmen at home use a variety of designs, some of which are quite complex. But for beginners, it is recommended to abandon intricate ideas and forms, use only simple options.
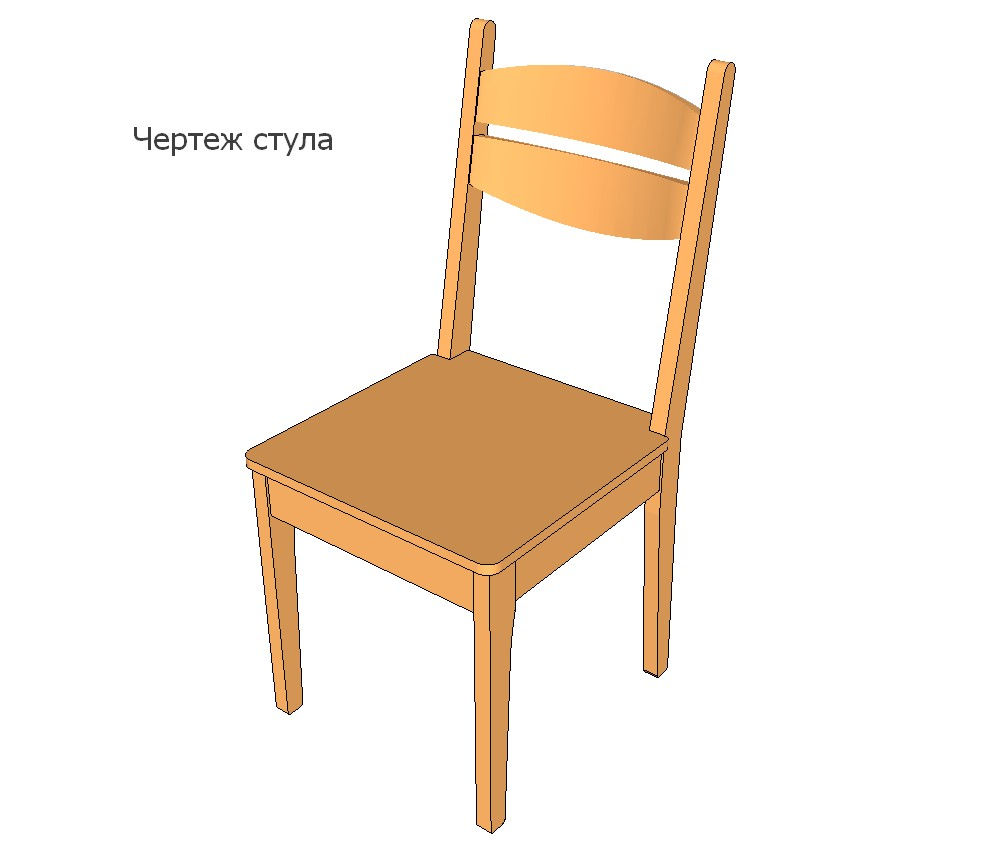
The main structural elements of the chair:
- legs, including the rear ones (they are the backrest supports)
- jumpers between the legs;
- seat;
- backs.
As a rule, the rear legs are up to 1 meter high and at the same time act as backrest supports. In this case, it is recommended to use a straight beam or with an angle approximately at the level of the seat (45 centimeters from the floor). This gives stability to support the structure. In addition, the back of this chair is more comfortable. In this case, the angle should not be too sharp (normally - 190 degrees), otherwise, under the weight of a person, the hind legs will begin to move away too much, and when leaning on the back, the person may fall.
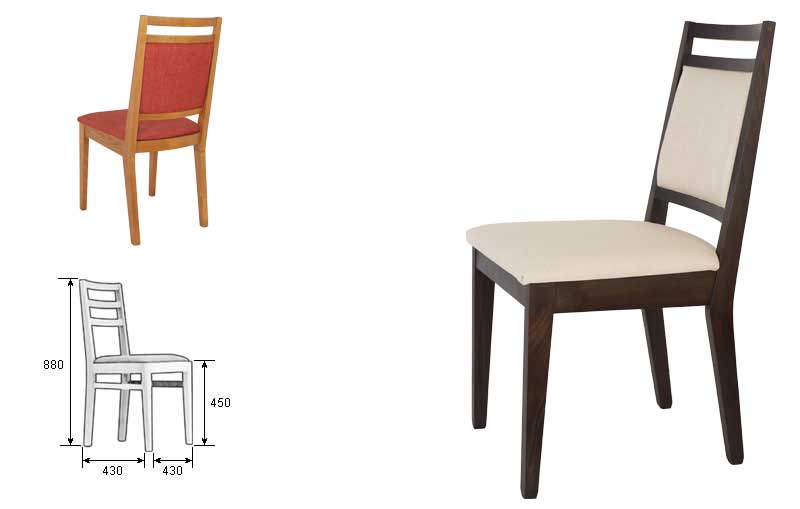
The optimal distance from the front to the back edge of the chair, that is, between the extreme positions of the legs, is about 500-550 mm. The chair is approximately 490 millimeters wide. Bridges between legs, seats and backrest should correspond to these dimensions based on the total length and width of the chair, as well as the thickness and possible inclination of the legs.
Preparing for assembly
To make a good stable chair, you need to use a few tools and supplies. To do wooden chair, in addition to wood, foam rubber and fabric may be required. Self-tapping screws and wood glue (or PVA, which is worse) are used for fastening.
The assembly tools are a construction stapler, jigsaws, and a screwdriver. You may need to work with a plane, for example, to make a corner of the rear leg. A tape measure and a level are useful for measuring accuracy.
The use of the tool depends on the type of chair assembly. They often resort to assembly without self-tapping screws. But glue alone, especially in the hands of a beginner, does not always ensure the stability of the structure. On the other hand, too many self-tapping screws and improper handling can lead to additional material costs. If you do not calculate the optimal thickness, strength of the beams and boards, then self-tapping screws can damage their structure, which at first will be imperceptible, but then fraught with breakage
It is important to assemble your stool so as not to hurt yourself. To do this, use a familiar tool. For beginners, it is recommended to additionally understand the safety rules when handling devices and equipment that first fell into their hands.
Assembly stages
- First, the bars for the front and rear legs are processed - 2 on each side. The front legs (400-500 mm) and rear legs (800-1000 mm), depending on the selected dimensions, are cut to fit the drawing. This folds the front and rear legs together. If a corner was previously prepared for the rear legs, then the front legs in height should correspond to the location of this corner. It is at this height that the seat should be located. After that, appropriate marks are made on the legs for the holes for the jumpers.
- The holes themselves are made with a chisel, based on the location of the prepared marks. In this case, all sawdust is removed from the hole so as not to interfere with the connection.
- Jumpers are created, and the front and rear should be the same length as the side ones. The dimensions of the lintels correspond to the width and length of the chair, taking into account the thickness of the legs. In the jumpers, you should also mark the places of the spikes that will connect with the holes on the legs. In this case, the width of the thorn should be in the region of 10-12 mm. They need to be cut carefully, taking into account the fact that they must be firmly and tightly connected to the legs. Clearances are not allowed.
- The back is knocked down. It can be made from one board or from several. The backrest is manufactured according to the principle of creating jumpers, leaving spikes that must fit into the rear supports tightly and firmly.
- The seat itself is prepared, which also corresponds to the dimensions of the frame. It can be wider and hang over the legs and lintels. At this stage, the seat is assembled from planks, used in a solid solid wood piece, plywood or, for example, a chipboard board. It can also be separately covered with a cloth for softness. It should be noted that the seat is attached to the legs with self-tapping screws.
- Everything wooden surfaces processed with varnish, preferably odorless. You can proceed to assembly only after drying. Use the varnish according to the manufacturer's instructions.
- Direct assembly of all elements of the frame, except for the seat: all the spikes are greased with glue, and then connected together with a rubber hammer or mallet so as not to beat off the varnish.
- At the last stage, the seat is screwed on with the help of self-tapping screws. As a rule, they are screwed deep enough and masked with PVA mixed with sawdust. This mixture is applied to the caps, and after varnishing the screws are no longer noticeable.
Result
In this way, the most common chair for home, summer residence or for work is assembled. Over time, a beginner can complicate the design, add decor, use other types of connections and materials. In doing so, you can also use recommendations from the network.
A hand-made chair is not only a comfortable household item, but also a symbol of comfort, an object of pride for every master. With experience, such a chair with your own hands can even become an object of art, but the main thing is that it is comfortable to sit on it. And the chair is really better and more comfortable than the stool, it is much more attractive and indispensable in the house. Therefore, every master should know how to make a chair.
Not everyone is satisfied with purchased furnishings. In addition, making a chair with your own hands is much cheaper; on average, 2 or even 3 times. An additional plus is that it can be made according to your own drawings, of any shape, size and designed in relation to the place of permanent "deployment", that is, organically fit into the interior.
If you deal with the nuances of wood processing, the main stages of assembling a chair, then make this indispensable attribute many rooms are not a problem.
Before proceeding with the choice of materials and direct work, you should decide on the following points:
- the place of the future location of the chair;
- its purpose - target (only for sitting) or universal use (for example, a transforming chair that easily turns into a mini-step-ladder or whatnot; "clamshell", which is convenient to transport in the trunk of a personal car, store, and so on);
- chair sizes and options for its back and seat (hard, soft, correct shape or curly);
- wood is a somewhat generalized concept in the furniture business. You can make a good chair and from materials (or use them partially, for individual structural elements) based on wood. First of all, from plywood;
- own capabilities. This applies not only to practical skills, but also to the list carpentry tools that is in the house. If you plan to make more than just a simple chair, but to put this business "on stream", that is, to decorate your home with exclusive furnishings, it makes sense to either purchase the appropriate accessories, or rent them. What a home craftsman will need can be found in the article on;
- model. The variety of chairs is such that before choosing an option it is worth familiarizing yourself with their most common schemes and drawings. It is enough to "go" on the Internet and view the photos available in it. Copying on a one-to-one basis is hardly worth it. But if you take your favorite model as a basis, draw up your own drawing, you will get a truly original and comfortable chair in all respects.
When starting to engage in furniture business, you should start with the most simple option... In addition, use the cheapest materials. It's okay if the chair is not very good. It can be placed anywhere in the back room, garage, and so on. But such "training" will enrich with invaluable experience; there is no doubt about it.
An overview of the chair varieties
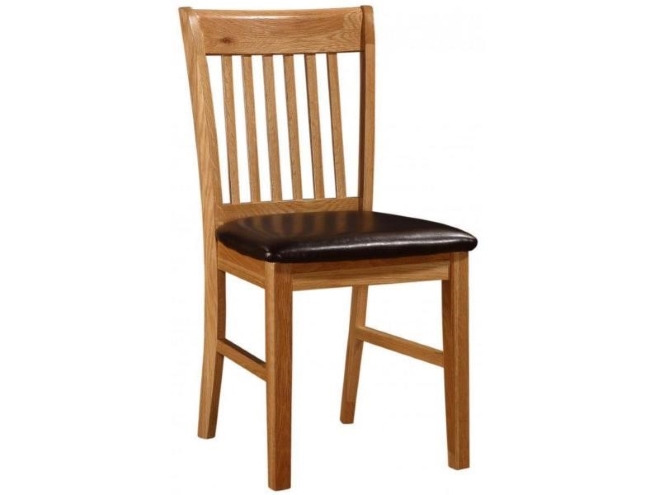
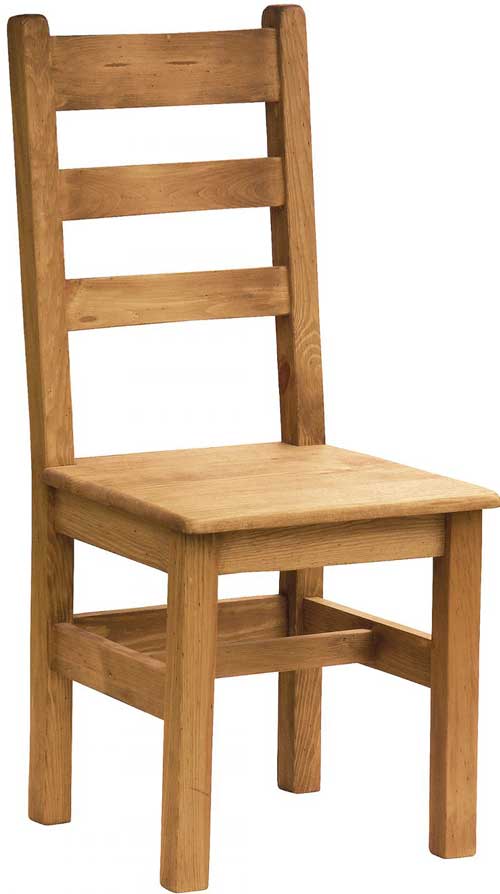
"Array"
These models are the most common, and they are also some of the easiest to manufacture. No curly lines, no changes in geometry, that's why such chairs are recommended for assembly by novice furniture makers. They are stable, reliable, durable and fit well into the interior of the premises. wooden houses or dwellings that are decorated in a rustic style.
The only drawback of this type of chair is its massiveness. But it is partially leveled out if you use a tree with a low density. And decorating it to look like a "heavy" species, such as oak, is not so difficult. Some technologies can be found,.
For living quarters and dining rooms, you should focus on any of the modifications of the massive chair, which differs from the standard options by a soft seat. When assembling such a piece of furniture, it is advisable to combine materials. It is advisable to make the frame from solid wood, and the parameters of all elements should be somewhat reduced - carved legs, a more elegant back (not solid, but from slats). For the seat, it is worth taking plywood, which is sheathed.
Another type is a chair-chair. It is somewhat more difficult to make, but for a living room, a rest room, a terrace, these are the most acceptable models. Such comfortable chairs can be additionally sheathed, cushioning material can be laid under the cover; here a lot depends on your own imagination.
If the chair is made for a child, then it is the "array" - the best solution due to its stability. The fact that the naughty baby will not turn over with the chair is guaranteed.
"Cot"
These chairs are more suitable for use on site or in country house... In addition to being easy to transport, they are convenient in small spaces. Such a chair can, when folded, stand somewhere against the wall, to the side of the cabinet and not take up useful space. If necessary, it is easy to transfer it to the "working position". It is these models that are most often used on garden plots, loggias, terraces and other places where the small weight of the product, size and mobility play a special role.

If the "folding bed" chair is assembled from plywood, then additional ease of use will appear; it (given its low weight) can be hung somewhere on the wall or from the ceiling.
A lighter structure can also be made. In such a "folding bed" the seat (and sometimes the back) is made of canvas. For example, from tarpaulin. For a summer cottage, going on a picnic, fishing - a good option.
"Transformer"
This is the name of the chairs that can be easily turned into a multi-tiered rack, step-ladder or other (depending on the features of the scheme). These models are great for apartments. Whether it concerns cleaning, repairs, or fixing something on the wall (ceiling), you don't have to look for a sliding ladder - it is always at hand in the form of a "transformer" chair. And for those who like to plant flowers in the house, summer residents, who at the beginning of each year have problems with placing containers with seedlings in the rooms - a thing is simply irreplaceable.
Choice of materials
One of the most difficult issues, about which most novice masters and "stumble". The nuance is that, unlike many other pieces of furniture, there is such a feature in the manufacture of a chair - not every wood is suitable for this. And the point is not in its strength, texture, degree of moisture, but in the specifics of operation. The chair experiences dynamic loads in different directions. This is what makes it different from the same cabinet, table, bedside table.
Experienced craftsmen are not advised to collect coniferous wood on chairs, even the highest quality... The reason is that it has a straight-layered structure. Constant loads in horizontal plane(who does not like to "fidget" on the seat, especially toddlers) will lead to the formation of numerous chips. As a result, the lifespan of the chair is drastically reduced; it will simply have to be repaired quite often. The only one structural element where the use of such wood is allowed - plywood seats (made of sheets for which coniferous veneer was used).
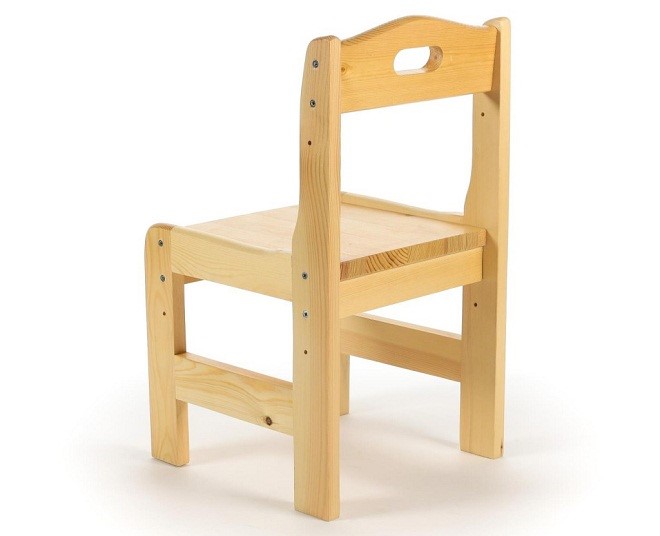
- For children - birch.
- "Folding beds" - it is or plywood from this veneer.
- For all other models - hardwood, but only fine-grained and durable. These include rowan, walnut, oak, elm, hornbeam, beech.
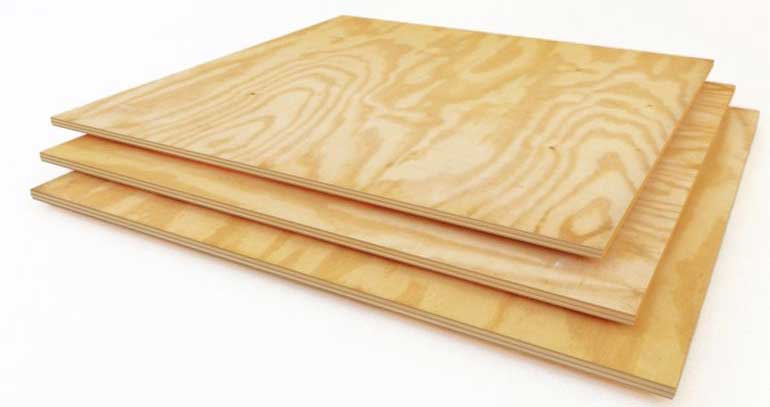
- When choosing plywood, one should take into account not only the cost of sheets, but also their toxicity. If you focus on relatively cheap products, then the choice is small - FC or FSF. What is the difference? The main difference is in the composition of the glue used in the production. Without going into the details of the technology and the issues of "chemistry", it is enough to note that plywood of the FSF category is not recommended for use for internal works... The reason is the release of harmful fumes when the material is heated.
- The chair wood must be free of visible defects. For example, for a countertop, some of them (curl, oblique) can be turned into an advantage if you know how to process. But for a chair experiencing a variety of loads that vary in direction and magnitude, all this is unacceptable. The same bitches transforming appearance tables that make its texture original will fall out of the chair pretty quickly.
Specificity of tree preparation
- If it is possible to dissolve the array yourself, then the manufacture of furniture will cost much less.
- The moisture content of the workpieces is no more than 12%.
- Mandatory impregnation with biocides. Options - water-polymer emulsion, furniture oils (or wax-based compounds), acrylic compounds.
Features of structural parts
General - they are made from solid wood only. It is unlikely that it will be possible to make complex, curly elements at home. And it's not just material cutting. We'll have to change the angles (and before that, calculate everything correctly), under which the connecting spikes should be located. In addition, accurate sampling of wood (for grooves) requires not only special tools and devices, but also a lot of experience. Deviations from the size will lead to the fact that the chair will constantly "play", and from a practical point of view, the benefit from such furniture is zero.
For this purpose, all elements of the same type should be prepared in this order. First, for example, one front leg. After processing it, it is used as a template for the second one. The same applies to tsars, crossbars in the backrest, and so on. The meaning is clear - to achieve complete identity of the parts, so that later you do not have to deal with their fitting.
Legs. Making the rear split is not the best solution. The reliability of such a chair is drastically reduced. Seat. The thickness (in mm) of the board or plywood is in the range from 10 to 30, depending on the size of the chair. If a foam pad is intended for the upholstery (to soften the seat), then cover it with something that absorbs sweat well. Optimally - a thin layer of felt. Unlike all structural parts, the upholstery is not fixed with an adhesive, but "fastened" with staples using a stapler. This will allow, if necessary, to easily replace both the casing and the "softener".It makes no sense to consider more complex options (curly, openwork, combined). The reason is noted above. In addition, if you master the profession of a furniture maker (like any other), then you need to start according to the principle "from simple to complex." Having made yourself, albeit not quite a "decorative" chair, in the future you can master more elegant models. The main thing is to understand the design principle and all the features of working with wood.
Chair assembly procedure
You will have to do this at least twice. The first is made "dry", and its task is to check the fit of all structural parts (whether the dimensions of the jibs, crossbars, tsars coincide at the installation site). At this stage, it is still possible to eliminate the mistakes made, to correct something, and so on.
The second build is final. Here, all the elements of the chair are already fastened tightly, and further alteration is usually impossible.
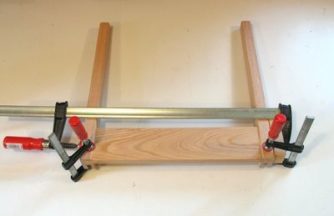
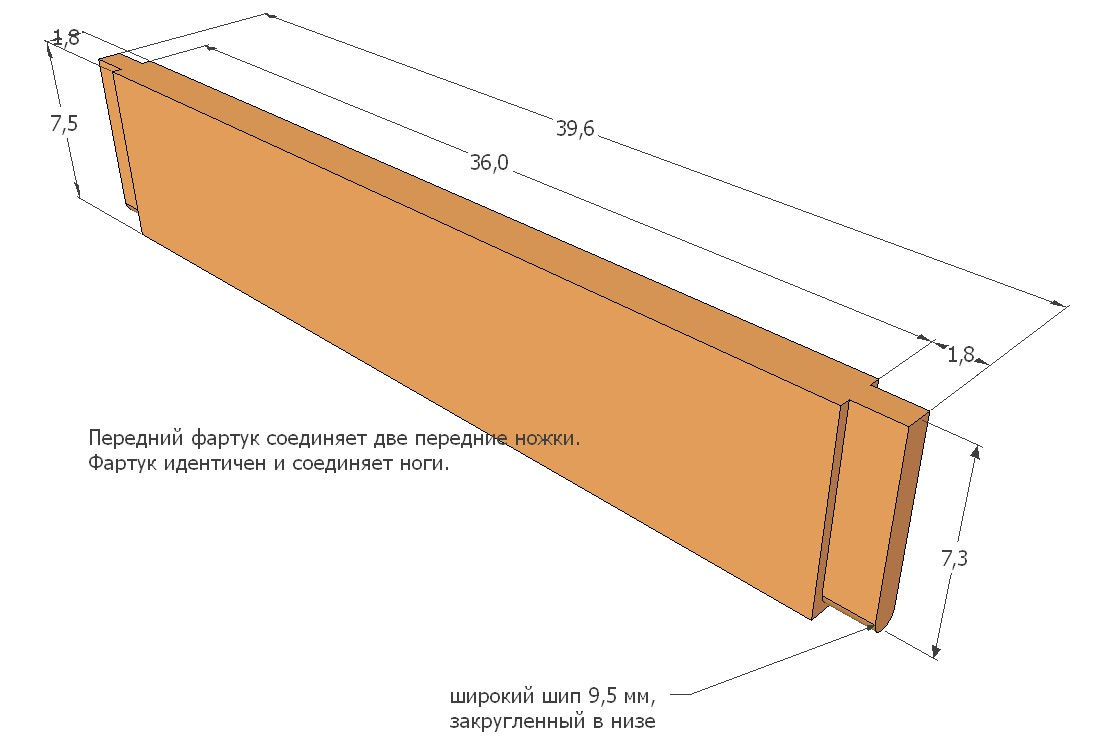
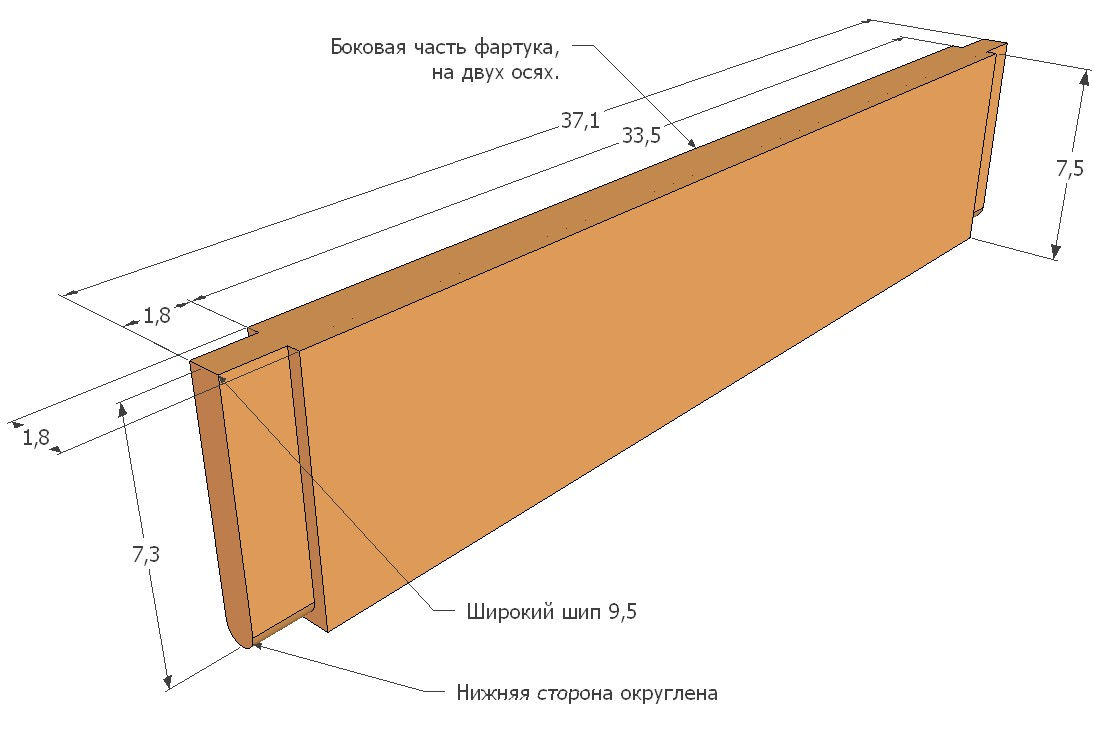
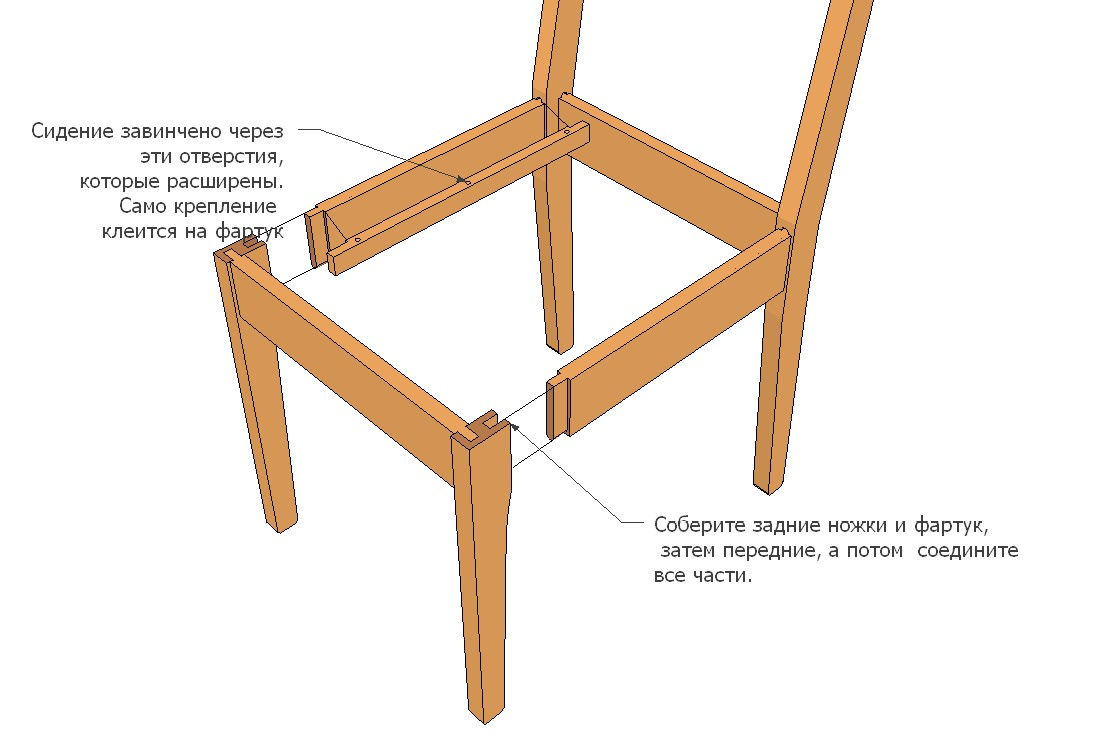
Chair assembly algorithm: "apron" - tsars - "apron".

This is short. Although all work is divided into large quantity stages.
Assembling the rear legs and backrest
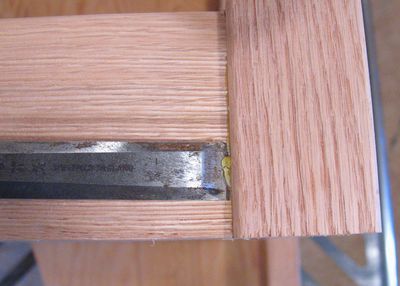
- All elements are adjusted in place and tenon-groove connections are made. The fastening of the parts is done with wood glue. It is easy to make it at home,.
- The places of gluing are tightened with a clamp, and in this position the chair blank is left until the composition is completely dry. It is not necessary to accelerate this process artificially (with a hair dryer, a reflector, etc.). The result will be negative, since the adhesive mass will dry out unevenly in depth, and the strength of the joint will decrease.
Assembling the front legs
The tsars are inserted into the grooves, the parts are joined, and then everything is the same.
Front leg and rear leg connection
At this stage, the side drawers are installed.
Chair tie
What to use, you will have to decide for yourself. If you don't have large clamps on hand, a cord will do. The task is to achieve complete drying of the glue at all points where it was applied.
If necessary, you can additionally strengthen the gluing points, you can fasten the parts with self-tapping screws. For this, "channels" are drilled out and the chamfer is removed so that the head of the fastener is completely drowned in the tree. You can disguise it with a putty (furniture) composition or decorative plugs (available on sale, and in a variety of shades).
Seat anchorage
There are several options. For example, to attach prepared wooden stops to the side frames, and to them (from the bottom side, through through hole) pull the seat. One of the best options for ensuring good maintainability of the chair.
All the beauty independent work- in the possibility of realizing your own ideas. Therefore, all photos, drawings, recommendations should be considered only as a basis for creating something of your own, unique. And if the meaning of the main technological operations is clear, it is not difficult to do this, as well as to develop your own drawing.