Making and repairing a chair with your own hands is much easier to do than it might seem at first glance.
A homemade chair will become original furniture in the house, because by showing imagination, you can come up with a unique design. Also, such furniture will definitely be of high quality and inexpensive.
You can make any chair: kitchen, folding for fishing or summer cottages, step stool. You just need to find out how to make a chair with your own hands.
First, measurements are made, after which it is necessary to draw up a project, develop drawings of a chair (examples are presented below).
A wooden chair with your own hands can be made of beech, pine, oak. The wood is picked up without knots and cracks. Beech and oak can be sanded to give the chair a great look.
Wood can be easily prepared on your own, for this you need to remove the shavings from the bar and process it first with coarse-grained sandpaper, and then with fine-grained one.
This is necessary in order for the wood to become smooth.
To make or repair a kitchen chair, you will need tools such as:
- construction stapler;
- saw;
- mallet;
- jigsaw;
- plane.
Below is a look at how to make a chair and repair it.
The procedure for assembling a new product and repairing an old one is the same. Only if repairs are made is the chair disassembled first. The worn-out part is replaced with a new one. Then the repair continues with the assembly of the elements.
For manufacturing, you first need to prepare four bars: two 40x60 mm, 80 cm long - for the rear legs and two 40x40 mm, 44 cm long - for the front ones.
Holes are made in these bars for longitudinal and transverse bases and projections. The elements must be stacked on top of each other, the ends must match, as in the photo.
Now with a pencil on adjacent legs, a chisel marks 2 recesses each 20x40 mm in size. The rear legs need to be cleaned, the edges must be planed with a gradual transition from 6 to 4 cm.
Now, from two bars 40x40 mm long 420 mm, transverse bases are made with spikes similar to those of the longitudinal base.
The next step is to make a backrest 420 mm long and 8-10 cm wide. For this, it is recommended to take an edged board.
WITH inside the back wall needs to be grooved equal to the thickness and height of the back. The backrest must be inserted into the grooves. Next, the seat must be fixed with screws.
You can attach small braces to increase the rigidity of the chair. The legs and back should be rounded on the outside.
The finished base must be varnished, polished and left to dry completely.
If repairs are carried out, then all joints are glued with glue.
You need to varnish in a ventilated area. Or purchase an odorless coating that is safer for your health.
If the wood is uneven and uneven in color, then you need to cover the chair with a dark varnish.
Now you need to make a seat for which foam is cut out of the required size so that the seat is soft, and wrap the foam in a strong fabric. The fabric must be secured with a stapler.
If an old chair is being repaired, then the product can be upholstered with a cloth, like a cover.
After the base has completely dried, all elements must be collected. The spikes are processed with glue and hammered into the recesses with a mallet. Finally, the seat and backrest are screwed on with screws.
The screw heads can be hidden. To do this, a thick mixture must be prepared from sawdust and PVA glue and applied to the cap and left to dry completely.
Then the camouflaged hats need to be varnished, after which they will become almost invisible. Repair of the chair must be completed with varnish.
These chairs are perfect for giving
Garden chairs and a table can be made from logs, examples can be seen in the photo.
A table and chairs made of logs will become an original decoration of the summer cottage. The sawn logs are left to make a table and chair, and the stumps will serve as support.
The table is made as follows: several boards are knocked down and installed on a stump - this will be a lid. A log table must be carefully sanded.
Then the logs need to be cut into identical logs, 60 cm high. The logs are dug into the ground, surrounding the table. It remains only to make the frame of the chair and the seat.
So the kitchen garden table and chairs from a log are ready.
Assembling the folding chair
Folding chair is an excellent option for summer cottages and fishing, consider how to make a folding chair with your own hands.
Backless folding chair
You will need a hacksaw and a drill to work.
The difficulty of making a chair lies in the preparation of parts such as:
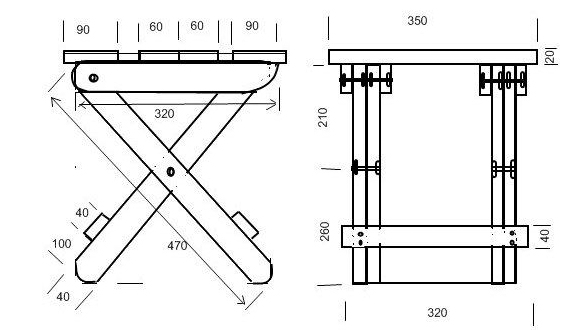
- 4 legs from a bar 470x40x20 mm;
- 4 slats for the seat 320x40x20 mm;
- 2 pins 320x40x20 mm;
- seat bar: 2 pcs. 350x90x20 mm, 2 pcs. - 350x60x20 mm.
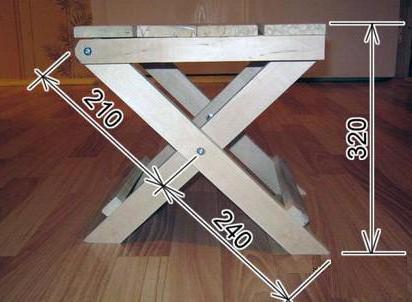
First, the axle bolts are installed on the legs. The axis must be shifted up so that it is 2 cm below the wide beams of the seat, otherwise the product will be unstable.
Then the seat crossbars must be bolted: first to the inner legs, and then to the outer ones. It turns out 2 hinge parts that need to be connected.

First, the seat strips are connected, which are fixed at the free ends of the crossbars. From the bottom of the legs, at a distance of 10 cm, projections are attached with self-tapping screws.
The middle bars should not be connected to each other for the chair to fold. One bar is installed on the outer crossbar, the second on the inner one.
If you insert a 20x20 mm bar between the middle bars of the seat, this will allow you to adjust the height of the seat. A clearly visible folding chair for a summer residence is shown in the photo above.
Foldable version with backrest
The next option for giving or fishing is a folding chair with a back.
Details are being prepared:
- 2 legs 90 cm long and 55 cm long;
- 2 transverse strips 400x50 mm, 340x50 mm, 280x50 mm;
- back 400x70 mm;
- 2 seat supports, length 290 mm;
- 6 seat boards 340x40 mm.
First, you need to lay out 6 boards at a distance of 10 mm, and on top place the supports with a pitch of 34 cm on the last board and 28 cm on the first.
With a pencil, you need to mark the boundaries of the location of the slats, then the structure is turned over and the support and seat are fastened with screws.

Outside, in the lower part of the long legs, a recess is made for the bolt, and on the inside there are recesses for the ends of the rod. Notches for dowels are made on top.
You need to thread the dowels perpendicularly between the uprights, clamping the rod. A 34 cm long transverse bar is fixed to the dowels. Cross bar 40 cm long, fastened with screws.
In the middle of the short posts, a hole is made to connect with the long posts, and on top is a hole for fixing the seat.
Cross bars 28 cm long are fixed on dowels in two places: below and just above the center.
Now you just need to assemble the elements: the short legs are connected to the seat and the long legs with bolts. A do-it-yourself folding chair for a summer residence is ready.
How to assemble a stepladder chair?
The stepladder is an indispensable item in the household, but it takes up a lot of storage space. Therefore, a compact plywood step stool can be made.
The seat, backrest and steps are made of plywood, the legs are made of pine boards. Below are the drawings with the dimensions of the elements according to which the step-ladder is made.
A comfortable step-ladder is made with the following dimensions: distance between bowstrings - 48 cm, distance between bowstring and support - maximum 60 cm, seat height - 60 cm, plywood seat dimensions - 30x50 cm.
For a plywood seat, 5 cross rails and 2 base rails are required, which are processed and fastened together. Having retreated 5 cm from the edge, lines for the grooves are marked on both sides.
Then the cross bars are fixed on the base rails. The joints of the elements for the plywood chair are coated with glue.
The support part is made of 5 rails. The slats are connected with dowels. Holes are made at the ends of the rails, the same holes are needed in the racks.
The joints are glued. This design represents the back of the chair.
Now 44 cm wide plywood bowstrings and steps are being made.
In the photo is a drawing of a stepladder chair.
Then the bowstring and support legs are attached to the seat. The slats connecting the ladder and the uprights are fixed on the bowstrings between the seat and the top step, and at the other end they are attached in the middle of the uprights.
The finished step-ladder is varnished. A stepladder chair made of plywood is shown in the photo below.
Wooden chairs are perfect for home and summer cottages, performing a practical and aesthetic function.

If you often go to nature or are fond of fishing, take care of your comfort and convenience. In such conditions, you simply cannot do without a folding chair, it is compact and easy to use. By the way, this item will perfectly fit into the city small apartment freeing up space. Such a chair can be made with your own hands, even without carpentry skills. The main thing is to develop a drawing that is correct in size and strictly follow it. The assembly will not take long.
Making a folding model with a back
First you need to take measurements. Most often they are standard, so you can use ready-made drawings to create folding chairs.
Materials should be used natural, they are strong and durable. Choose these types of wood: beech, birch, oak. Do not use pine, as it is soft and does not repel water well. The wood must be free of knots and cracks. You can prepare the material for work with your own hands. The shavings are removed from the bars, then the surface is rubbed - first with coarse-grained sandpaper, and then with fine-grained sandpaper.
Many people use compacted plywood or chipboard to make chairs with their own hands. This will do economical option furniture.
Preparation process
Required tools:
- set of files;
- clamps;
- roulette;
- building corner;
- screwdriver or a set of screwdrivers;
- Sander;
- chisel;
- pencil.
Materials for making chairs:
- bars of wood with a square section with a side from 30 to 40 mm;
- boards with a thickness of 20 mm or plywood up to 10 mm;
- dowels;
- screws 5x70 mm with nuts and washers;
- steel rod with a diameter of 10 and a length of 360 mm;
- screws and self-tapping screws;
- PVA glue.
After preparing the materials and tools, the next stage begins - cutting out parts for the chair from wood. They all have to be included in the drawing.
You need to cut out the following details:
- 4 legs from a bar 30x30: 2 900 mm long and 2 - 500 mm each;
- cross braces for legs from boards 400x50x20 and 340x50x20 mm;
- backrest base - 400x70x15 mm;
- 2 crossbars 280x50x20 mm each;
- 2 supports under the seat from a bar 30x30, length 290 mm;
- 6 rails for a set of seats - 340x40x15 mm each.
Chair assembly instructions
Step 1. Assembling the seat. It is better to start assembling a folding chair from the seat. This can be seen even if you look at the drawings. First, you need to make holes in the supports for the passage of the steel bar, approximately 40-45 mm from the edge. Holes are also made on the opposite side for screws that will connect the seat to the legs. Here you need to step back 70-75 mm from the edge.
After that, the seat slats are attached to the support with self-tapping screws. The mechanism is as follows: first, the rail is screwed on with our own hands at a distance of 340 mm from the support bars, then it is aligned along their outer edge. The second rail is screwed from the first at a distance of 30 mm from each edge. The boards that remain are attached between these slats using self-tapping screws. It is advisable to leave gaps of 1 cm. Now you can thread the steel bar through the hole - the seat is ready.
Step 2. Making long legs. An indent of 110-115 mm is made from the upper edge and a hole is drilled for the dowels. Thus, the transverse ligament, the size of which is 340 mm, will be fixed. This renders the drawing very well. After that, the grooves for the back are sawn. Attention: the grooves must be of the same depth so that the folding chair does not mow to one side. A steel bar is threaded through them, which will allow the seat to move in a folding structure. To do this, you need to retreat from the holes for the pins 40 mm. Use the saw very carefully to avoid damaging the material. Be sure to clean the ends of the gaps with a chisel to ensure good friction.
Wooden long legs are drilled at the bottom. Holes for screws are needed here, which will secure the second cross-link. This should be done like this: attach the crossbar to the legs and drill through 2 times on both sides. Before twisting these parts, it is recommended to glue them so that they do not loosen during use. PVA glue is fine. It is necessary to coat both parts that will touch.

Now you can start making the frame of the long legs. The ends of a steel bar attached to the seat are inserted into the gaps and fixed with bundles. The backrest is screwed onto the upper part of the legs with screws. Rigid joints are glued with glue. The drawing should provide for these connections with a note for gluing.
Step 3. Assembling the short legs. The folding chair also includes short wooden legs. The middle of the leg is marked on the part. Next, you need to make holes for the screws according to the marking, which will connect the pairs of legs of the structure. Just a few millimeters later, you need to make a few more holes for attaching the short legs to the seat.
Crossbars 280 mm are fixed on the dowels. The first is closer to the bottom, the second is closer to the mount with long legs.
Step 4. Assembling the folding chair. The final stage of assembling furniture with your own hands is the connection of the main parts. The seat is screwed to the legs and back. This will allow the structure to move as the pivot joint is formed.
Step 5. Stool protection. The wood folding chair is very reliable. Moreover, it is made by hand. But still, it's better to cover it with a special protective varnish or paint.
Chair model without back
A simpler option is a folding chair without a back. It is easy to do it yourself, the work will take a couple of hours. Before starting work, you need to draw a drawing. It will be easier to navigate on it when cutting parts and during assembly.
Required materials and tools:
- 4 legs from a bar 470x40x20 mm;
- 4 slats for the seat 320x40x20 mm;
- 4 seat bars: 2 pcs. - 350x90x20, 2 pcs. - 350x60x20 mm;
- 2 pins - 320x40x20 mm;
- hacksaw;
- drill.
When starting to make a folding chair without a backrest, install the axle bolts on the legs of the product. When creating furniture with your own hands, the axis must be shifted so that it is 2 cm lower than the wide beams of the seat, otherwise the structure will become unstable.
The wooden seat bars are bolted together in the following sequence: first to the inner legs, and then to the outer legs. These are the hinge parts that need to be held together. The seat strips are connected with fastening to the free ends of the tree. Legs are attached with self-tapping screws to the lower part of the legs at a height of 10 cm from the floor. An important point when creating folding furniture with your own hands: medium-sized bars should not be in contact with each other, otherwise wooden chair will not fold. One of the bars is attached to the outer crossbar, and the second to the inner one. To adjust the height of the seat in folding structures, one 20x20 mm bar can be inserted between the middle blocks.
In contact with
classmates
« Have
trom money - chairs in the evening! The phrase of the fitter Mechnikov from "12 Chairs" illustrates the process of acquiring a chair by the heroes of the novel. Yes, the chair can be bought, but also the question how to make a chair do it yourself - not a question for a real man!
There are many types of chairs: high and low, sophisticated and simple. For bars, summer cottages, offices and restaurants, all styles, models and materials. All varieties and countless! Let's expand this variety even further, and make our own chair, choosing as a basis a simple model, with a straight back and a padded seat.
Where do we start? From the project! It is said loudly, but it is imperative to draw a sketch and the components of our future creation.
DIY chair materials
Metal and plastic furniture is suitable for an office, industrial premises, cafes, but, significantly inferior to wood in terms of natural "soulfulness", it is unlikely to be good for a residential building.
We can do without various wood "plastics", OSB, chipboard, plywood. Even high-quality wood processing products cannot be compared with real wood, its unique, warm texture. And, the main material of our chair will be wood. Dry pine without knots, beech or oak will do. The last two breeds are not easy to handle, but the result will be more solid.
We will need: timber 40x60 mm, timber 40x40 mm, edged board measuring 400x480 mm for the seat and 100x420 for the back. Board thickness 10-15 mm. Further, a sheet of thick foam rubber to fit the seat, dense fabric for upholstery. And consumables: screws, glue, sandpaper.
You can buy a planed bar ready-made, or you can process a regular one yourself by cutting it with a plane and polishing it with sandpaper. For rough sanding, paper # 100-120 is suitable, and the final shine will give numbers from 220 and above.
The tool you need to make a chair with your own hands
Before starting work, you need to provide yourself necessary tool. You will need:
Plane;
saw with a fine tooth;
chisels;
sandpaper with various grain sizes;
construction stapler with staples.
As an additional device, you can help make a chair with your own hands:
Screw clamps - conductors.
Making a chair with your own hands, how to make a chair
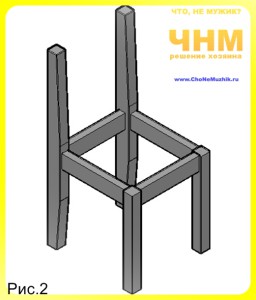
Saw off four beams. Two with a length of 800 mm, with a section of 40x60 - blanks for the rear legs and two of 440 mm each, with a section of 40x40 - blanks for the front legs. See fig. 1. First, we cut grooves in them for longitudinal, transverse bases and projections. The grooves of the bases and the grooves of the trays must be in the same level. To do this, we put the bars together so that their ends of the bottom of the legs exactly coincide. After that, mark the grooves with a pencil. Dimensions of grooves: 20x40 mm, depth 15-20 mm. The inner edge of the grooves should be 10 mm away from the inner edge of the leg.
It should be noted that the grooves for the bases must be made two for each leg. Make grooves on the adjacent (not opposite!) Edges of the legs. As a result of assembly, the bases form a rectangle, the vertices of which are the legs. (Fig. 2) We gouge out the grooves with a chisel, carefully clean the inside from sawdust and shavings.
Let's improve the hind legs. To do this, from the upper groove to the top and from the lower groove to the bottom of the leg, cut or shave off the edge, making a smooth transition from 60 to 40 mm.
The chair legs are ready, we proceed to the manufacture of two projections and two longitudinal bases: we saw off 4 bars 350 mm long, 40x40 mm in cross section and from each end we mark the dimensions of the future spikes 10 - 12 mm with a pencil. Using a chisel and a hacksaw, we cut out the thorns.
The spikes must be made very carefully, they must exactly match the grooves, fit into them tightly, without the slightest backlash.
Now we will make the back. An edged board works best for this part of the chair. The back will be 420 mm long and 80-100 mm wide. In the inner edges of the rear legs, we gouge grooves of the corresponding width along the height and put the back in them.
 We fasten the seat with self-tapping screws from the bottom side. For the convenience of fastening and additional rigidity between the bases, it is advisable to add small braces (see photo).
The legs of the chair from the outer edge and the back on both sides will be rounded and sanded.
The finished parts of the chair are varnished and carefully polished.
As experience shows, in order to make a chair with your own hands, and not to poison the life of your loved ones and neighbors, it should be borne in mind that many varnishes have a sharp bad smell... Therefore, even if you temporarily transformed one of the rooms into a workshop, it is still better to paint outside the apartment.
It's also a good idea to use odorless, water-based furniture varnishes for home use. You can learn more about their types and characteristics from the managers of the hardware store.
 While the varnish dries, let's take care of the seat. We cut out the foam rubber according to its size or a little (no more than 5 mm from the edge), less. We cover the foam rubber with a cloth, carefully securing it from below with a stapler.
We assemble a chair from the dried and polished parts, carefully smearing the thorns with glue and knocking them down with a wooden mallet. You can also use a metal hammer, having previously wrapped the striking part soft cloth... The main thing is not to damage the varnish. We fasten the back and seat with screws. While the glue dries, we admire the creation of our hands. (Fig. 3).
We examined how to make a chair with our own hands, with only one solution to the issue. By showing ingenuity and imagination, you can create the most diverse and unique chairs for your home. Chairs for the living room, kitchen, veranda, garden, high chair, etc. You can also find out from other materials on the site. Buy chairs from the manufacturer, stools and other furniture, because it is cheaper from the manufacturer!
And if your son or grandson is growing up, make a chair with him. Believe me, for him and for you it will be a great pleasure and a useful lesson! Ask questions either.
The main fishing activity is waiting for a bite. And it is much more convenient and pleasant to do this while sitting on a fishing chair assembled with your own hands. There are more than enough drawings of them on the corresponding resources, and the variety of types allows you to choose the most suitable option that suits your own preferences.
Features of fishing chairs
You can assemble various models with your own hands and using various materials... But their main characteristics remain unchanged. Among the qualities that chairs must have are the following:
- Sustainability... The chair should be stable regardless of the topography of the coastal strip.
- Strength... The structure must be able to support the weight of the fisherman and not break after the first use.
- Small size and weight. Stowing a bulky and heavy chair, even in a private car, can be problematic. And in those cases when it is necessary to walk a certain distance, any person seeks to lighten his burden. And a heavy or large chair in such a situation is unacceptable.
Since it is planned to assemble a fishing chair with your own hands, its design should be simple. Therefore, it is better to give preference to simple schemes, which everyone will be able to collect.
Design options
Before deciding how to make a do-it-yourself fishing chair, you need to decide what kind it should be.
The most simple option is a stool. These are the lightest and most compact models that are easy to carry. And the technology for their manufacture is simpler than that of other options.
A fishing chair with a back will be more comfortable. It is a little more difficult to assemble it with your own hands than the previous version. However, it will allow you to relax your back during prolonged sitting, which is also important for any fisherman.
The most convenient option is a chair, which has both a back and armrests. Sitting on it, the fisherman will not experience muscle tension... True, such models are heavy. But if you go to the place of fishing by private car, then this is not a problem. One of the modifications of this model can be considered a folding chair. You can even lie down on it.
Experienced fishermen often prefer the box chair. You can sit on top of it. And inside, it has a storage space where you can hide gadgets, tools or catch. This option resembles a home locker. Only on top does it have a seat. In order not to get up every time you need to look at the contents of the drawer, the drawer can be organized in the form of a pull-out drawer.
Materials used
You can assemble a fishing chair with your own hands using various materials. The use of improvised raw materials will significantly reduce the cost of all the work.
Wooden chairs can often be found. Wooden bars different sizes are used both for the manufacture of the frame and for the preparation of the seat, backrest and other elements.

They are widely used as supports metal pipes... They can be combined with wooden or fabric seats. Pieces of tarpaulin, leather and other durable fabrics are used to cut out the seat. There are also plastic elements. It is a durable yet lightweight material ideal for making fishing chairs.
With their own hands, the structures are assembled using fasteners. The base is assembled, as a rule, using self-tapping screws, bolts, screws, staples.
Stool on four plastic legs
Self-assembled folding chairs for fishing, in the shape of a stool, are very convenient to use. The base in them is made of plastic pipes. A piece of dense, durable fabric is taken as a seat.
The first step is to prepare the blanks. From plastic pipe cut off 8 parts. The pieces that will serve as a support should be about 50-60 cm long in length. 4 pieces of such blanks will be required. Another 4 pieces will be required 35-40 cm long. Two of them will go to the lower jumpers between the legs. They will allow you to get a more reliable and stable design. And two will be organizing the seat.
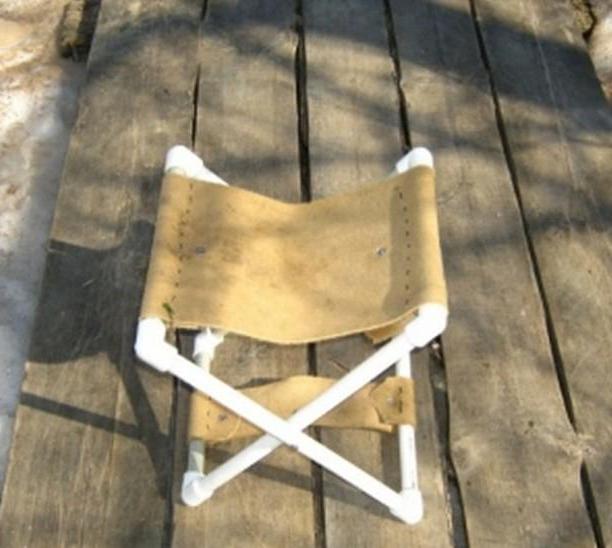
Long pieces are connected in pairs. Each pair is secured with a bolt twisted in the middle. There should be two cross-shaped parts. They are connected to each other along the edges with short elements. You should get a sliding structure. Ease of folding (unfolding) is regulated by the tension of the bolts.
The upper short bridges are connected by a piece of fabric (eg tarpaulin). You should get a seat. A narrower ribbon of fabric is pulled between the lower pair of jumpers. It will be a limiter that will not allow the chair to fold.
Folding chair with metal supports
You can also make do-it-yourself folding fishing chairs with metal legs. Their design is similar to the previous version. The only difference is in the use of aluminum (or steel) pipes. It is worth noting that this option will have more weight than one made of a plastic pipe. But at the same time, its reliability will be higher.
The manufacturing process itself is similar. Blanks can be taken in the same sizes. The only difference is in the way the individual elements are attached to each other. Metal will be a little harder to work with. With tools, most joints can be welded. Only at the intersection of the legs must there be bolts. Otherwise, the chair will not fold.
Wooden chair on four legs
This is another option that will help you assemble a folding fishing chair with your own hands. Drawings prepared in advance will allow you to determine the dimensions of the structure and the required amount of materials.

4 blanks are prepared from wooden blocks, which will be supports. The two parts are connected to each other by a bolt twisted in the middle of the legs. You should get two blanks that are somewhat reminiscent of scissors. The workpieces are connected to each other with wooden planks. They will serve as a seat. They can be replaced with fabric.
Jumpers are made from below in the form of wooden beams. They will not let the chair crawl.
Wooden four-legged stool with backrest
Similar to the previous option, you can do it yourself with a folding fishing chair with a back. To do this, you will need to slightly change the design. And the following materials will be required for this:
- (2 pcs.) 91 cm long.
- Wooden supports (2 pcs.) 55 cm long.
- Wooden seat supports 31.5 cm long.
- Six boards of different sizes for the seat (40x7, 39x4, 36.5x4, 36.5x4, 31x4, 30x4).
- Wooden back (40x0.7 cm).
- Crossbars for connecting the bars (1 piece with a size of 39x5 cm and 2 pieces with a size of 32x3 cm).
Work begins with the preparation of supports. Holes for bolts are made along the outer part of them. On the inside, along the rail, grooves are made with a length and depth of 1.1 cm. The supports are connected with crossbars. The joints are coated with glue.
To make it more comfortable to sit on the chair, a bevel is made over the bundle of long supports. The seat boards are connected to the bars with dowels and screws.

Three-legged chair
There are options for chairs that have only 3 legs as a support. There are also drawings for similar models. Folding chair for fishing with your own hands assembled, and even with minimal cost, will be liked by many. And it's easy to make. You will need the following materials:
- 3 legs about 60 cm long (they are made of wooden bars with a round cross-section).
- A piece of fabric in the shape of a triangle (for example, thick leather).
- Mounting bolt with loop.
- Long mounting bolt.
- Washers (3 pcs. Fixing and 3 pcs. Finishing).
- Nuts (2 pcs.).
A hole is drilled in the middle of the cut bars. The same holes are made on the upper cuts of the bars. You will need these to attach the fabric to the seat. Holes are pierced under them in the corners of the fabric.
The two legs are connected with a long bolt. A bolt with a loop must be put on the bolt between the legs. With its help, the third leg will be fixed.

The fabric is screwed to the upper cuts of the legs using decorative washers. Next, a fabric strip is attached, for which it will be convenient to carry a chair.
This version of the chair is very lightweight, compact. Unfolded (assembled) without any effort. And the strap will make it easy to carry. Materials for making it are available. The only drawback is convenience. Three legs do not provide the desired stability. And the small seat does not allow you to completely relax. And the service life is in question. The fabric begins to tear quickly enough in the corners.
Conclusion
As you can see, it's easy to make a fishing chair with your own hands. Having chosen the model you like, you can start preparing the drawing. A calculation is made on it necessary materials and the sizes of the required parts. And then all the elements are connected together.
The choice of model and materials depends on several basic parameters. The main ones are ease of manufacture, convenience and comfort during operation, size and weight. Their combination depends on If you go fishing by car, then you can choose comfort and neglect the low weight. If you give preference to walking, then it is better to choose lighter and more compact models.
- Designer chair
- The usual option
- Product with bent legs
There are a lot of instructions on the Internet on how to make a folding chair with your own hands. Quite often, you come across interesting designs, but for amateur craftsmen inexperienced in carpentry, their manufacture can present certain difficulties. Italian designer Leo Salom has created a folding chair that even a child can make. His creation can be seen in Figure 1.
Despite its simple design, the folding chair is very stable and durable.
Designer chair
True, the Italian used plywood from veneer, exotic for northern latitudes, for the manufacture, but it will be perfectly replaced by 20 mm birch, coniferous or combined material of domestic production. When making this chair with your own hands, the drawings, which are shown in Figure No. 2, will be of great help. The list of tools required to create it is minimal. You will need:
- jigsaw;
- drill;
- tape measure, ruler, pencil.
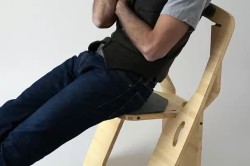
Figure 1. A folding chair from Italian designer Leo Salom can be made by yourself if you use the drawings.
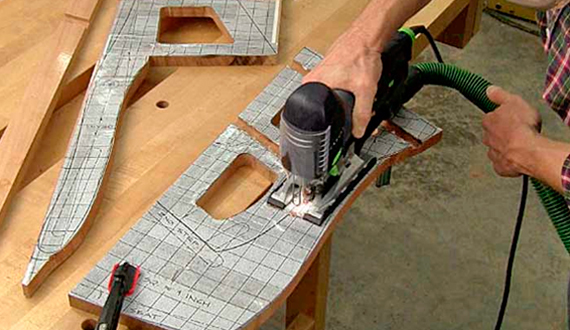
The most difficult thing in the process is the exact marking of all the details of the chair, so it should be approached with all seriousness. You can make paper templates and transfer the outlines to plywood using them. There is another option - to apply a grid of square cells on the veneer with a pencil and draw the configuration of the blanks along them. After this operation, all parts are cut out with a jigsaw.
The folding chair is equipped with two pairs of articulated joints. In their capacity, you can use the corresponding size butterfly loops, but the best solution there will be hinges that will be cut into the thickness of the plywood. They are somewhat more difficult to make, but the design with them will look more aesthetically pleasing. M10 threaded rods are best suited for hinges.
In the places of their installation in the part No. 2 marked in the drawing, 8 mm holes must be drilled. Threads are cut into them for studs. On the rods, threads are removed on one side. At the opposite end, a slot is made for a screwdriver. Studs are screwed into plywood, and all structural elements are assembled together on some plane. In parts No. 1 and No. 3 of the folding chair, the holes for the hinges are marked. After that, shallow holes are drilled into them, into which the studs are screwed.
The chair unfolds at the desired angle, and on part No. 3, holes with a diameter of 30 mm are marked and drilled for the canine-retainers. All surfaces are sanded, treated with linseed oil, stained, varnished or painted. If desired, a pad of soft material can be attached to the seat.
Back to the table of contents
The usual option

Figure 2. Drawing for the manufacture of a designer chair
After creating a work of design art, you will be able to make and regular chair that can be installed in the house. Despite its simplicity, this design is characterized by increased strength, although no tenon and groove joints were used in its manufacture. Its drawings are shown in Figure 3.
To make a chair go:
- bars 50 by 25 mm;
- self-tapping screws;
- plywood or similar back and seat plates;
- glue.
If you want to upholster a chair, then stock up on foam rubber and upholstery.
Sawed out of planed bars:
- 2 rear legs (A) 1150 mm each;
- 2 front legs (B) 550 mm each;
- 2 crossbars (B) 650 mm each;
- 2 crossbars (D) 500 mm each;
- the blank of the crossbar for the back (D) is cut to a length of 400 mm.
Before installing the screws, holes are made in the bars that correspond to the section of the fastener. In addition, countersinking is performed under the caps of the self-tapping screws. In the places of contact of the bars with each other, glue is applied. It will provide greater strength to the joints. The assembled surfaces are tightly pressed and tightened with fasteners. First of all, the side parts (A, B, C) are glued and pulled together. After that, the transverse elements (D and D) are mounted.
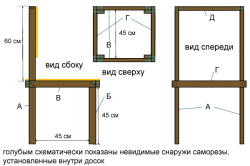
Figure 3. Schematic drawing of the manufacture and assembly of a conventional chair
For the backrest, a square of 450 x 450 mm is cut out of plywood. The seat is prepared from a 700 x 500 mm rectangle. From the side of the rear legs, grooves are cut into the seat corresponding to their cross section. Both the back and the seat are screwed to the chair with self-tapping screws. Before this, glue is applied to the contact surfaces. You need 9 self-tapping screws to fix the backrest, and 12 for the seat.
You can upholster the chair with some material if you wish. The upholstery on the back of the backrest can be masked with an overlay made of thin plywood or fiberboard. Well, if you have a milling machine, then all the edges of the chair can be given a more presentable rounded look.
It is best to treat the wood of the structure with antiseptics and moisture-resistant impregnations, and then cover it with varnish or enamel.