Create a flower pot with your own hands – great idea for the weekend. The creative process will not take much time and effort. The raw materials are easy to find: in the hardware or hardware store closest to your home, or perhaps even in your own pantry or in a neighbor’s garage.
It all depends on what kind of art object you expect to see in the interior of your apartment: a brutal stone pot for or an openwork wicker pot for delicate violets. Choose the option that suits you.
DIY clay pot
Clay is the first material that comes to mind when it comes to flower pots. This is the same classic that does not require any special introduction. So let's get straight to the point.
Required materials

Step by step instructions
Before you start, make sure you have all the necessary tools on hand. To create without distraction, place a rolling pin, a craft knife, brushes and a container of water on your workbench.
- The clay needs to be kneaded well. The modeling mass should become homogeneous and pliable.
- The main thing is a flat bottom. Roll out the clay into a layer. The thickness of the layer is equal to the desired thickness of the future pot. Cut the bottom into the shape of a plastic container.
- You need to cut a strip out of the remaining clay. Strip sizes are individual. The width of the strip is the height of the walls of the flower pot. And the length should be slightly greater than the circumference of the base.
- We connect the parts to form a pot.
- Now we need a little water to wet our fingers and smooth out the joints of the parts - “solder” the seams.
- Most important stage– drying. Follow the clay manufacturer's recommendations. On average, products need to dry for 24-48 hours.
- When the clay is completely dry and hardened, we begin painting. You can apply 1 or 2 layers of paint, depending on the intensity of the color you want to see in the finished product. At this stage, it is important to include all your imagination in your work.
- After the paint has dried, coat the pot with a finishing layer of varnish.
- Place a plastic container inside: it will protect the pots from moisture.
- We enjoy the result.
Plaster pot

Making pots from plaster is an art. The technology for making the base is simple. And options for decoration finished product many times more than in the case of clay.
Required materials
- Gypsum.
- Water.
- Two plastic containers of the same shape, but different volumes.
- Cling film.
Step by step instructions
- Prepare a gypsum solution in a 2:1 ratio. Mix it thoroughly.
- Container larger size cover the inside cling film, wrap the small container with film on the outside.
- Pour about 2 cm of solution into the bottom of a large container. Give it a chance to set.
- Place a container of smaller diameter inside.
- Pour the remaining gypsum mortar into the void between the walls of the containers.
- Leave for 2 hours until the plaster hardens completely.
- Carefully remove the plastic molds.
- Let's start with the decor.
A plaster pot, like a clay pot, can be painted acrylic paints. Decorate using decoupage technique, cover with shells, cereals, beads, buttons or mosaics. Or even carve patterns directly onto the surface.
Cement pot
It's hard to imagine something more solid than concrete. Therefore monolithic flower pots made of cement will organically fit into a serious interior with a claim to steadfastness.
Flower pots can be created from cement in at least two ways. The first one will exactly repeat the instructions for making a plaster pot described above. Only the ingredients will change. The second method is worthy of a more detailed description.
Required materials
- Cement.
- Sand.
- Water.
- Terry towel.
- Bucket.
- Cling film.
Step by step instructions

And if you want something more refined, you can make the surface of the flower pot glossy. To do this, you need to mix the cement mortar not with water, but with silicate glue.
Wicker
Eco-style, rustic, country... If you are close simple shapes And natural materials, then the idea of weaving flower pots with your own hands will inspire you to create a real eco-masterpiece.
Required materials

Step by step instructions
- We cut the branches slightly larger than the height of the base pot.
- We tightly tie the twigs together to get a cloth that looks like a mat.
- Cover the base with burlap.
- We attach our “mat” to the burlap using glue.
- We secure the structure with jute cord.
- The pot is already good, you can leave it as is. Or you can continue to create - braid the flowerpots with thinner branches in the shape of a bird’s nest.
Mosaic
Mosaic – best way give a second life to dishes or tiles, which the hand will not raise to throw away.
Required materials

Step by step instructions
- We prepare the basis of the mosaic - fragments. They can be cut using a tile cutter. But it’s easier to wrap the old dishes in a piece of cloth and give them a few blows with a hammer.
- We lay out the fragments, creating a test drawing.
- If we are satisfied with the result, we glue the mosaic to the base.
- Let the glue dry, following the manufacturer's recommendations.
- The final touch is grouting the joints.
This method is perhaps the simplest and most inexpensive. Even despite the low cost, a mosaic pot in the interior will look expensive, like a famous designer item.
Made of wood

Wooden flower pots are not so often found in apartment interiors. Perhaps because wood requires more careful care than plastic, for example. However, to be afraid wooden products not worth it. It is enough to treat them with special solutions against moisture and mold.
Required materials
- Small blocks of wood.
- Varnish for wood.
- Bio- and moisture protection for wooden products.
Step by step instructions
The manufacturing process is so simple that it can be done in three steps:
- We drill out and then hollow out the core of the block, leaving the bottom untouched.
- We impregnate the inside with protective solutions.
- We varnish the outside.
Other unusual options
If a person who feels like a real creator, artist, designer gets down to business, then he can create an exclusive thing with his own hands from any available items.
Vinyl records, shoes, hats and bags forgotten on the mezzanine, cans of tea or baby formula, old teapots, cups, plastic bottles, glass jars, unnecessary candlesticks or shades from chandeliers, cubes from a children's room...
The list of things that collect dust on the shelves can be continued endlessly. But any item on this list can be used as a flowerpot using various artistic techniques: painting with paints and dot painting with contours, decoupage, embroidery, weaving from newspaper tubes, knitting, applique, macrame...
Feel free to adopt our ideas, complement them with your own, and create. You will get a flower pot worthy of taking the most honorable place in the interior of the apartment. The main thing is not to be afraid of experiments!
It is known that little things made by hand give a home a special charm; many can tell about the tastes, habits and hobbies of the owner. And one of these individual features of your home can be flower pots made by you yourself.
In addition, each of your green pets has its own character, requirements for planting and care conditions, and a pot made according to an “individual project” can fully satisfy both your aesthetic tastes and the urgent needs of the plant.
Making your own flower pots
Clay pots
Clay is considered a traditional material for making flower pots. And, of course, you can purchase without any problems clay pot in the store.
But it's possible make it yourself, even without a pottery wheel at hand.
To make it you will need:
- clay;
- oven for firing the finished product.
Before starting work, knead the clay thoroughly until smooth.
Separating a small part from the total mass, form a ball and, flattening it, give the shape of a round disk. You have the base of the pot ready.
Form a rope with a diameter of about 0.5 cm and a length of equal to the diameter bottom. Strengthen the rope on the bottom and begin making the next one. This way you will form clay pot the size you need.
Leave the finished work to dry for a couple of days, after which the product must be fired.
 Don't know how to do it correctly? We'll tell you!
Basic conditions proper reproduction hyacinths are described, do not neglect them if you want to grow a healthy and beautiful plant.
Cement pot
This product will not only be original, but also durable.
To work you will need:
- several bricks;
- cement;
- sand;
- two plastic containers, different in volume;
- In addition, you will need a hammer drill and an old basin or pan in which you will mix the solution.
 Prepared Grease clean containers with oil(can be plant-based): smaller in volume - on the outside, larger - on the inside. This way you will protect them from excessive sticking of the solution.
Prepare a mixture of sand, cement and water. Place the finished solution in a larger container, and place a smaller piece inside. How more difference between the volumes of these vessels, the thicker the walls of your pot will be.
Place bricks or other weights inside a small container. The cement mortar must dry within 2 days. After this, cut the plastic containers and free your product from them.
In this way you can make quite large flowerpots. Small pots made in this way will look rather bulky, but, nevertheless, also original.
If desired, such a pot, after drying, can be painted with acrylic paints or decorated in another way.
Plaster pot

The procedure for making a pot from plaster is similar cement technology. Only other ingredients will be needed:
- gypsum;
- water;
- two plastic containers of different sizes.
We take a larger container, lubricate the inside with oil, place a smaller container inside, lubricated with oil on the outside, set the desired level and fill in the plaster, having previously made a solution in a 2:1 ratio.
To have a more complete idea, I recommend watching the video of this process below; in addition, at the end of the video they will show how to decorate such a pot using the decoupage technique.
Wicker pot
 If you are a fan of eco-style, you can try to weave a flower pot from twigs. The process is quite labor-intensive, but the result will undoubtedly please you.
You will need:
- twigs, preferably even;
- a piece of burlap;
- strong twine;
- glue;
- base container in the form of a cylinder.
Cut the twigs so that their length is slightly longer than the height of the base container.
Use twine to tie the twigs together to create a solid “canvas” that you could use to wrap the cylindrical base. Cover the base with a piece of burlap, and place the resulting structure of twigs on top. Secure with twine. If instead of twine you take a bright jute cord, your product will turn out more elegant.
Mosaic pot
 Pots made using the mosaic technique are beautiful and original..
As a “mosaic” you can use small pebbles, shells, fragments of porcelain or dishes, or colored glass.
In this way, you can decorate both small pots and large vases.
To work, in addition to the “mosaic”, you will need:
- tin base (this can be either an empty tin can or a tin bucket);
- plaster;
- mounting mesh;
- grout for tiles.
Cover the tin with plaster, and then wrap it with mounting mesh, “drowning” it into the plaster mixture. Next, lay out the entire surface of the future pot (excluding the bottom) with the prepared “mosaic”. After this, leave your product to dry completely.
Finally, treat the surface with tile grout. to make the pot smooth and eliminate cracks and the gaps between the pieces of the “mosaic”.
Remove any remaining grout from the surface with a soft cloth.
Pot made from a piece of wood
 Original floor flowerpot can come from a small old stump, and from a piece of a fairly thick branch you can make a smaller pot.
To make such a “house for flowers,” remove the core from the tree, clean the inside and sand it.
If desired, you can free the stump from the bark or leave it in its “natural” form. In any case, coat the top of the product with several layers of wood varnish.
After complete drying, the new pot can be used for its intended purpose.
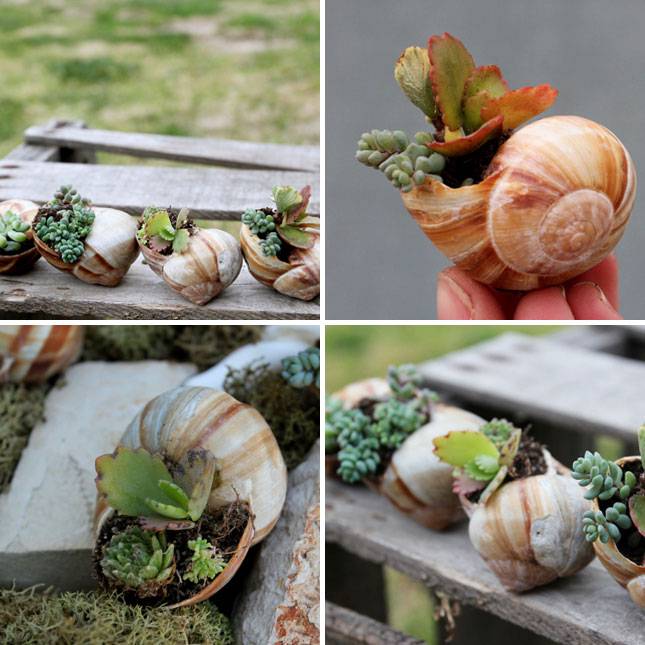
Coconut shell planter
 Coconut shells serve as an excellent container for plants that do not need frequent watering.
Hanging plants will look good in it.
Making such a design is quite simple: cut a coconut in half, extract the flesh, then drill holes in the bottom for drainage, and holes at the edges in order to thread a cord or chain through them.
Place expanded clay on the bottom, and place the substrate on top - the pot is ready!
Felt pot
 Felt products are now at the height of fashion. Why not give your favorite flowers a felt “nest”?
Take pieces of felt, ready-made or felted yourself, cut out the details of the future pot and sew them together! In such an unusual pot, plants will feel very comfortable.
Mini cactus garden
 Unusual containers for planting cacti and other slow-growing types of indoor plants can be made from wine corks.
To do this, the core of natural cork is removed with a knife. The mini-pot is filled with soil.
On one side, using a heat gun, a magnet is attached to it, powerful enough to hold the weight of the “pot” with the plant.
Such mini-containers can be attached to any metal surface, for example, to the refrigerator door, forming entire flower arrangements.
Other ideas for unusual homemade pots
- If you are a fan of high-tech style and you still have unnecessary computer floppy disks, you can build original flower pots from them. By the way, they are perfect for growing violets and other small plants.
- By gluing together 5 square mirrors of the same size or 5 ceramic tiles, you will get an easy-to-make, but stylish and original pot for flowers.
- Pots can be made from old vinyl records. If a vinyl disc is heated, it becomes soft and pliable, easily taking on the most unimaginable shapes.
Using old things
Sometimes The most unexpected objects can serve as flower pots. So, porcelain, earthenware and pottery can turn into an excellent container for planting indoor plants. Cups, deep salad bowls, teapots with flowers planted in them will enliven a country or Provence style interior.
Enameled dishes are also suitable for planting flowers. But this is more of an option for a country house.
By the way, if you couldn’t find a suitable pot for bonsai, an elegant salad bowl is perfect for this. You just need to carefully make drainage holes in the bottom using a drill.
Sometimes the most unexpected things can turn into flower pots. For example, an old cosmetic bag can also serve as a container for planting flowers.
Decorating finished flower pots. How to decorate a pot with your own hands?
To create a flower pot with unusual design, it is not necessary to make it “from scratch”. You can take ordinary standard pots as a basis and decorate it yourself and according to your own taste.
By painting a clay pot with acrylic paints and varnishing it, you will get a real designer item. By the way, you can entrust such work to a child - and the image on the finished product will delight you with its sweet spontaneity.
You can decorate ordinary plastic pots, simply pasting them with bright scraps of fabric. Or you can crochet “clothes” for a standard pot - such containers will add special coziness to your home.
 By covering the whole or part of the pot with braid, twine, lace or simply bright threads, winding them around the container, you will get an original and stylish decoration for your home.
You can decorate an ordinary pot with buttons, shells, coffee beans, cereals or beads.
Even used to decorate pots eggshell . It must first be treated with a soda solution and dried. The prepared shell is glued to the surface of the pot using PVA glue, gently pressing in the process so that it cracks. Next, the surface of the pot is covered with ink, which fills the voids between the pieces of shells. After this, the surface of the pot is wiped with a cloth and varnished.
Regular plastic pot can be decorated using decoupage technique using PVA glue and a paper napkin with a design you like. The design is cut out and glued to the surface of the pot, carefully leveling it so that wrinkles do not form. After drying, the finished picture is coated with varnish.
Other photo ideas for flower pot design


Using the tips above, you can create a truly unique pot at home, as well as decorate and decorate it with your own hands.
For flowers with your own hands. Almost all families grow indoor plants or flowers in the garden. It looks very interesting if standard flower pots are placed in an unusual flowerpot. Of course, there are a lot of bright and original models flower pots, but any person wants to bring individuality and some zest to their home or garden. There are a huge number of options on how to make a flowerpot with your own hands; all that remains is to choose the material that will look most appropriate in yours or home
Advice! It is worth remembering that a flowerpot, unlike a flower pot, does not have special holes in the bottom from which water could pour out after watering. Don’t forget to drain it from the pots so that the plant roots don’t rot. Free space between the pots and flower pot or another container in which flowers grow, usually lined with moss or gravel so that the pot does not “dangle” inside.
DIY flower pots: building material
Surely, after renovation, any housewife is left with some unused materials that can be used to create flowerpots:
- If you have slats, bars or other boards, you can create wooden planter . First you have to cut out equal parts for the walls, and then connect them with nails or glue. The walls and bottom of the pots can be designed in the form of a lattice, or they can be solid. For oblong bowls with flowers will do planter box in the form of a small fence. This design is appropriate in an apartment or.
- Pretty easy to do DIY planters for the garden from leftover logs However, it is better to entrust this matter to a man. A log about 1-2 meters long can be rested on two small logs to form a kind of bench, or simply placed horizontally on the ground. Then the inside of the large log is cut out, leaving only the walls and bottom. You can put small bowls inside petunias or others.
- From the leftovers ceramic tiles you can make a bright flowerpot . To do this, you will need only 5 parts, one of which will become the bottom, and the rest - the walls. The easiest way to connect the parts is with glue. Spectacular interior items are obtained from mirror tiles, they are easy to fit into modern minimalist interior or style.
- When burlap or other dense fabric remains from construction and gardening work, you can make pot pockets for small plants . To do this, you need to cut out two identical square or semicircular parts and sew them on three sides. For a more complex pattern, you will have to select a base in the form of a wire, which will give the shape to the product. These pockets look great on a fence country house or on the balcony.
Pots made from natural materials
What could be easier than using the materials given to us to create vases and pots? nature? In the nearest forest or by the river you can find something that will subsequently significantly transform your interior:
- A beautiful flowerpot will be made from pebbles - small, streamlined stones. They are glued together, giving the future product an unusual shape. Similarly, you can use nut shells, tree cuts, small twigs, cones, etc.
- Can be done do-it-yourself garden pots made from a stump . A core is cut into it, into which a large plant, such as a fern, is placed. If you make several of these stumps at the same time, you will get a whole clearing in the garden.
- Eco-style pots can be woven from wicker. Weaving from wicker is quite difficult for a beginner, but the products are very impressive. You can hang or place such pots both in the house and in the garden.
With your own hands, so that it matches the general design solution dwellings. In addition, the reader will learn how to make a flowerpot from improvised materials without spending money, but, on the contrary, using household items that have served their purpose.
Making a pot from metal utensils
Outdated buckets, watering cans, pots and teapots can become beautiful source material for making flower pots. The main condition for these containers is the presence of holes in their bottom to allow excess moisture to escape. Therefore, you should immediately drill or punch several holes from below in a bucket or pan using a large nail. Then comes the turn design work. You can use ordinary paints and paint the future pot to your liking. Or you can use old CDs, breaking them into pieces about 3 centimeters in size. By gluing them on top of the vessel, you can create amazing design pot. You can use other options, similar topics how to decorate bottles, boxes and other interior items.
Pot of gramophone records
Old record players can also be used to make an original flower pot. Making it with your own hands is quite simple. By the way, you will no longer need to make a hole in it. Since you can make a flower pot from a plate by heating plastic, the craftsman will need a metal lid for preserving vegetables in jars, a nail and a hook with a long handle. A hole should be made in the lid in advance into which the hook can fit. The lid is applied to the plate so that the holes coincide. On the side of the lid, near the hole, a nail is placed along the plane, and a hook is inserted into the hole, which is used to pick up the nail. Now the plate is held by this device in a position parallel to the ground level. You need to heat the plate over an electric stove or gas. It will begin to lose its shape, its edges will hang down in beautiful folds, just as dense, rigid matter sags. After the desired result is achieved, the heating of the plate is stopped. Now all that remains is to cover the flower pot, made with your own hands from a gramophone record, with paints. You can also create irregularities using plaster, putty, plasticine or clay.

Large flower pots
For large plants containers required large size. It is not always possible to buy a large pot in a store: either there is no suitable one on sale, or it is inconvenient to transport. Therefore, the best option is to create such a pot yourself. There are several options for making large flower pots:
1. Using old village large cast irons as a pot, in which our ancestors cooked food in the stove. They can be painted very beautifully, turning them into unique flower containers.
2. Can be used as big pot a composite container of several small ones. This is done like this: cut out the bottoms of two identical flowerpots, connect them in the places where the cutouts are made, glue (or install) a large flat plate at the bottom - here you have a large, tall pot, extremely convenient for a palm tree, lemon or other large plant.